
Ginger and Lime Tea Shoot
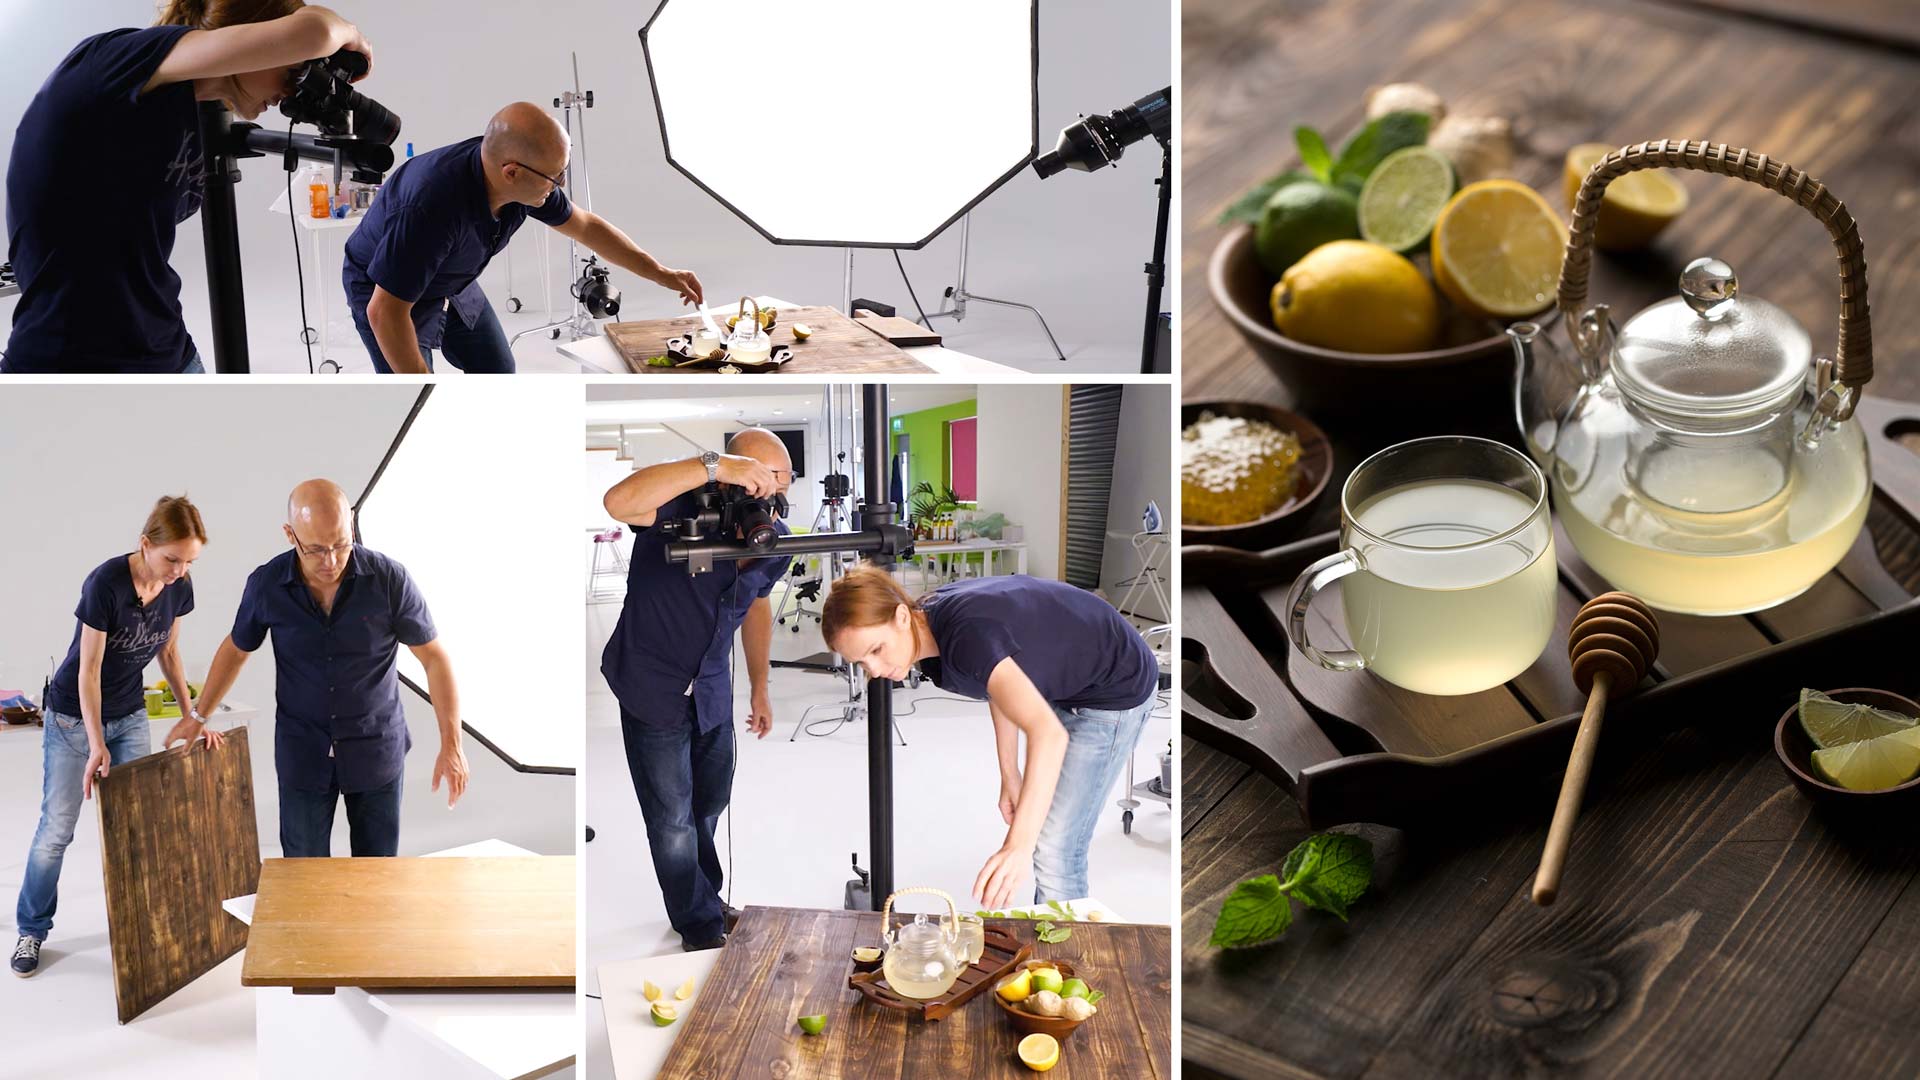
In this food photography class, Karl and food photographer Anna Pustynnikova demonstrate how to creatively use one studio light to create a beautiful image of ginger and lime tea.
This class provides a simple one-light setup that you can quickly and easily try yourself, while also demonstrating how to incorporate alternative lighting solutions (such as reflectors and specialist lights) that can be used to enhance the shot.
In this class:
- How to photograph food
- How to light and style food for photography
- Best modifiers for food photography
- Finding props and backgrounds for food photography
- How to use reflectors as an alternative light source
- Explain and demonstrate how to photograph glass objects
To begin, Anna and I first had to determine the composition of our shot. This included selecting and background and choosing what items we would include as props. After your product, the background is the second most important element of your shot. We experimented with different backgrounds, testing color, texture and depth of each option.
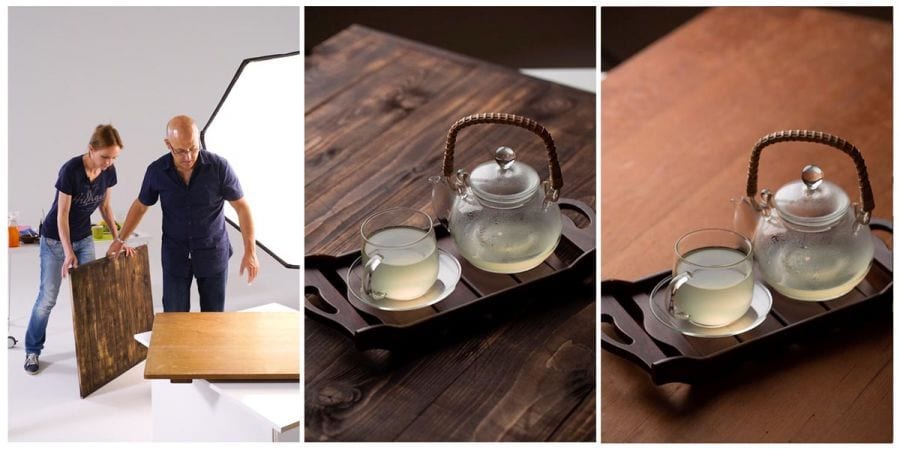
Testing different backgrounds for our ginger and lime tea shoot.
Once we’d made our final decision we started working on the styling of the shot. Again, we experimented with the placement of the props, such as the bowls, teacup and saucer, as well as the ingredients.
Here you can view our tests and choices for the bowls we used as props:
Experimenting with different sizes, colors and textures for props.
And here you can see Anna’s styling in progress:
Step by step styling in the early stages of the shoot.
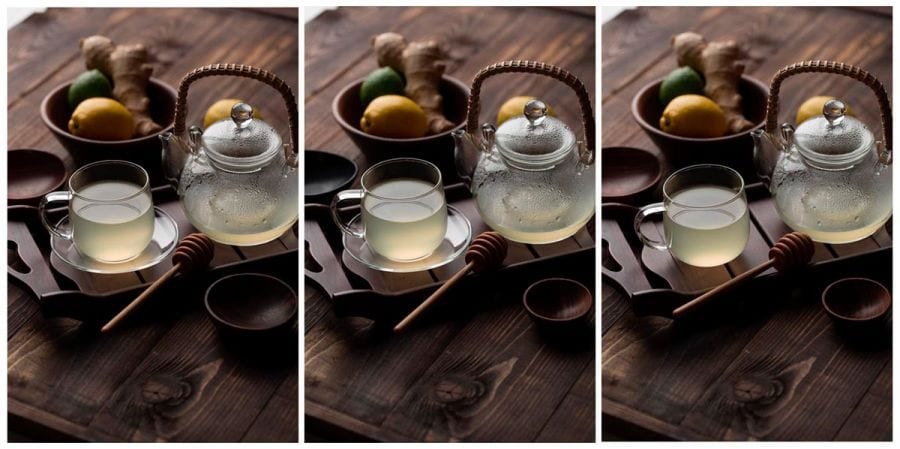
Once Anna was largely satisfied with the styling, it was time to focus on the lighting. Shooting with a single softbox placed behind the setup, the initial results were very pleasing.
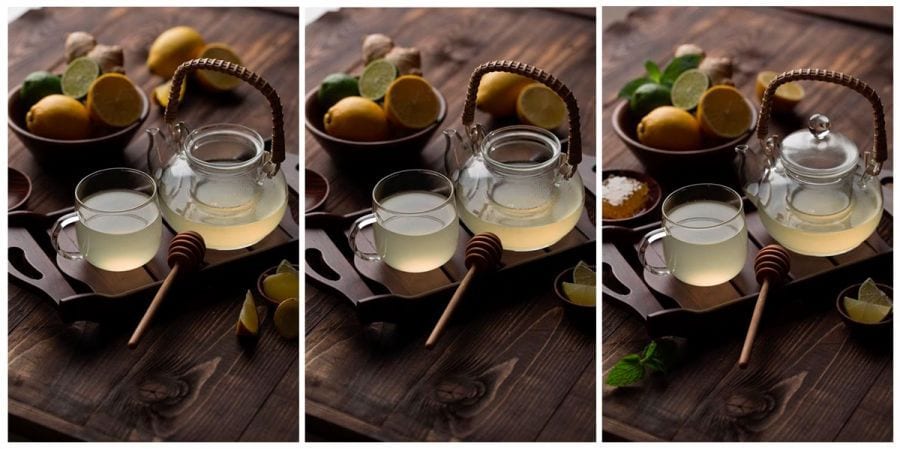
To take it one step further, I added additional lights and reflectors to add pockets of light and create interest on certain elements of the shot, such as the mint and lemon slices in the foreground, the spout of the teapot and face of the cut lemon in the background.
In the image below you can see the effect of the additional picolite on the mint leaf.
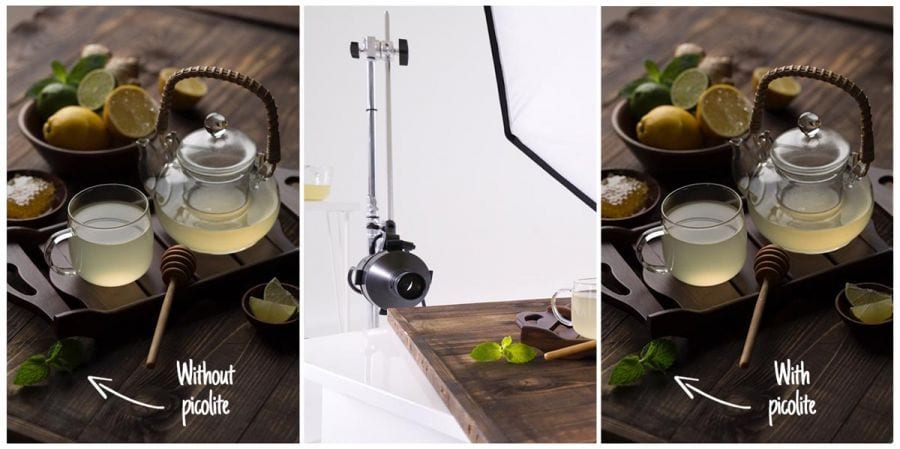
The effect of adding a picolite to highlight the mint leaves.
We also used a reflector to separate the teapot from the bowl behind it.
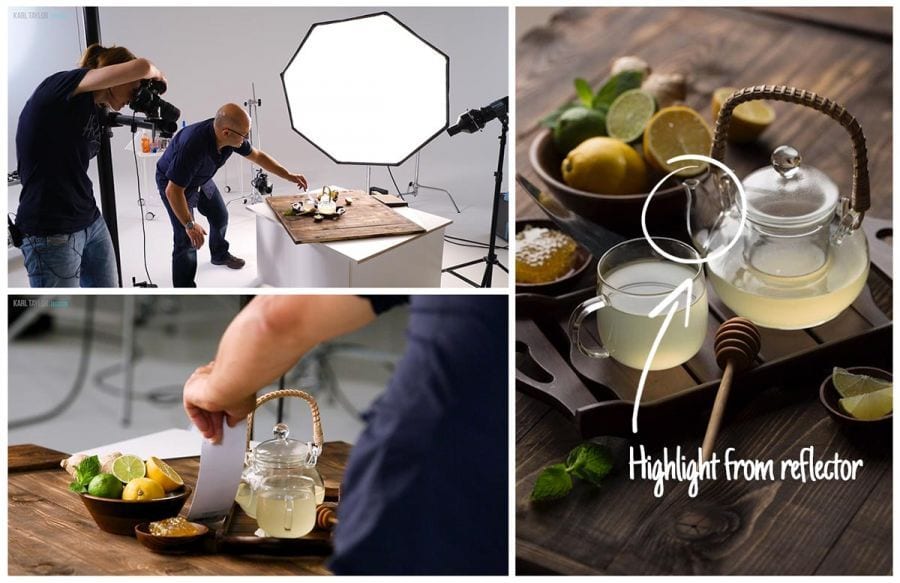
Using reflectors to highlight the spout of the teapot.
The final shot was achieved using three lights (two of which were picolites), but it’s important to remember that a great result was achieved using only the softbox. If you don’t have specialist lights such as picolites, reflectors are a powerful tool that you can use too.
The final image:
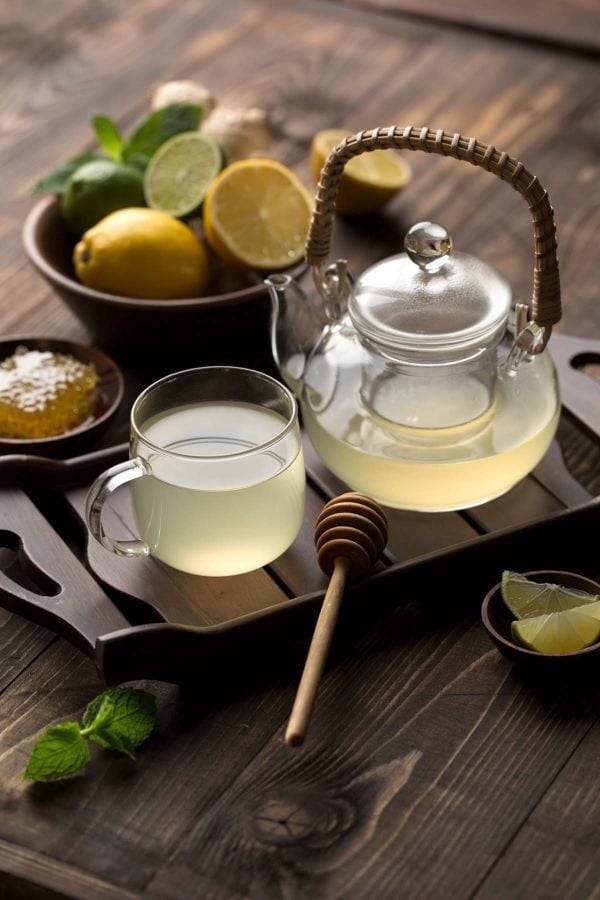
The final image of our ginger and lime tea shoot.
If you’d like to learn more about food photography, browse our selection of food photography courses in our Product section. I’ve also put together a selection of our most popular modules below.
- Key skills for food photography and styling
- Berries on a wooden board
- Live cheese shoot with Anna Pustynnikova
If you have any questions, please post in the comment section below.
Comments
Hi Karl!
I really like the big studio “column” camera stand. Is it a factory piece or a one-on-one design?
I showed the picture to my favorite store-maker who had the challenge to build a similar … 🙂
Thank you for your attention!
Attila
Hi Attila, that stand is a Manfrotto Super Salon.
Thank you very much! I found the link.
Very good tutorial, I would like to talk more about the parameters of the lights, such as power etc.
Thanks!
Hi Rodrigo, I’m afraid I’m going to upset you now because your thinking here is not going to be conducive to productive and creative results in the future. The first thing that you need to be clear on is that even if I gave you the exact power of each light, that without the exact distance or the exact same modifier these mean absolutely nothing. Even if we measured the light falling on the subject with a light meter, the inaccuracies of reflective surfaces or the angle of the light meter would mean that they are all just approximations. You need to stop breath and look at the light and examine it based on what you see or more importantly on what you believe or ‘feel’ it should look like. I can look at any raw picture and I can tell you how it was lit or where the key light is coming from and usually what modifier was used. Please go to the portrait section and watch the first 15 chapters on lighting and you will come away with a different perspective that will literally change the way you think about lighting forever.
Hi Karl. You’ve told us that Anna was using gloves not to left fingerprints on glass but here you both were touching glass without gloves. Is it so critical to use gloves or may be you can touch handles or edges but nothing else?))
If you look the photo full size can you see any fingerprints on glass?
Hi Anna, no we just kept the glass clean, by wiping it with a cloth.
That was outstanding!!
Thank you very much 🙂
Great tutorial series, I must say I have learned a lot about food and styling. Karl, where do you get those great background boards or are they a DIY item(s) like your custom skrims?
Keep up the great work.
G.
Hi Gary, yes I think Anna explained that she gets them made at a local woodwork shop. I also find my table tops from second hand furniture stores.
Wow she is a tough customer 🙂 Enjoyed your back and forth with her. It is much nicer working with someone who is passionate about the shoot and gets involved. At the same time I wouldn’t want to be pushing back a lot with the client (just pretending she is a client). I love how you handled a potential “conflict” w.r.t the background selection.
great tutorial, love the way you present …
love the lighting tips . using only one light
thanks again Frank Garvan
A great video, enjoyed watching the respectful mutual of learning curves of two great photographers working together. But I don’t think we’ll see Mr Taylor cutting up honeycomb any time soon. As I was a chef for twenty years this is definitely a genre that appeals to me and I will be giving it a go this week. You’ve definitely inspired me with this one, thank you.
Nice work! However, if you’re open to some professional criticism, I would have loved to see the use of Capture One over Lightroom. Its much better raw development engine would have given the colors in this particular shot a more healthy warmth. Imho the shot is too cold and clean and lacks a little soul.
Also a little steam from the cup would add a nice touch 🙂
Another great tutorial!
You should pay attention to small details, there’s the difference
It’s like a puzzle, the richness of detail gives the photo a touch.
Well done!
Another great tutorial! I’m absolutely loving these food videos.
In the food photography videos, the modelling lights of your lighting always seem to be on. Is this purely for the filming so that we can see the process or are you using the constant modelling light to see where highlights etc will be formed like on the honey spoon?
Hi James, yes we left them on to assist filming, It’s always worth taking a test shot without the flash trigger to see if the modelling lights are having an influencing factor on the picture and if they are of course turn them off or turn them to low power.
Love seeing how you worked with the lights and mirrors! Will you be going over how you composed these two images in PS and what other edit you did?
Hi Christina, yes I will in the coming months but the same basic editing tips are covered in our ‘post production’ section.
Absolutely brilliant…loved the whole process for a simple Ginger Lime tea…to make it really classy..excellent support from Karl..the highlights on the pot and the tea cup is mind blowing…i will try this on my shoots now…thanks Karl & Anna
Thanks Lal.
Very nice. Styling is everything. In my experience that’s a universal truth for good product photography.
Totally agree, many of the lighting setups were very simple even with my ‘tweaks’ on the berries shoot.