


Architecture Photography
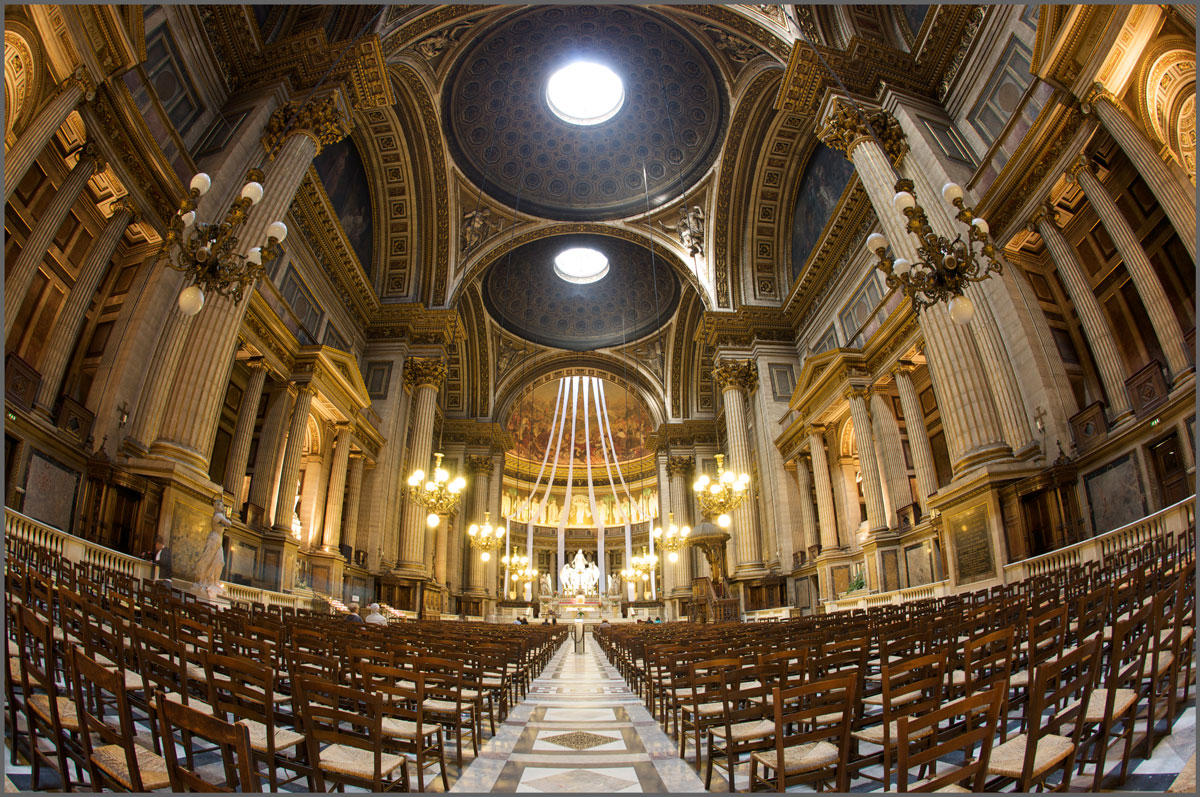
When traveling you often have fantastic opportunities to visit and photograph interesting or historical buildings. In this photography class Karl heads indoors to photograph the spectacular architecture of the L’église de la Madeleine in Paris, one of the city’s most famous historical monuments.
Working in such low light conditions can be difficult, but Karl explains how to photograph in low light, general camera settings and also what equipment can be useful.
These photography tips don’t only apply to indoor photography, they can be applied to any low light conditions.
In this travel photography class we cover the following:
- Architecture photography: How to photograph in low light
- Long exposure photography tips
- Useful equipment for photographing in low light
- Camera settings for photographing in low light
- How to use a fish eye lens for indoor photography
If you have any questions about this photography class please post in the comment box below.
NOTE: This photography class is available with subtitles.
Comments
I was surprised to see you using fisheye lens for architecture. I thought rectilinear lenses would have been better. I think the videos regarding architecture photography and street photography don’t go enough into the details of these two photography genres that are complex enough to have dedicated course categories (like product or fashion).
Hi Carlos, yes those particular classes are very much in our beginner sections and are there to outline those genres, our main strength as it has always been is in studio photography and studio lighting.
What would you set the white balance to for a shot like this with lots of different colour temperatures, ceiling lights, candle etc ?
Hi Matthew, that’s a very good question and it can be a dillemma because this is the exact type of scenario where you have mostly tungsten or other incandescent, candles and some daylight. In those scenarios I’d try to ascertain what the predominant lighting was and in this case it was tungsten around 3600Kelvin, any daylight windows will look quite blue but the advantage shooting in RAW is you can change the colour balance later or split the shots into masked areas and change it separately. However it gets more tricky where the light sources blend and hit the same object, in those cases you just have to do your best to balance it. On full commissioned architectural shoots for hotels we’d often shoot at twilight so the predominant light was tungsten or if we had to shoot in the day for ‘views’ etc then we’d gel all the tungsten lights with CTO gels to convert the tungsten lighting to daylight balance. See the live show replay with architectural photographer Sean Conboy if you’re particularly interested in this area. All the best Karl.
What did this lesson, or the last one, teach us?
This lesson is part of the overall course titled ‘Travel and Landscape’ hopefully you’ve watched the course as a whole in the right order. This is also a follow on course from the Introduction to Photography course which teaches you the fundamentals of photography, the Travel and Landscape course follows on from that by putting into practise the techniques of working in Manual in a situation or scenario that is very common to people such as shooting various subject matter when they travel.
Dear Colosuper,
I hope you are doing well. I must say I find your behaviour pretty offensive towards Karl and his community i.e us all. Negative comments like those are unnecessary and I am sure that with some work on yourself you will be able to leave them aside sooner than you know.
I wish you a great and blessed day,
Hi Karl!
May I ask where you set your focus point in the frame?
Sometimes I have this problem of a blurry foreground; your photo seems to be crisp all the way, does it have something to do the aperture as well?
Hi Larry yes it definitely has something to do with aperture as well. If you haven’t fully grasped these concepts then you need to visit our Introduction Course and run through these principles again. When shooting architecture I generally like to be at f11 or f16 which cuts alot of light out so you’d need a tripod as the shutter speed will become longer.
Thank you for the reply Karl!
And I have some questions.
If I use a small aperture, say, f16, the photo should be equally sharp from foreground (the chairs) to background (the stage)?
and may I ask the distance between the camera and the closest chairs?
and lastly, do you just focus on the centre of the frame or you use flexible spot to select certain point in the frame?
thank you very much!!
Hi Larry, due to something called hyperfocal distance you are best to focus almost to the middle of the shot and then the smaller aperture will extend the sharpness forwards and backwards from the focus point. As a general rule of thumb it comes one third towards the camera and two thirds away from the focus point towards infinite.
not totally balanced
Gotta try this Fosho
Beautiful work as usual. I’m curious, did you end up asking for permission to use your tripod or did you just walk in and took the shot? I assume it would be okay to bring your equipment as long it doesn’t interfere with other people.
Hi Ryan, generally we just adhere to whatever the signs say at the door. If we need to do something special then we write in advance for special permission. At this location it was OK.
What was ISO for this shot ?
Looks more like a 1dx mark ii than the 5d mark ii listed under equipment. Clearly I’m about a year and some months late to the party but have only been a member for a few months.
I was in Lincoln Cathedral last Thursday doing my first architectural photography. I wish I’d seen this video before going as I never even thought of using a tripod inside a building and used a 14mm lens at ISO640. The photographs are OK, but I don’t want OK.
Hi Karl, gorgeous shot… can I just ask, were you using a filter on your lens? It seems like 10s is a super long exposure for only 7.1 f-stop. Just curious, thanks!
Hi Robin, no filters at all. It was very dark in there, darker probably than it looked on the video. Another option on many DSLRs is to set the ISO to low, lower than it’s default of say 100, for example on one of my Canons you could drop it down to 50iso. Having an ND filter in your bag will obviously help you overcome the problem but with this lens it would have been difficult to use without vignetting.