
Environmental Portraits: Carpenter
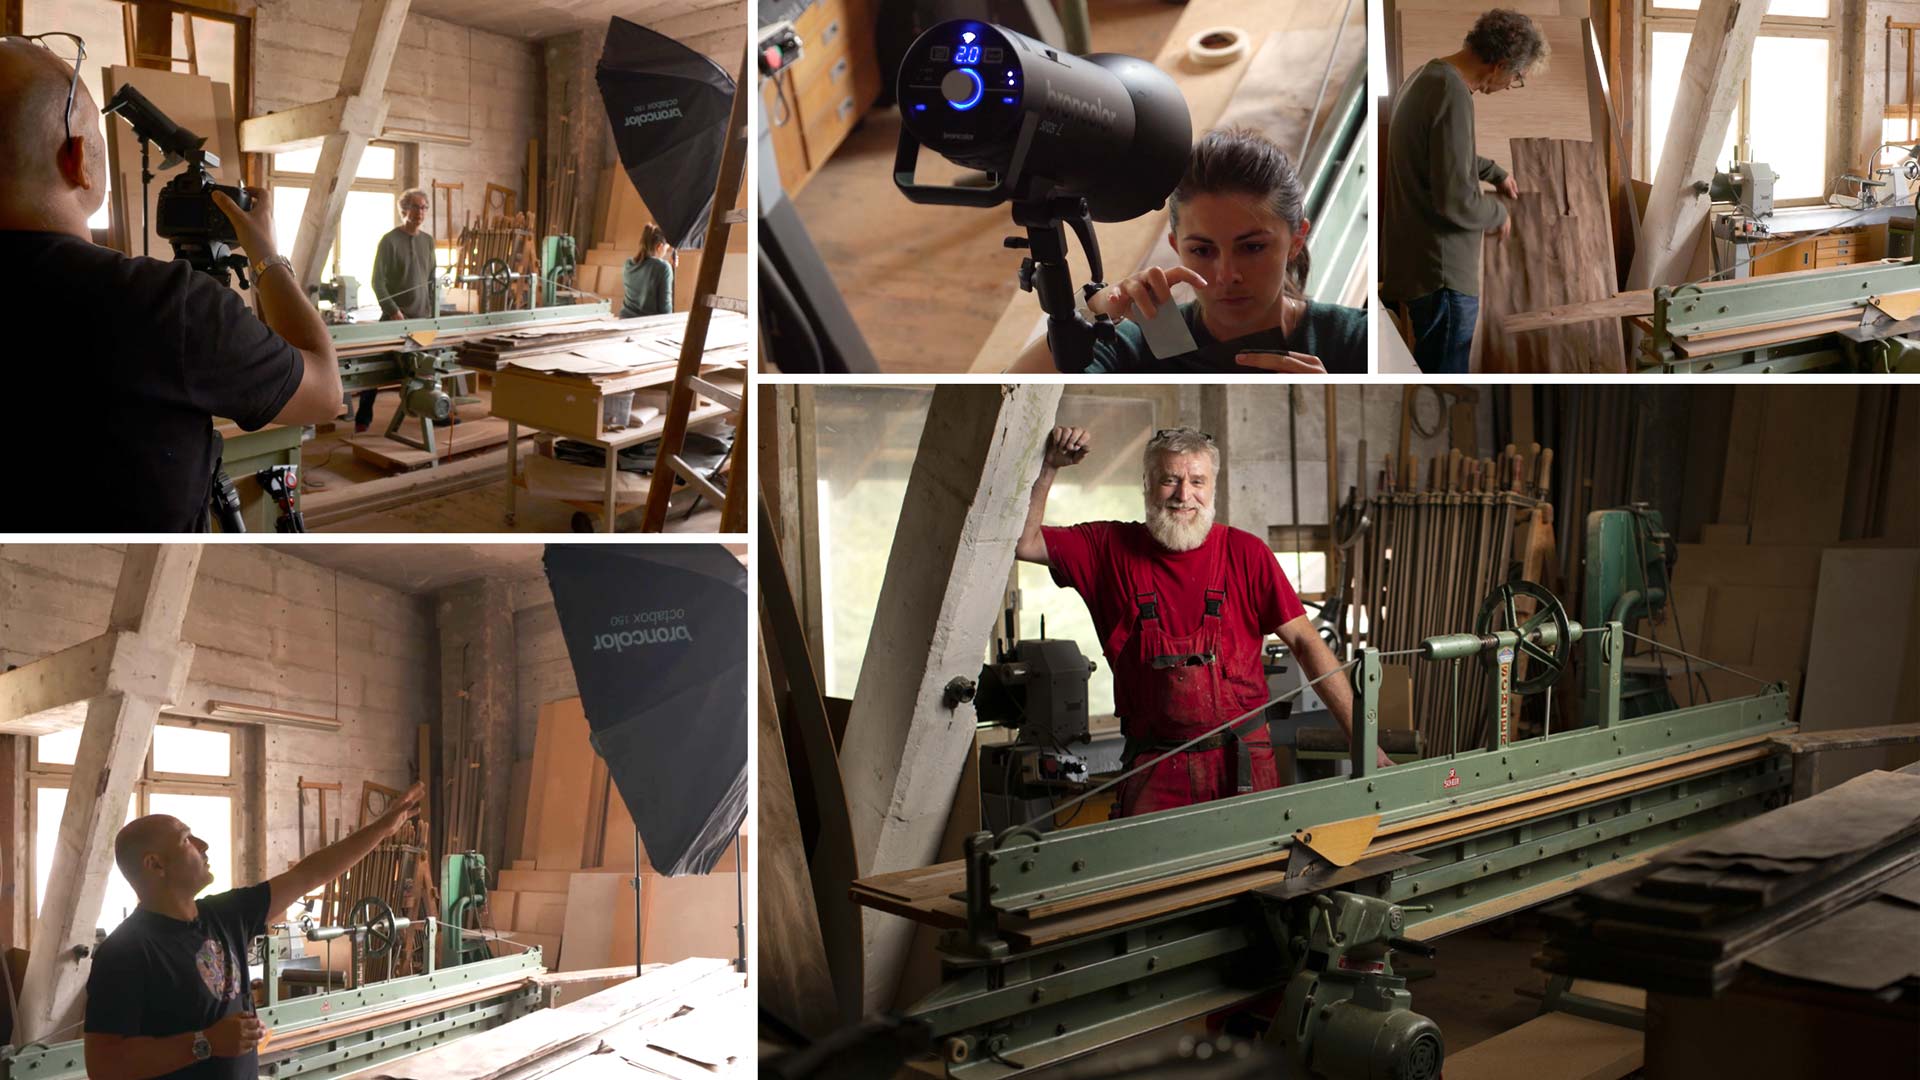
When it comes to environmental portraits, one of the key things is finding the right location. For this environmental portrait shoot, Karl took some time to look around a wood-working yard before finding the ideal spot.
Shooting in at a carpenter’s factory, Karl had to work with mixed lighting, combining natural and studio light to create an atmospheric light suited to the location. In this class you’ll be able to see as Karl carefully creates his composition, rearranging elements of the scene to incorporate key details in the shot, and precisely builds up his lighting.
Using just three lights, you’ll learn how Karl balances mixed lighting and how he uses modifiers such as grids to create carefully controlled pockets of light.
What you’ll learn:
- How to photograph environmental portraits
- Identifying suitable locations for environmental portraits
- How to rearrange a scene for the best results
- How to shoot with mixed lighting
- Using softbox grids and honeycomb grids
- Tips for working quickly and effectively when photographing people
If you have any questions about this class, please post in the comment section below.
Working with mixed lighting is a common occurrence when photographing environmental portraits. In instances such as this carpenter’s portrait, it’s important to know how to carefully control the studio light so as not to overpower the atmospheric light.
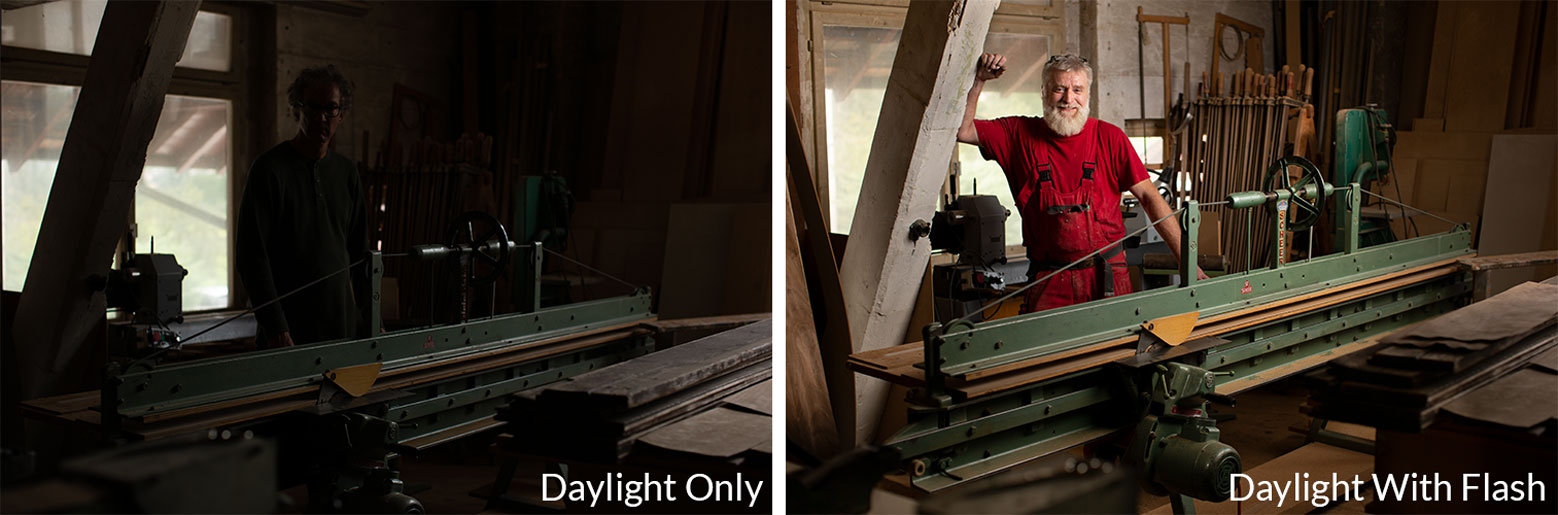
A comparison between only daylight only and daylight with flash.
In this shoot, I knew daylight alone would not be sufficient lighting, but I also knew I wanted just small pockets of light to enhance the atmosphere of the room, especially as I was shooting slightly wider than some of the other environmental portraits in this series.
To create the lighting for this shot I used a combination of lights, modifying each so that I could carefully control the spread of light, and I continuously checked the result of each lighting adjustment to ensure an overall balance was maintained.
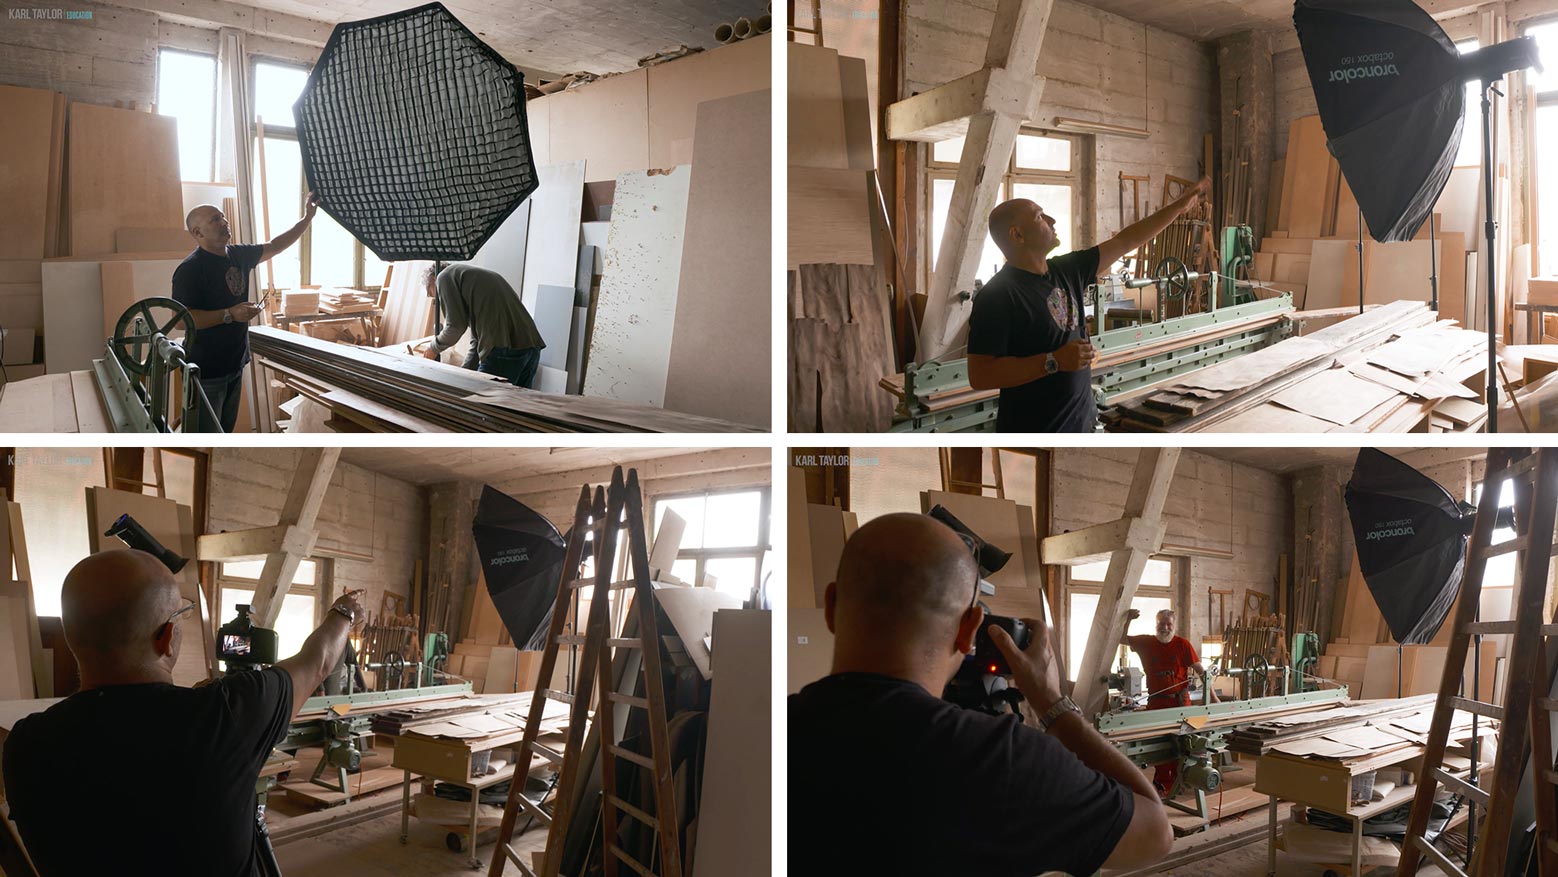
The final setup used just a few lights with basic modifiers.
In the end, I used just three lights with basic modifiers to achieve the result I wanted. With careful planning and by testing my lighting before, I was able to minimise the time spent photographing the subject and finish the shoot in just a few hours.
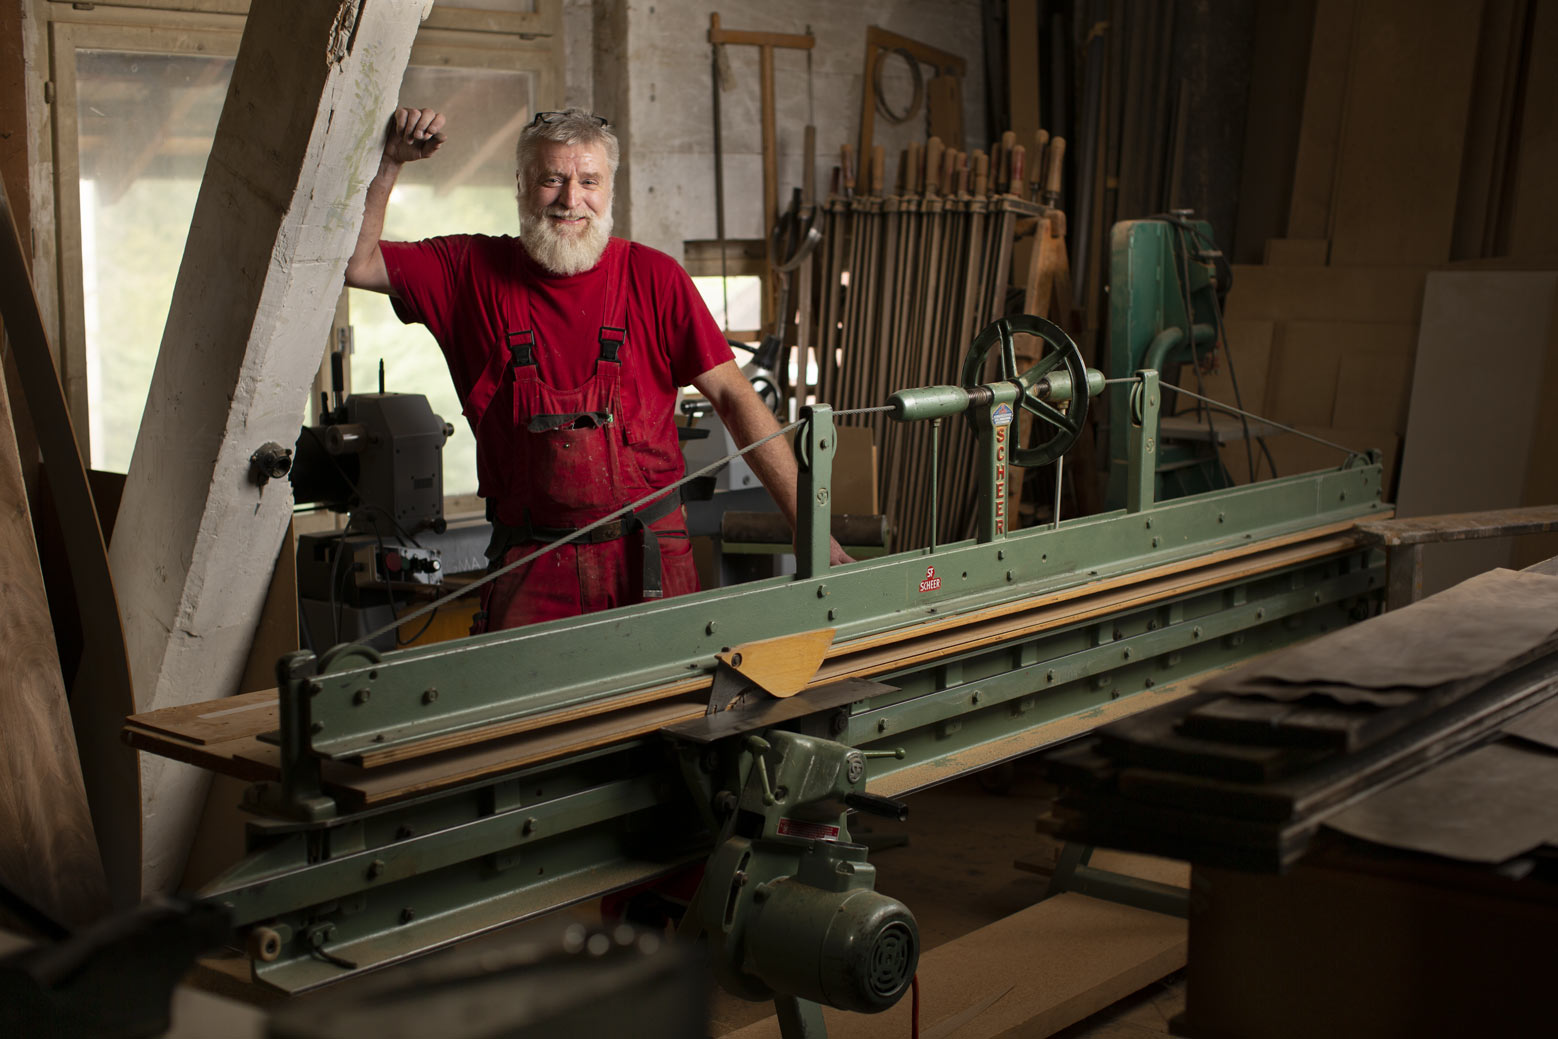
The final environmental portrait image of a carpenter.
Comments
I like very much this “drama” light setup! As always good job!
Thank you kindly!
Great class
Cheers.
Could I get a similar effect as the Siros pointing at the motor by using a snooted speedlite (moved closer?)?
I really enjoy how you build up the lighting and scene like one would build up a painting. Lot of fun to watch you work.
Hi James, thank you. Yes a snooted speedlite would work, you can also combine a snoot with a grid in front of it to create smaller spots of light.
Hi Karl,
I learned more in this one video on Environmental Portraiture than any book I’ve read. I love seeing your thought process and how you look at every part of the image in the frame in regards to light.
May I ask what Lee ND Filter you seem to use the most or do you carry a range in your kit when you are on location?
Superb work, as always, and thanks for sharing your insight. It’s the best money I’ve spent in ages.
John Calpin
Hi John, thanks for your comments. I use the LEE Pro Glass ND which are very good. If you want the best but very expensive are the LEE IRND filters which are 100% neutral. I also use graduated ND filters. We have a video coming soon on just filters. Cheers Karl.
Karl…Tell me when you come to switzerland again, we have a beer together!!! 🙂
Thanks I’ll keep that in mind.
Would a 120cm ungridded octabox do the same thing here as the gridded 150cm octabox?
Hi Mohamed, no it wouldn’t, what you need to think about is how the grid works. It basically funnels the light so that it can’t escape out sideways as much, any softbox without a grid will have light also going out sideways, which isn’t usually a problem unless you are working in a tight space and you are trying to avoid light pollution other areas of your shot.
Thanks for quick informative reply Karl
I love environmental portraits. It’s my favorite type of portraiture. Yours is very nice , Karl. Excellent tutorial.
Thanks Doug, we plan to make more of these.
The subject have made a shot – chap with character in red overall standing out from the surroundings.
The wireless siros kit is making so much easier to work and the time for re-charge after each shot is amazing!
We are used to work with old bowen kit – all cable powered.
Although, it is a reliable kit to work with there are situations when we do not have enough power plugs on site to plug all battery packs to make the shot.
Question: have you ever used the siros kit to lit the large piece of machinery/equipment?
If so, have you ever came across any problems regarding wireless connectivity?
Many thanks,
Jakub
Hi, I’ve used the Siros outdoors with a light 100m away from me no problem.
This is my favorite series. Very informative and it emphasizes thinking on your feet. Great work!!!
Thank you Donell, I think these are also more indicative of the problems that most photographers will face in commercial work so I’ll look at doing more of them. Cheers Karl.
I like you series. It show us very well how you work. Just to bring into discussion. Would it not be better to block the window on the right. Then put ND on the window behind him ? Then you would need less power and the skin would look better. Right now the skin tones looks a but harsh and pushed. Why not use som makeup powder to let skin look less shiny ? Keep up the good work. I like the way you explain things and the multiple camera angels at the same time to show different perspectives. Thanks.
Svein
Hi, I prefer to keep some of the daylight in the shot so that it has a more natural feel.
Hi Karl,
Loving this series.
Off topic (ish) question….
What would change if you were shooting this as a video plus stills?
I have yet to dabble into video. I would love more on the topic.
Cheers!
Hi Ivan the main thing that would need to change is the lights to either high power daylight balanced continuous LEDs or HMIs
Very nice!
Thanks John
in my opinion there is a some missing info, i understand that you do not use a meter but probably 90% of photographers do as it gives you a fairly good starting point for the less experienced with light, it would have been nice to let us know what f stops each light was set to or al east what th exposure was at what f stop. You did mention that you were not going to use wide open fo rout of focus background but unless I missed it I did not hear what f stop, just curious, thank you
Hi Winslow, the shot was at f2.8 at 100ISO. The best working practise is to forget about specific power settings on the lights and needing to know them, this is really important and something you will come across more and more in our classes. The reason is that if I’m unable to give you the exact distance of the light from the subject then knowing the power settings isn’t worth it, due to the inverse square law even if I had the light 1 foot closer would have resulted in a different level of exposure. So without the distance it’s meaningless. Additionally is the type of modifier used, each brand of modifier may have different or more capable output attributes so again this can affect the actual value reaching the subject. So here’s a better and more professional way to work: The first creative factor that the photographer can decide is ‘what depth of field do I want?’ In this instance it was f2.8. Once that decision is made then the lights are simply brought up and down with the power dial to meet that requirement as that is the only setting on the camera affecting flash power. As I then decide to move a light further, closer or more to the side (for the look of the light) then I constantly have to re-adjust the power anyway. I don’t use a light meter or even the camera meter, I go in with the aperture I need, set the approximate guessed shutter speed, in this case it ended up being 1/200th to keep the daylight down and then set flashes up or down like a volume control until the level looks right. It’s a good idea to look at the histogram in conjunction with the image on the screen just to ensure there’s nothing odd going on. And as you would have seen in this video, adding one light at a time let’s you understand what each light is doing. There would almost never be a situation where I set the power of the light and then adjust the aperture to match it, otherwise I would be removing a creative decision from the process. Practise working this way a few times and see some of the other modules and you will come to realise that this is the quickest way to work.
Thanks Karl,
OOPS forgot about distance. I am very appreciative of your program I am learning a lot. My work is improving since I found your program. I actually have a friend that is a carpenter and I am going to do a portrait of him after watching this video
Thanks again.
Darryl
Hi Darryl, great stuff I hope it goes well. Remember just thing about the power of light like a volume dial on a stereo.
Love this series! One question: what shutter speed and f-stop did you use?
Thanks John, it was 1/200th to keep the daylight subdued, ISO 100 and f2.8 for the required depth of field.
Thanks! Looking forward to the next one.
Wonderful set of videos! Learned a lot!
Can’t wait to see the next environmental video!