
Creative Portrait Lighting 2.0
Looking to shoot creative portrait photography on a budget? Check out these tips.
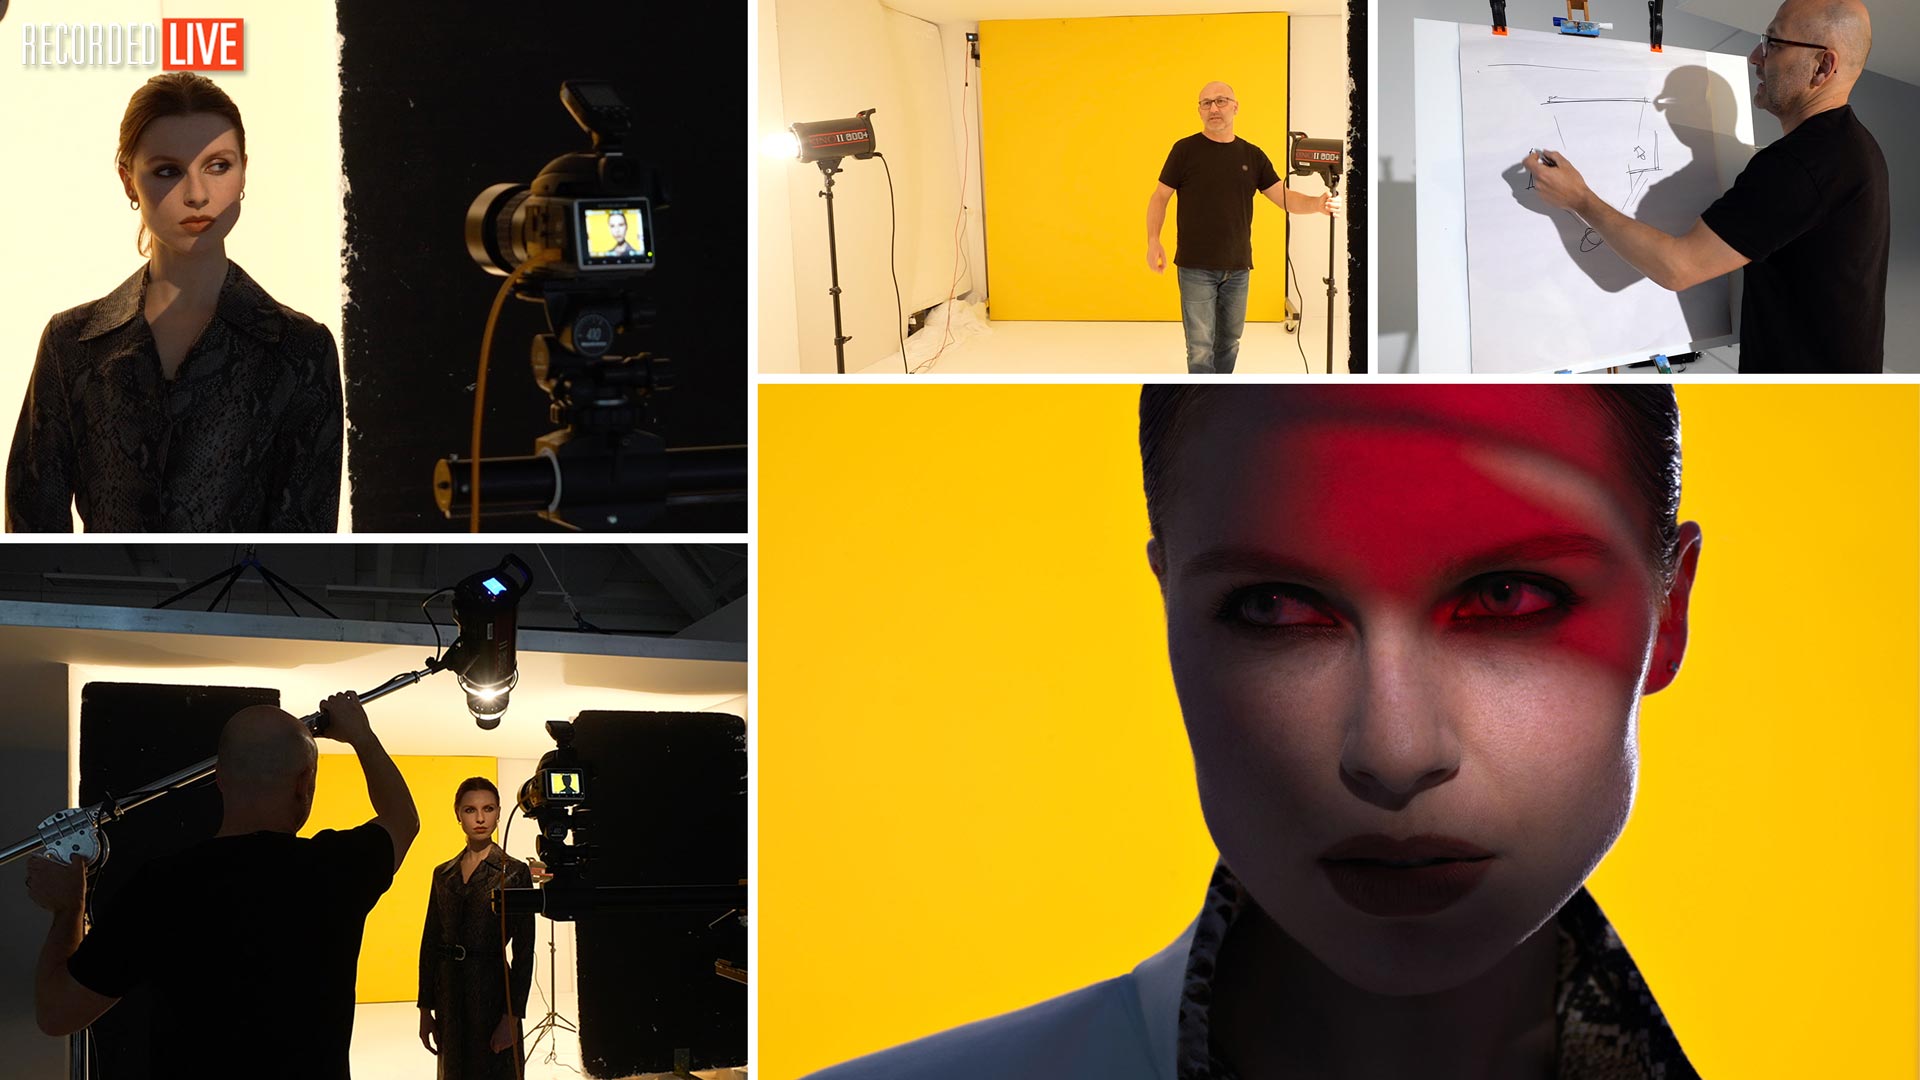
In this live workshop, Karl Taylor demonstrates how to create this impactful portrait using just three studio lights, including a Godox projection attachment and further DIY modifiers.
As part of this shoot, Karl shows two different methods that can be used to achieve even illumination on a colourful background with clean, crisp lighting on the subject.
Building on this setup, Karl demonstrates numerous creative techniques, including how to create rim lighting, control shadow depth and colour, and make controlled pockets of light.
In this class:
- Creative portrait lighting ideas
- Indirect lighting for even illumination on a background
- Creating and controlling rim lighting
- Controlling shadow depth & colour
- DIY modifiers for portrait photography
For further portrait photography ideas, watch our first creative portrait lighting live show or take a look at our 40+ portrait photography lighting setups.
Questions? Please post them in the comments section below.

Comments
Westcott Lights now offer an Optical Spot branded by Lindsay Adler with adapters for a number of popular lighting brands. It include gobo’s and four section blades to shape the light without going to a gobo. I bought one and it works quite well.
Another great session with lots of creative examples and perfect explanations, enjoying every minute of it 👍
Hi Karl
Great show as always, just a comment on the projection equipment, i have used the generic ones coming out from China and yes they are a bit flimsy and akward and if you have a large light then the whole assembly become too big and the knobs are not strong enough to hold them tight, they slowly slip and tilt downwards.
Just read that Lindsay is coming out with a optical snoot kit in conjunction with F J Westcott, hopefully the quality is better. Maybe you should design one and have it manufactured and then resell.
Amit
This was a very interesting module. I liked the creative outcome a lot.
The use of the Godox lights was great as I use Godox presently. I am invested in godox for now, but considering using Broncolor for some parts of my setup.
Is there a module on broncolor lights in the material? I see a few in the theory section but nothing that covers the different light setups.
The one light I am considering adding is a picolite, which I think could allow me to have the pico, fresnel and a projector option with the extra accessories. The only thing I haven’t figured out is whether that requires me to buy one of the expensive power packs. If I like the broncolor I could add more over time but it is possible that I only need this one for the time being and the initial outlay for a power pack makes it tough for now.
Second question if whether I can use the godox trigger to control the broncolor and Godox light combinations. I think that is possible as you are combining the Godox (as key and gobo) and Broncolor for the fill here in this module but I wondered if you had some other approach that you are using to do that or whether you are using the same trigger.
Sorry for the very specific Broncolor questions – but I love how you use the pico/projector and fresnel, and I am doing ok but not getting the same sharp effects with my current setup (snoots, cardboard cutouts etc).
Thanks a lot in advance
Derrick
Hi Derrick, yes lots of our courses here feature broncolor lights in action, some Elinchrom and more recently a few with Godox. The Picolite can only be plugged into a broncolor pack but there are a few to choose from. It is often possible to activate lights from one trigger if they can be triggered on the same frequency. In this case however I went for the much simpler option which also works and that is to simply have the ‘slave’ cell on on the broncolor pack so that it picks up the flash from the godox and then fires at exactly the same time.
Thanks for the reply Karl – much appreciated. I will do some research on the Broncolor.
I would love to wake up tomorrow with a full studio of Broncolor but I need to sell some work first 🙂
La verdad enamorado de esta plataforma el único detalle que mejoraría es los videos del live no tienen la opción de traducción y solo entiendo por vista mas no la explicación de alguno de los mas interesantes segmentos de esta plataforma espero algún día pueda agregar esa opción al español mi ingles es demasiado básico jejeje saludos
GREAT SHOW LOVE IT , SHOWING THE CONTROL OF LIGHT . WELL DONE AGAIN TO YOU AND YOUR TEAM THANKS
Thank you Frank much appreciated.
Just signed up about an hour and a half ago and went straight into this video. What a fantastic way of teaching you have Karl! Absolutely love this and I’m looking forward to watching many more videos. Thank you
Thanks for joining us and loads more for you to enjoy!
It’s heartening to know that I am not the only one who is struggling with the Essential Photo boom and lights! It takes me and my assistant ages to get the strobe light securely attached to the boom!
😊
Thank you Karl for an another very inspirational live show!
I’m really enjoying the contents on KTE! It was very clear understanding and fantastic as usual.
Thank you.
Hi Karl!
I had off course the same gobo probleme so i asked a friend of my who owns a 3D printer to make me new gobos with a much smaler stripes and holes. And also new shapes.
just have to use black plastic to stop the light going thru.
Marc.
Hi Marc, doesn’t the black plastic melt from all the heat absorption?
Hi Karl!
First i use Godox d400 and the modeling lamp is LED so not so much heat, then the gobo is a about 5cm from the bulb and finally the plastic melting point is near 80degrees so with all that combined i haven´t have any problem. Metal would be probably better but this was an easy and fast solution for that problem.
Marc.
Hi Marc, just wondering if you’ve had chance to try plastic gobos, have they stood up to the heat from the light?
Thanks in advance.
Kim
Hi Karl… Another great show with lots of very helpful information… while I was watching you build up the various levels of lighting, it reminded me of painting with oils or water colours… as you transitioned from light to dark and then added back the fine details… a term often used in motion picture lighting is painting with light… I think this show was a very good example of that technique… I tend to agree with you on the equipment issue, after all when photography first came into being there were no brands or must-have bits of kit required before you could take a photograph… just a black box with a bit of glass on the front for a lens and natural light… think where we’d all be if all those would-be photographers of yesteryear adopted the mindset that if only they had digital cameras then they could start to take pictures… remember always work with what you have, and if there are limitations think creatively to get around the issues… enough said, looking forward to your next presentation… Geoff.,
Thanks Geoff much appreciated and glad you enjoyed the show.
At least with Bowens mount you can get a optical attachment. With the Balcar mount it is slim pickens. I made my own optical attachment for the Balcar mount. I have the attachment that Karl has, I don’t know the brand name. It is simply too big, bulky and heavy, in my opinion. I wished we had something like Bron has. Maybe someone will make something.
Hi, Karl just managed to catch the show on replay. I had to watch it on 1.5/2.0 speed, so I may have missed you saying where you got the optical snoot, but if it’s the Essential Photo version, I see that they have adjustable blades and iris diaphragm options. This ability to have adjustable rectangles or circles does seem to give the kit a lot of flexibility – maybe over the Bron version! Heresy, I know and this comment will probably get me banned …
I knew I wasn’t ever going to be as dexterous as you with the tin foil and scissors :-), so I’ve ordered the adjustable options too. I’d been considering ordering this modifier for a while, so your show swung it for me. Many thanks.
Thanks Barry, that’s good for our audience to know. Don’t worry your comment won’t get you banned 🤣, we have to cater for everyone here and while I managed a perfectly good photo with this kit I would still have preferred the efficiency of my bron gear and the build quality. Let us know how you get on with yours once you’ve had a play with it.
Hi Barry/Karl,
Worth noting the projector from Essential that takes the framing shutters and iris, is a different one to the one Karl demonstrated. It has a built in lens on the front that is available in, I think, 50mm and 85mm, but it’s a spanner job to swap it out. I have both types of projector and I just checked and unfortunately, the framing shutters will not fit in the one with the Canon EF mount on the front as the outside diameter of the gobo holder is a little bit smaller, so if you do want the shutters and/or iris then get this projector:-
https://www.essentialphoto.co.uk/product/optical-snoot-spot-projector/
Of course, with the EF lens mount projector, if you want the shapes smaller or larger, you can fit a different lens. I regularly use mine (via an Canon-Nikon adapter) with a Nikon 18-35 zoom – so I can adjust the size. This lens has a smaller max aperture though, so it nicks even more light!
The framing shutters also have the grips to take a metal Gobo which can useful to combine with the shutter blades (say you want the dappled pattern but only a slice of it).
To Karl’s point on quality, and efficiency – these shutters do work, but they are a bit shonky tbh – getting them in place in the projector is quite a fiddle, and the handles on the blades are not quite long enough, so if you push them all the way in, it’s hard to get them out again once in place in the projector. My example is also a bit loose.
If you need more pre-cut gobos for either projector, Rosco size M will fit if you cut the sides off. The metal is thin enough to do this with a large pair of scissors. I put gaffer tape over the cut edges as they can be quite sharp. Happily, while the gobo holders for each type of projector are different sizes, you can use the same gobos in either.
I also have a massive S-Fit projector which is much more efficient with a studio head, but has very crude “optics” on the front which projects an image that is a fuzzy at the edges. This is not a problem if you’re going to de-focus the projected image anyway. I use this for full body projection or on the background:-
https://www.ebay.co.uk/itm/Flash-Optical-Snoot-Gels-Bowens-Mount-Photography-Studio-Background-Lighting/282961428646
You can also use the same size gobos in this one. I’ve also made gobos out of black card and Cinefoil.
The most efficient and cheapest projector I own though is Spiffy Gear’s Lightblaster. This takes a speedlight (or a Godox AD200) and has a Canon EF mount on the front. It transmits so much more light as the small flashes push all of their light forward in the centre, rather than bigger studio heads with circular tubes. Best results with speedlight fully zoomed in. Rosco size E will fit in the Lightblaster mounted on black card:-
https://owenlloydphotography.com/more-gobo-options-for-your-lightblaster/
On the Godox trigger – you can adjust the Godox lights in 0.1 stop increments, by changing the “Step” option the config menu on the XPro-1 trigger. This works with all the higher end Godox lights (the AD series) for sure, and possibly with the QT/QS series ( I think the lights Karl has are rebadged QS heads). There is also a trigger better suited to use in the Studio (no TTL 😛 ) that works in 0.1 increments. This is the one I use the most:-
https://www.lencarta.com/wavesync-2-4-remote-radio-trigger
Very enjoyable and effective class Karl – I love the live sessions as they really demonstrate the reality of shooting with creative lighting – ie a succession of challenges to overcome 🙂 There’s no pretence and nowhere to hide. Good to see the full crew back in the studio too.
Thanks Owen, and thanks for the detailed extra info for our audience. All the best Karl.
Owen, there are sets for both the EF and the version with the built in lens. I’m suspecting the quality will likely only be adequate, but like much equipment choices I guess it’s a balance between usage and price, and how often you throw it around the studio.
Thanks for your Rosco suggestions too …
Thanks for this one Karl, I actually ordered a similar projection attachment from China (still waiting for delivery) but I managed to find one that had shutter blades as well as the gobos. Lets hope I can make such good results as you did.
Glad you found something, I hope it works well.
Hi guys! It would be really nice if a calendar event with a link to the show was attached to either email or downloadable here (or both)… This would make life much easier 🙂 Thanks!
Hi Oleg, I’ve passed your comment on to the tech team!
Thank you Karl!