

One-Light Lipstick Product Shoot
In this product photography class Karl demonstrates how to shoot a close up product shot of lipsticks in red paint using a one light setup.
Meticulous thought and planning were required for this shoot as there would only be one opportunity to get the shot. You’ll see each stage of this shoot, including planning, testing, lighting and shooting. You’ll also learn more about tilt-shift photography and how to use tilt-shift for product photography.
Course objectives:
- Learn product photography
- Product photography lighting
- One light product photography setups
- Learn how to photograph lipsticks
- How to create gradient lighting using softboxes
- Tilt-shift product photography
For this cosmetics product shoot I wanted to create a close-up image of Chanel lipsticks in red liquid, but I knew I’d only have once chance to get the shot. This meant every stage of the shoot had to be carefully thought through and planned.
To start, I had to determine my composition. It was crucial that I get this right because the lipsticks, in order to prevent them floating in the liquid, would be stuck down. Once they were stuck, there would be no changing my composition.
I had to decide on my composition before introducing the liquid.
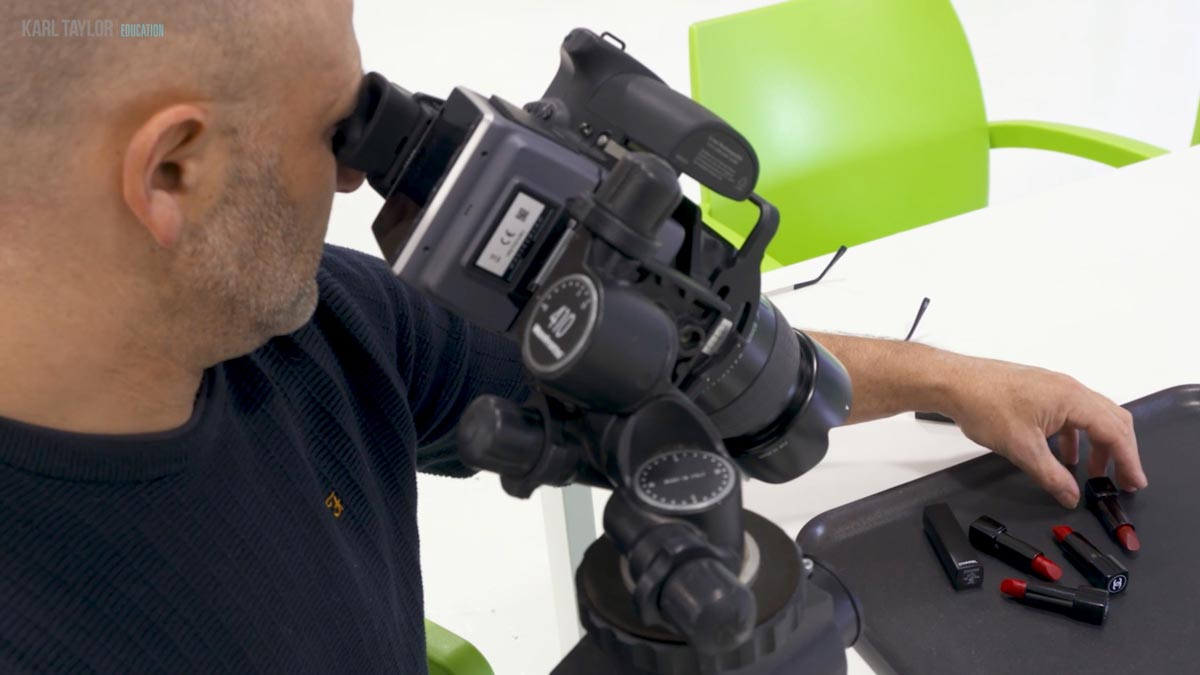
Once I’d finalised this, I started working on the lighting. The setup for this shoot was very simple — one large softbox from overhead.
To see the lighting on the product, I used a test plate with a single lipstick in red paint. This stage was important as it allowed me to figure out my lighting before I started adding liquid to the final arrangement of lipsticks.

I USED A SEPARATE PLATE AND INDIVIDUAL LIPSTICK TO TEST THE LIGHTING ON MY PRODUCT AND LIQUID.
Once I was satisfied with the lighting, I swapped out the test plate for the final arrangement. Then, very gradually, we started pouring the paint. This was done in gradual stages as I wanted to see how the paint interacted and wrapped around the lipsticks. I had to find a balance where the lipsticks looked good in the liquid but weren’t overwhelmed.
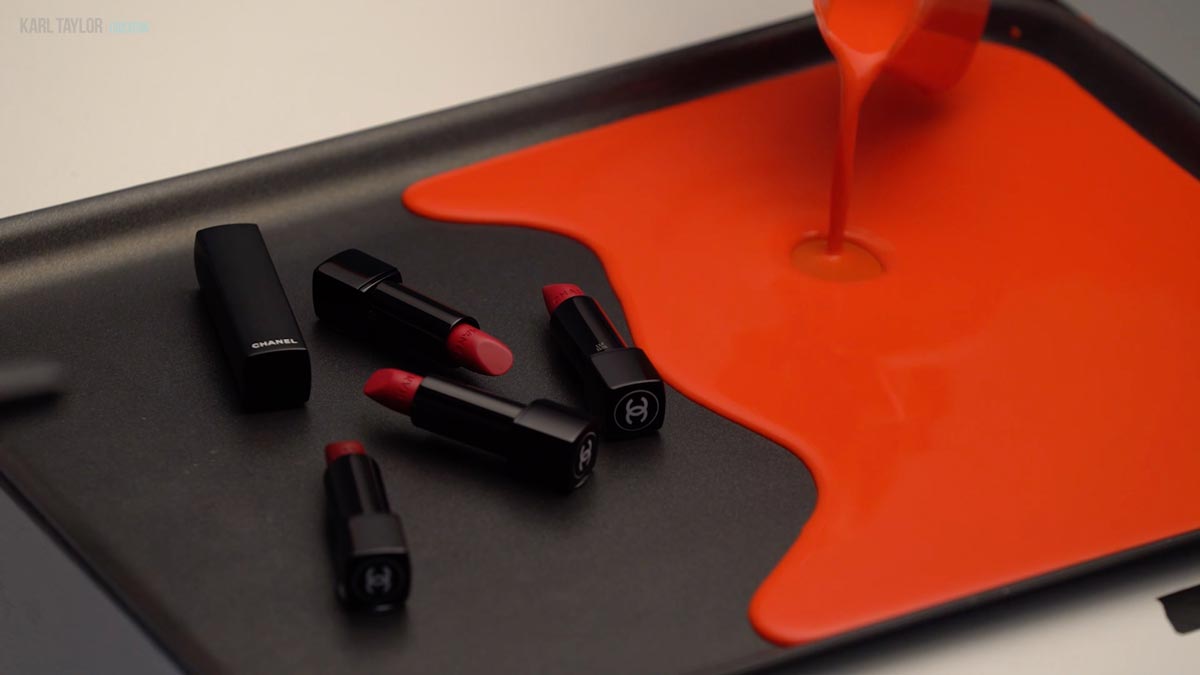
I gradually added the paint to ensure I achieved a good balance between the product and the liquid.
Pouring the liquid was the final stage of the shoot, having already determine the composition and lighting, and once it had reached a point I was happy with, I knew I had my shot.
The final image:
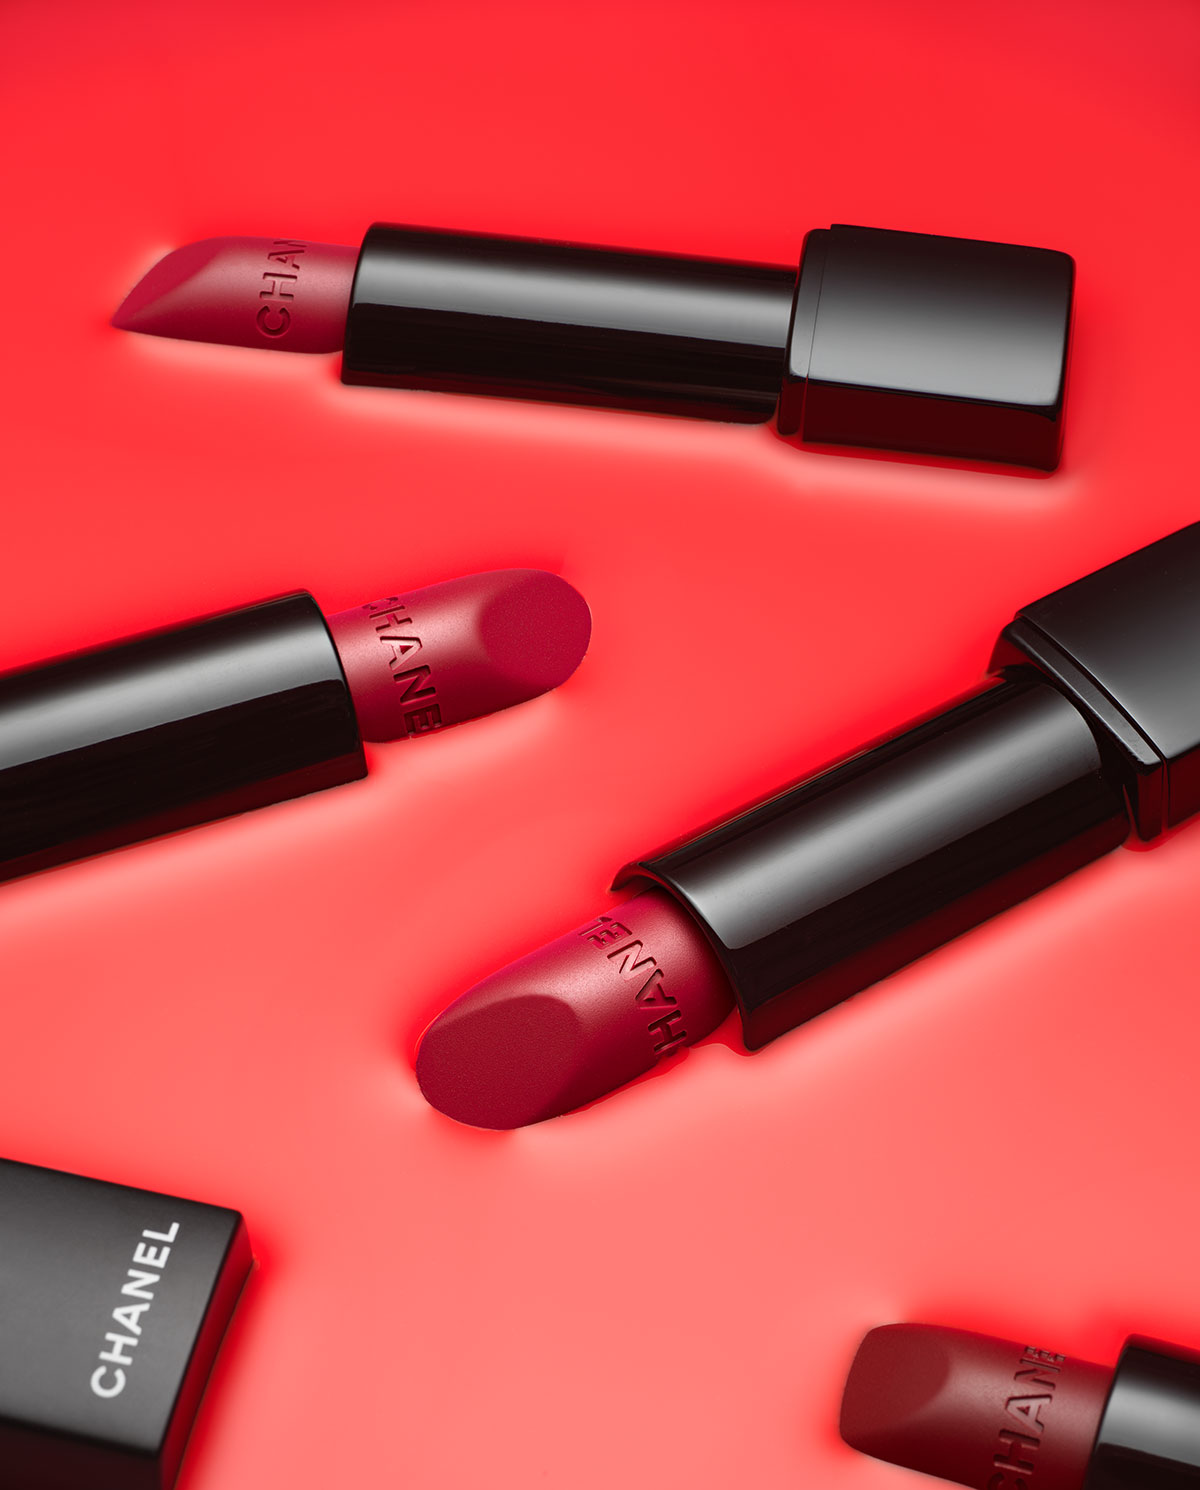
The final lipsticks in red paint shot.
To learn more about product photography and how to photograph cosmetics, visit our Product section, where you’ll find a range of classes detailing all you need to know about product photography. To help you get started, I’ve put together a list of popular classes and articles that you’ll find useful.
Product photography classes:
Product photography articles:
If you have any questions, please post in the comment section below.
Comments
Hi Karl, I hope all of you and your families are well.
I want to ask you something, on your website http://www.karltaylor.com, there is a photo with two lipsticks and some balls in matte black, I am very interested to know what material those balls are and how they where made, thanks for your response. Regards and keep safe.
Hi Daniel, table tennis balls sprayed black.
Hi Karl
On most of your product tutorials, the key lights are placed at the top, back or on the sides.
Very rarely do you light up any product from the front, what is the reasoning behind this? Is it because lighting products from the front is unflattering?
thanks
amit
Hi Amit, I’m glad you recognised that, in fact nearly everything looks better lit from the side or back rather than the front. You still need light from the front but it shouldn’t always be the main light otherwise the light can look flat because your subject might not reveal shape and 3-dimensionality so the choice of lighting key.
Very nice!!
Hey there! This was awesome. I was just wondering what is the stand that the scrim is on called? I have spent an hour on google, and cant find quite the same one, that rotates like this. And also, what brand is the stand that the light is on so you can rotate the soft box without getting of the way of the scrim (like a normal vertical stand would do). Thank you so much.
Hi, C-Stands with grips and a giraffe boom for the softbox.
Thank you so much. I am limited on studio space. Would a 120cm x 180cm scrim be sufficient to do this type of photography?
Hi, yes for the most part I think it would but there is not one lighting solution that is perfect for everything. Obviously every product has its own peculiarities and characteristics that need to be dealt with on a case by case basis.
Just watched great video Karl. Gave me other creative ideas…
Thank you.
Karl,
I use Rosco Cinegel #3001 48″x25′ Roll as my diffusion material. If I wanted to put two pieces together to make a larger scrim would the seam have a negative effect of the gradient light or will it make a difference? Trying to figure out how to make a larger scrim as you use without having to buy something else.
Thanks,
Kyle
Hi Kyle, yes the seam would have a negative effect in gloss objects. Go for the larger scrim rolls that we use from LEE.
Hi Karl. Beautiful work and always educational. When doing focus stacking how do you deal with lens breathing? Are the images slightly off and do they have to be realigned?
Hi Vince, photoshop can re-allign images for you as part of the process. I demonstrate this here https://visualeducation.com/class/jewellery-photography-rings-focus-stack/
Great lesson Karl Thank you. The paint mixture was at 50/50 paint to water? Also when the paint level went too high would you be able to draw some out of the tray with a syringe? I was wondering how the paint would interact with the plastic casing. When you were levelling the tray I taking the viscosity of the paint did not allow it to stick to the lipstick casing, hence my thought on drawing paint out.
Hi Geoff, yes it was about 50/50 and it would have drawn out with a syringe if necessary. We didn’t need to do that as we applied it very slowly and took shot at each stage. The plastic lipsticks and been cleaned with meths and seemed to repel the paint quite well.
Hi Karl. Thanks for replying. You answered it well! Well done. Your right it’s very situational depending on the effect and how much you would like to feather the graduation. This is what makes product photographers exceptional as we consider several planes of diffused light depending on the effect. I.E. Flat scrim and angles light behind or angled light with angled scrim. etc etc… I always leave my top scrim in my studio flat. I am thinking to experiment a bit more with angles of the scrim to see what effects it can have on the light.
Karl. I notice that most the time your top scrim is at an angle rather then flat. Does it make a difference to lighting or is it more practical for access to the products easily?
Hi Nicholas, good point. It does allow easier access obviously but is more so that the gradation is more gradual as the light is then weaker as it comes more over the front of the product but that will depend on the product it’s shape etc and what you wanted to achieve.
Great concept photo! Karl, I am curious. As far as the focus stacking shots, was there any issue with drifting paint, or was it nice and stable once poured?
Hi Peter, Thank you. I only needed two or three shots for the stack and in fact I didn’t actually run a focus stack I just did a manual mask on the layers. There were no problems with it either was though as you mentioned the paint was perfectly stable once poured. The only thing that can be a problem is if you didn’t finish the shoot and came back to it the next day there could be a drop in levels due to evaporation.
I did not know what I do not like about this picture… And suddenly I noticed that paint is acting differently on lipstick itself (this lips-contact part) and plastic part. Maybe it was worth to try make plastic more hydrophobic to create same type of meniscus?
Wow. Another great course. You always make this look easy! How long start to finish Karl? I’m guessing longer than 35mins!
I wish I had your talent!
Hi Tiaan, thank you for your kind comments. I believe that talent is something that only comes with 1,000’s of hours of practise and combined with passion, so I truly believe anyone can achieve it. For example the worlds best Kung Fu Master did not become that person without 1000’s of hours of studying, training and practise. The best violinist did not make a great sound when they first picked up a violin even though now people would say they are talented. So we must always consider our ability to learn and our willingness to explore and practise as the path to talent! In answer to your question with planning, sketching the idea, mixing paint, executing the shot probably about 5 hours. 🙂
Thank you Karl for your response and the wonderful training you provide. I’ve been shooting professionally for many years and your programs always enhance my knowledge and teach me new, useful and wonderful things. Thanks again.
Hi Christopher, This course has now been published 🙂
Please, please, please let us know when upcoming programs are scheduled so we, your members/subscribers, can plan/schedule them. Even though you usually archive them the live feedback opportunity is a very effective tool for student/teacher interaction.
Hi Christopher, I’ve listed all of the live shows now until December but please check from time to time incase I have to make any changes due to other work commitments or guest schedules. Thank you.