
Packshot Product Photography
Want to perfect your packshots? Find all the tips you need in this comprehensive tutorial.
Discover how to achieve a clean white background, photograph reflective surfaces, control unwanted reflections and shadows on your products, and much more!
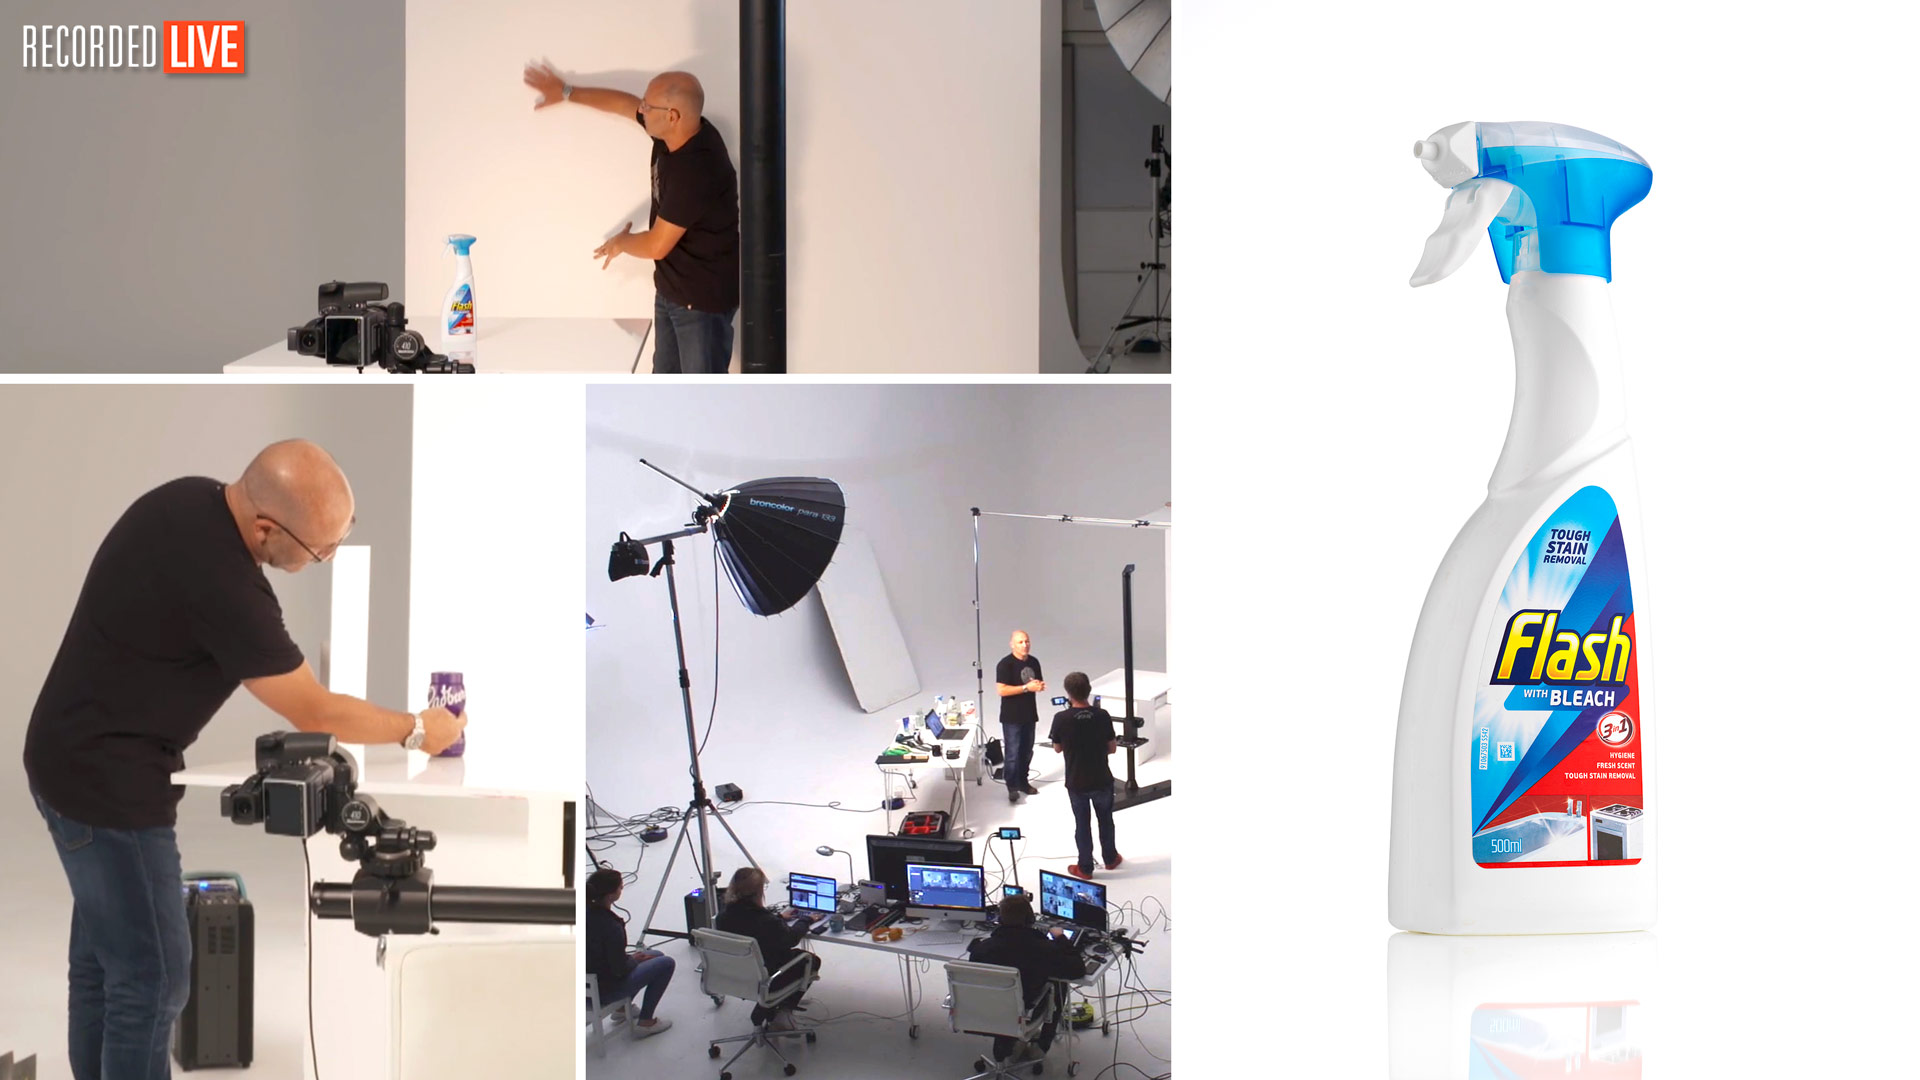
When you’re shooting packshots, speed and efficiency are key. That’s why it’s essential to have a lighting setup that’s both suitable and simple.
In this class, recorded LIVE, you’ll learn how to set up, light and and capture successful packshots.
Working through multiple products, Karl demonstrates just how important perfecting your lighting setup is. Starting with a simple two-light setup, he shows you how to achieve a professional result quickly – even if you’re working in a small studio and using basic modifiers.
In this class:
- Product photography: Packshots
- How to photograph packshots
- Studio lighting setups for packshots
- How to achieve a pure white background
- Small studio photography
- How to control shadows
- Controlling reflections on shiny objects
If you enjoy this class, check out Packshots: White Background Product Photography.
Questions? Please post them the comments section below.
Comments
Hey Karl, where did you get the MDF blocks? Are they solid or hollow? Thanks!
Hi Joshua, please watch this – https://visualeducation.com/class/studio-blocks-and-frames/
Hi Karl,
How can I shot whit product ( 3x smoke detectors ) on a white background front the top view to get a perfect shot ?
Thanks
I forgot to mention that I have big soft box with a studio light and one Speedlight..
Thanks.
Hi R, you have to watch all of the classes in this section for the answer to that – https://visualeducation.com/section/packshots/ especially the first one in this section.
Hi Karl,
I will watch it, Thank you.
Hey Karl,
Great video! What is the scrim material that you used to unroll to diffuse the key light?
Thanks,
Randy
Hi Randy, thank you. I use LEE 216 – 7m long rolls, 1.52m wide.
Hi Karl, love the video! I’m currently doing a pack shot of a round shampoo bottle with a semi gloss label and a gloss lid. The label and lid I’ve got perfect, but I’m getting a lot of light spill on the sides of the bottle that make the edges hazy for cutting out PNGs. Is there a way to define the edges more? My setup consists of 3 lights, 2 lighting the background at 45 degree angles (as you described would be ideal in the beginning of the video) with simple hoods and no diffusers, and a single large soft box lighting the product from the front through a diffuser, using a mirror to light the opposite side. I do also have small, square soft boxes and honeycomb grids, would either of these work better for the background lighting? Thanks!
Hi Jack, this video will answer your questions. If there is anything you don’t understand let me know, cheers Karl. https://visualeducation.com/class/how-to-use-continuous-led-lighting-for-packshot-photography/
Hi Karl, thanks for the prompt reply. I’m actually using flash, Elinchrom BRX 500s to be specific. I rewatched the beginning of this video and it answered my first question. My remaining question is just what would be the best light modifier to use when lighting the backdrop with 2 flash lights. I have square soft boxes and honeycomb grids. Thanks.
Hi Jack, lighting the background isn’t really a problem as long as you get an even spread of light, one of the best ways if you have the space is to fire it into to polyboards like in this class – https://visualeducation.com/class/photographing-white-products-white-background/ otherwise wide reflectors, standard reflectors or small softboxes will do the trick anything that will spread the light out.
Hi Karl, I’ve been through most of the packshot videos, including this one, and have a question. Here’s the setup : 1) shooting pack shots of handbags “straight on” as you are doing (or at say 25 degrees to the product), and (2) want to produce a slight shadow underneath the object, not a reflection (this is different than the setup with the glass, where you produced no shadow at all); 3) the subject is sitting on a matte white board (the type you can buy in a hardware store) and (4) lighting on the subject from above, to produce a slight shadow underneath, and to “skate” the light across the fabric to create some detail and contrast; 5) lighting a wall in the background to 255. The Problem : there is always a horizon line. How to shoot pure white, with a shadow, lit from above, and do so without creating a horizon, so there is no need for post production beyond cropping? Is the only solution a seamless white paper or board painted white and curved upward, as you suggested in the other videos – to create a “seamless” – and doesn’t this solution risk serious flare unless you use a huge long roll of paper or go through substantial trouble to flag out the background lights? Or is removing the line in post the simple and best solution. Any advice appreciated. Great videos and great work on this site.
Hi Matthew,
1. Yes understood
2. Yes understood, this would require a matt surface
3. Yes but I don’t know which type of board you mean
4. I understand that you are lighting from above to create the shadow on your base surface but I don’t understand what you mean by ‘skate’ the lighting across the fabric?
5. Yes good
6. This is very difficult to do without the whitest possible board, so as you say a seamless curve of hardboard painted with ‘Pure Brilliant White Trade Matt Vinyl (not the cheap stuff)’ then the lighting from above needs to me more from the back
7. Also you can use 3mm pure white matt acrylic and make it into an infinity curve and then even add some light from underneath through it too. There is always a risk of flare if you push things above 255 but this comes down to careful control, flagging, barn doors, grids on softboxes etc etc. You have to weigh up if you can easily create a repeatable setup that will achieve it or if it’s easier to do it in post!
8. This is a good question though so what I’m going to do is add this as a topic to create a new class you on this for later this year.
Hi Karl and team, what did you do with the green cloth for? Thank you.
Hi please could you explain what you mean, and at what time in the video?
at around 1:07:00 as Sara hold it with c-stand arm aim at the ceiling, Thank you.
Hi, I am using the green cloth to see if I can see its reflection in the surface so that I can identify exactly where the light should be to create the best lighting reflection in the surface.
Alright, Thank you very much.
You make a comment “this is why this is the best educational course out there”… I couldn’t agree MORE!!! I, sadly, found you after purchasing a number of other classes. Yours absolutely blows away the others…hands down…
Very kind thank you. It would be great if you could leave a Google review to that effect for us! 🙂
Done and with pleasure.
Cheers!
Howdy.
I have a potential client who wants potentially thousands of simple pack shots for web but at a very low price. Small products all similar. Obviously I don’t want to compromise quality, but
I’m wondering if, like you demonstrated, I get the set up exactly right, would there be any strong reason not to shoot in jpg so there is basically no processing required.
Grateful for any pitfalls I might be missing.
Hi Stephen, if your set up was absolutely perfect and you had no need to recover highlights or shift colours afterwards then there is no problem at all just shooting in jpeg. However personally I’d just set it up perfectly shoot them all in RAW and then not touch them and just batch export all of them as jpegs immediately after which would only take a couple of hours and it would be automated. Then if there was a problem with any of them I’d still have the RAW file too.
Many thanks this seems like the optimum solution. I was actually doing some tests last night and a few needed corrections so I’ll separate those out and negotiate a higher price for these!
👍
AWESOME! ❤ THANK YOU VERY MUCH 😁
Hi Karl! Thankyou for a great tutorial. I work as a product photographer in the equestrian industry and one of the products I am commonly photographing are Bridals & Halters. I have a jig that I’ve made which allows me to string them up so as to see them from both sides which you wouldn’t were it on a horses head. Clearly this isn’t “pack” photography as just the time it takes to string them up and make them look neat and tidy (and correctly positioned as if they were on a horses head) can be very time consuming, however the larger complexity I’ve had to overcome is regarding lighting, and this ties into the technique I saw you use in this tutorial. The additional complexity with Bridals & Halters is that they are often made of polished leather and also have shiny metal details in the buckles, bits etc. I have found that bouncing two strobes off the studios overhead white ceiling and then using several white reflectors around the product jig (as close as I can get them to the product) works fairly well. Would love to see you do a tutorial on a product such as this.
Hi James, yes it sounds like your techniques gives you the simples solution all round but it might also benefit from a bit of additional hard/spot lighting on key areas of the product to give it a bit of bite. This is a slightly different horse product but you may be interested none the less https://visualeducation.com/class/moody-lighting-for-an-antique-style-saddle-shoot/ this uses hard lighting but lots of it. Also many of our other product photography classes with scrims will give you some good ideas of techniques to try. All the best Karl.
Hi Karl! Thanks for the reply 👍 Yes I absolutely agree that it could benefit from some additional bite. I saw your saddle shoot a few months ago and showed it to my head of marketing. She was a big fan. I took over the role early this year and am currently in the process of trying to get some upgrades to the studio. Currently only have two strobes and 2 very small modifiers. No backgrounds, no grip arms or C-Stands etc. Good thing I like a challenge and DIY solutions 😉 Your tutorials have helped massively over the years. Glad to be back and able to watch all your new content. Thanks again.
Hi Karl! I’m curious about pack shoots for fashion accessories. If there’s another class on that I’d love to watch it (haven’t seen one though). If I were to shoot purses, watches shoes etc for e-commerce uploads.. would you still use the same light configuration? Also would shooting flat from above or straight forward be the client’s decision or is there a ‘standard ‘ way of shooting for these types of accessories. Thanks, these classes have been really fun and super informative
Hi Kelloosh, thank you for your feedback. Packshot photography is essentially high volume product photography that tries to find an easily repetetive method of photographing stuff. As such it doesn’t really matter which lighting setup you use as long as it works for the type of products you need to shoot. Of course we have hundreds of classes and live shows covering a variety of products – this one in particular you might find interesting based on what you said but please also explore the others – https://visualeducation.com/class/live-photography-workshop-fashion-accessories/
Hi Karl, I am new to product photography. I need to photograph books for a client on white background which are going to be used in an app where different products are going to be sold. Would you suggest to lay the books flat or in standup position?
Hi, this decision has to come from your client and what they require. I wouldn’t move forwards with a project like that without the client providing a ‘mood board’ or an example of what it is they would like. Once you understand this then I can direct you to the appropriate lighting class.
The client want an upfront photo of all the products, including the books, and a shot of an angle. Which classes would you recommend? I followed this packshot class and that was already a great help. Thanks for your good videos.
Hi Karl,
All of your videos are super helpful. In this video, you talk about the space being a min of around 3m x 2m for shooting the packshots in. Currently, the only space I have available to me is 2m x 2m. At some point could you do a video where you are shooting in a space this small, maybe inclosed with v-flats to simulate dealing with the light bounce from a small room. I am especially interested in trying to shoot handbag/ trainers size of products.
Thanks
Tian
Hi Tian, working in a small space like this is possible and we have covered this in previous live shows. Essentially you need to control light bounce so you will need to consider making certain walls and the ceiling black with fabric or using velcro to stick black foam board in position.
This is great Karl. I photograph Antiques and jewelry for a living to put online for auctions and I’m always looking for the fastest and easiest way too photograph these items. I usually make it work. Unfortunately I do not have a studio and just use available space. My go to is bouncing a strobe right off the ceiling to create an even “ambient” style light. It tends to be “flat” but it gets the job done. It was refreshing and and a relief when I saw you bounce a light right off top scrim. I guess I was doing something right.
-Mike
Hi Mike, thanks. Also see our jewellery photography on Rings the techniques should be helpful to you.
Really good stuff in this Karl! I have learned a lot. If the client wants a “light gray” tonality background instead of pure white at 255 levels, would you use a gray colored background, or would you just use a white background like in this video and get your levels in camera to around 235 to get that slight gray tonality? A lot of e-commerce requests I have received want light gray to match their website background and trying to find the best way to accomplish… with gray colored paper or with camera levels? Thanks!
Hi Tyrogers, yes exactly that I’d still use a white background wall but I’d light it with less light. When I’m at a reading of R236, G236, B236 then I know I’ve got 10% grey. The easy way is to get an image of the tone the client wants to acheive and then measure the RGB values in Photoshop and then you know what you need to light it to. You need to light it evenly of course so the methods of lighting backgrounds are covered in various courses here, from bouncing the light into white v-flats or polyboards or using softboxes to spread the light if necessary, it all depends on the area to be covered. If you look at the shot of the black glasses floating in the air that I did for Diesel on this page – https://karltaylor.com/objects you will see how they were shot on a 10% grey background (236,236,236).