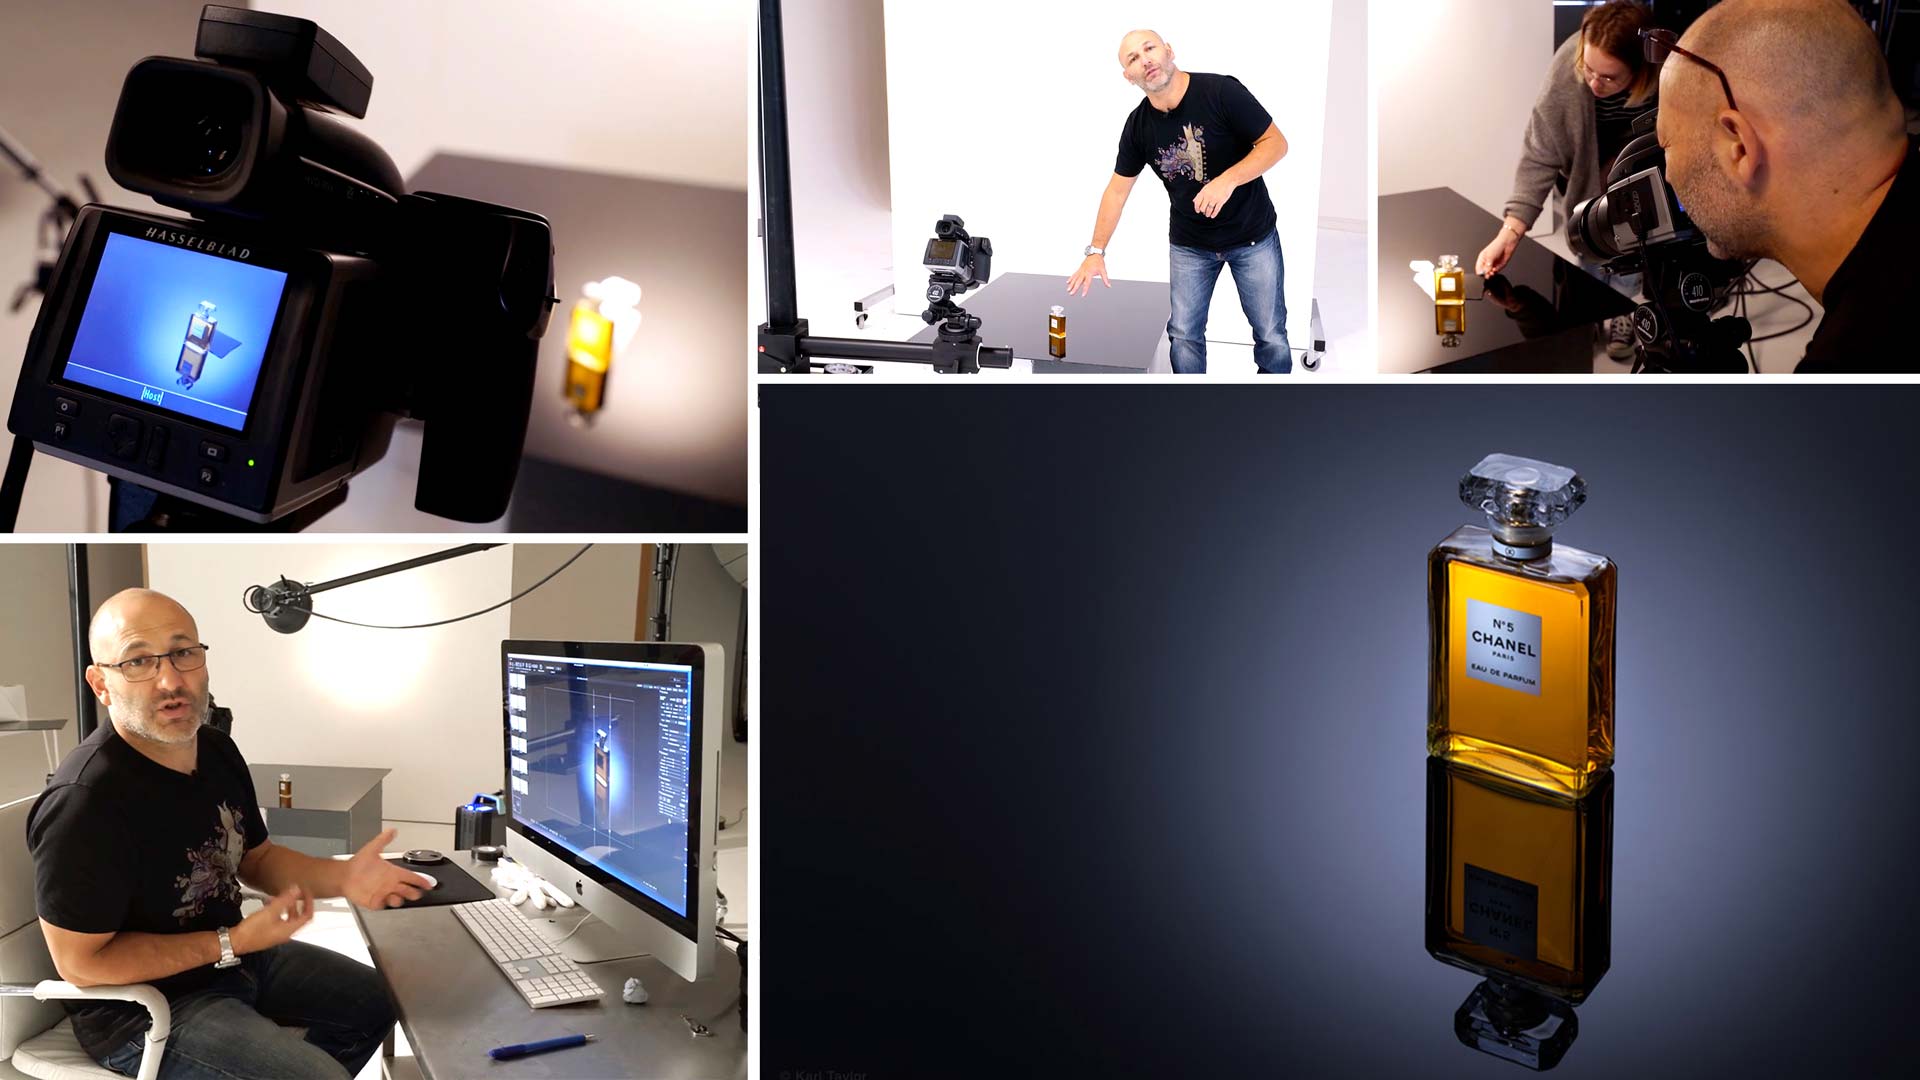

Perfume Bottle Photography
Chanel No. 5 is one of the most well-known perfumes in the world – an icon in its own right. In this perfume product photography class, Karl aims to create a series of images that are as elegant and beautiful as the fragrance itself.
With meticulous attention to detail and precise control, he demonstrates how to light this bottle perfectly in order to accentuate its key features. He also reveals a number of essential techniques that can be used to elevate the shot.
This class is a must-watch for anyone interested in product photography. Why? Because it provides a solid base of knowledge, recapping the basic principles before building to more advanced techniques that can be applied to a range of different products.
In this class:
- Product photography: How to photograph a perfume bottle
- Product photography tips
- How to photograph with multiple studio lights
- Lighting setups for product photography
- Using reflectors and flags
- Minimising reflections in glass objects
- Creating a composite image
To see how Karl retouches this shot, check out Perfume Bottle Photography | Post-Production for this final image.
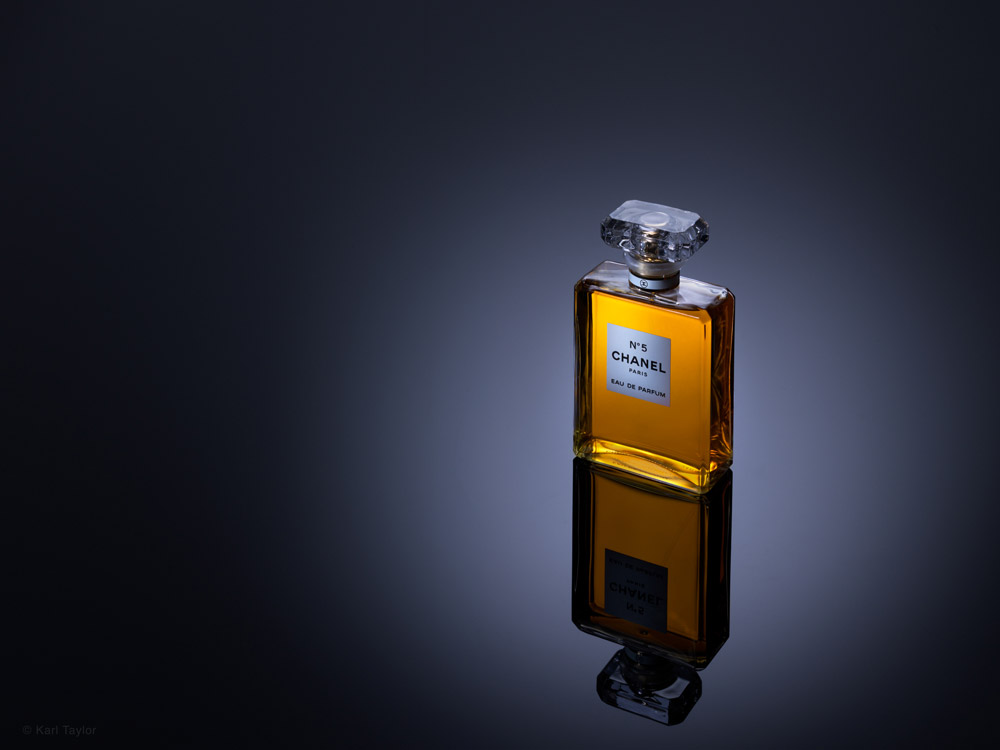
© Karl Taylor
Comments
Si I have few Questions.
I am not getting the perfect light reflection on the black acrylic. I think Iam doing a mistake on selection of the reflector bowl and grid. Can you provide me the link of the tutorial which shows the effect each size of reflector bowl create with different grids. I only have a 21cm reflector bowl and 10°, 20°,30° grids. I use Ellinchrome lights mono heads 400wats and don’t have power packs.
I have seen you use a lot of pico light , Projection attachments for many of your jewelry and cosmetics shoot. Can all of it be done If I have only 2 Shoots the normal ellinchrome ones with a 10° and 20° grids attached to it. Actually Ill not be able to afford frenal and projection units now.
Hi Igosh, you should consider trying it without the grid and also putting a piece of diffusion material inside your grid (before the grid). The glow behind the bottle is the result of the light on the wall which if it is a good smooth matt white then it should not be a problem you just need to control the size of the glow on your wall which can also be done with the distance of the light away from the wall.
Hi Karl,
love the tutorial, however, I am unsure on why the light you used to light the template did not make a difference to the rest of the image. It looked like the flash was aiming straight at the to of the bottle so expected to see the bottle top get brighter but it didn’t. Also, I thought it would make the black acrylic brighter but again, it made no difference!
cheers,
Nathan
Hi Nathan, simply because it only takes a low power of light relative to the rest to make white paper white. The black acrylic is essentially a mirror and will only reflect and image of the light source from the angle in incidence which was the back wall, it would need a huge power of light to make any difference to that from the angle it was being lit. And if I remember correctly the light on the white also had a grid so less spill on anything else.
Nathan, Karl multiple times explained why its not happening in the video itself. I suggest watching it again from the beginning.
One of your best tutorials, brilliant!
Hi Karl,
I have watched one of your Whiskey shot where you put a golden card behind it, I was thinking is it ok to add a golden card behind the perfume, like Chanel no.5?
Hi Ahmad, your only concern is really if it is going to change the natural colour of the product too much. It’s very easy to test with silver and gold.
Amazing! The last question, Do you recommend using a continuous Light for shooting the brand logo or label? since I cannot afford the Pico Light right now, such as Godox S30 LED and SA-P Projection Kit it has blades or what they call it Framing Shutter, my concern is the flash/burst light vs continuous light when shooting the labels.
Hi Ahmad, there is no problem mixing the two as long as you work in a completely darkened studio.
first of all thanks for the great class, i have question regarding cutting the paper, why you didn’t use this technique in the whisky shot? or why you didn’t do the whisky shot technique in the this shot, i mean why you used different techniques in both shots,?
Hi Fadi, the answer is down to the different amount of reflection required through different amounts of liquid.
Hi Karl!
Another amazing lesson!
My perfume bottle is shaped like a cylinder.
The label is black glossy and has a gold inscription.
I can’t evenly illuminate the label with the projection nozzle. Only a thin part and one of the letters is reflected. What ideas do you have about solving this problem?
Respectfully,
Alexander
Hi and thank you, you’ll find the answer to that in part 2 of this lesson where I show how to make the clinique logo black or silver. https://visualeducation.com/class/clinique-style-advertising-photography-2/
Hi Karl. Is there an alternative to the pikolite and the attachment if I am using Elinchrom lights? Or do I just need to stick to the snoot with a grid?
Hi you’d have to search for projection studio lights to see what’s out there. I believe there was one that you attached a canon lens to and then created your own gobos.
Hi Karl!
I just have to thank you for all the inspiration and knowledge you share.
I have one question. When you make the paper cutout, you put the mobile light in front of the lens, to cast a shadow.
so my question is if you knew you could shine the light through viewfinder,
and in that way get an accurate and sharp shadow.
My colleague showed it to me on his camera (Hasselblad H4). He belongs to the old-school photographers from the film era. he said it was a very good and useful technique and they used to do it back in the day.
Hi Yes Jonas you can do that too, not sure if its as bright though or as sharper shadow?
Hi Karl!
this was just a curiosity question, in case you knew this.
Actually, I don’t know.. He just showed me that it works.
but we never made any direct comparison of the two methods.
But from what I saw, it looked really good
have a great weekend!
Best regards Jonas
Hi Jonas, sorry I didn’t understand what direct comparison were you looking for? Thanks.
Hi Karl! What a brilliant video! I was blown by the paper cut out for reflecting the light.
If we were shooting a video instead of a photo where the camera physically moves a slight bit – maybe a pan, or even a dolly/physical move, how do you think we can achieve the liquid glow then? Would you then be hitting another light on to the wall for just the liquid bit with another light source?
If it was video you may have to rely on a silver or white card taped directly to the back of the bottle.
Thank you as always, Karl. Can you tell me what is the brand and model of the geared head you use to mount your camera on the monopod. There are so many options and I wanted to know, since you use them so much, which is your favorite. Thank you in advance.
Hi Marty it should say in the equipment list on the lower right of each tutorial page. But it’s a Manfrotto 410 geared head.
Hi Karl! Thanks for learning. I have one proposition. I think what I improved position of flashlight from this video. It should beam light through the viewfinder. As for my opinion, it is much comfortable than in front of lens. What do you think?
Hi Vitalii, backlighting your subject is often what makes great lighting as long as you also consider the fill lighting.
You misunderstood me. I said about using lightning from your phone and cutting paper behind bottle.
Hi Yes, if your camera has a prism that seems perfectly feasible.
I got it. Great! Thank you so much.
Regards,
Brigitte
I am doing photography as a hobby.
I got a question concerning the shooting of the chanel perfume bottle.
As I cannot afford a broncolor Picolite Projection Attachment – what else could I do to illuminate the lable of the bottle? I could use a torch, but if I use flash light and cut off the daylight it wouldn’t be of any use – I guess. Furthermore the colour of the torch light would not be the same. Do you have any hints or suggestions for me? Thank you very much.
Regards, Brigitte
Hi Brigitte, please watch this video and it will give you another idea 🙂 https://visualeducation.com/class/06-duck-legs-confit-with-potato-gratin-and-mushrooms/
Hi Karl, First month member and first time commenter here. Your clean, concise method of teaching has helped me immensely – many thanks!
As a product photographer, I’m drooling over this picolite. I’m already invested in Profoto and they have nothing that matches the control of the ‘Pico’. Dedolights seem fantastic at spotlighting. But as a tungsten light, I obviously would have to color balance with gels. I’m told the proper way is to gel the larger output – the profotos – so you don’t limit the dedo’s intensity. But adding gels on the 5+ strobes that have already been set would be a major hassle plus could knock a few lights out of position. Do you have any tips with this approach? I’m also not sure which CTB/CTO’s (i.e. 1/4, 1/2. full) to correctly balance the temperatures. I shoot jewelry, cosmetics and other highly reflective surfaces so color precision is essential. Do you suggest a method?
Kind regards, Mickey Kerr
Hi Micky, thank you for your kind comments. From what I can tell https://www.youtube.com/watch?v=MnlBH1jjpCw the Dedolights have a projection attachment you can simply put a colour correction gel in front of the projector part leaving a small airspace and you’ll be fine, if your correction filters are glass then even better but not necessary. You will need to find the exact colour temperature in Kelvin of the Dedolights, i’m guessing they will be around 3200-3600K and then you will need to consult the Lee Filters website for the conversion filters http://www.leefilters.com/lighting/technical-list.html it look like the 201 Full CT Blue will be close. Looking at the end of the Dedolight it look like you could easily get your local metal shop to fashion you up a metal ring that you could stick your gel on and had and extension clamp that clip to the projection part, that way you could attach them before you even positioned the lights. Cheers Karl.
This is fantastic! Thank you, Karl, for the detailed and prompt reply. Cheers!
Hi Karl,
What a great tutorial!
Thank you 🙂