
Photographing Clear Liquid Bottles (Gin/Vodka)
Wondering how to make bottles look beautiful? All will become clear…
Discover a host of clear bottle photography techniques that you can easily and effectively try out for yourself!
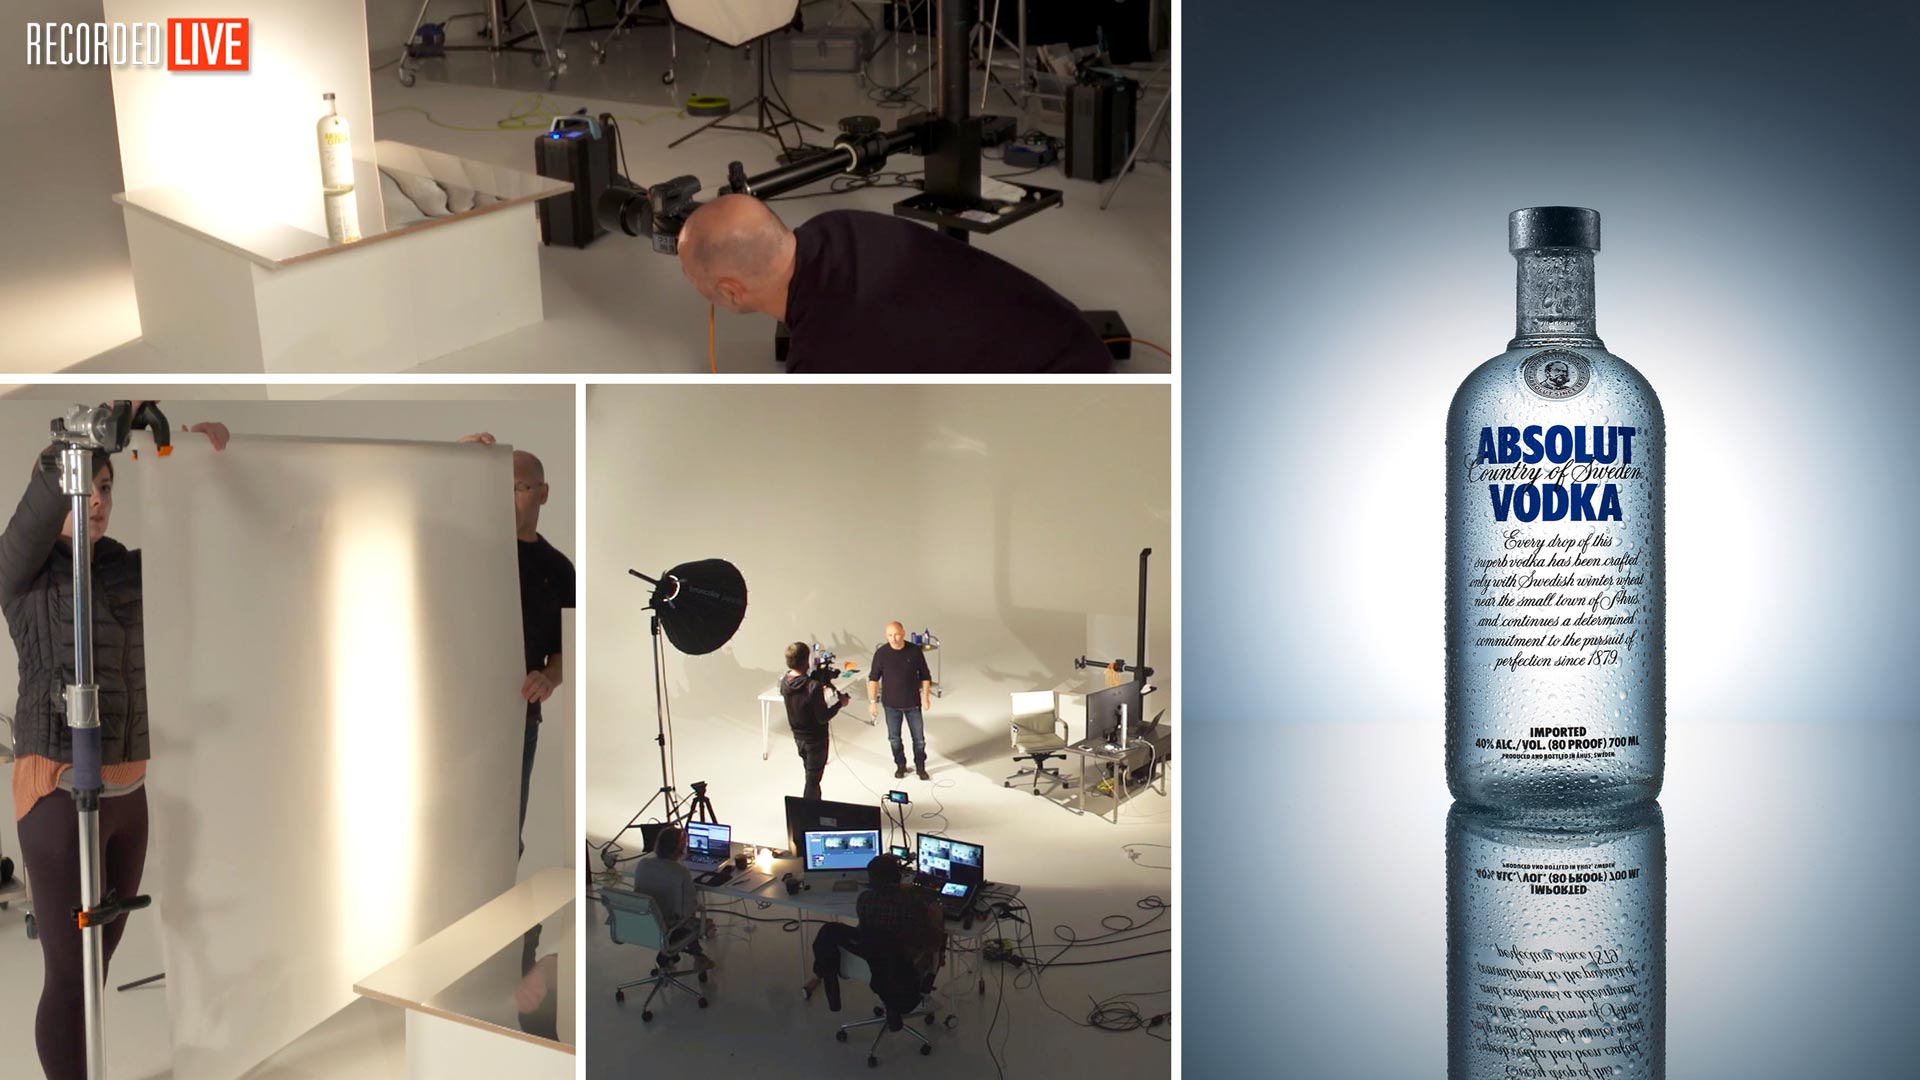
Learn from a pro as Karl shows you step-by-step how to light and photograph bottles of clear liquid such as gin or vodka.
You’ll discover how to achieve perfect condensation to create that cold, desirable look. Learn which backgrounds and base surfaces work best, and how to light the product beautifully using just two lights.
You’ll also learn how to incorporate additional lights to highlight the label and reduce unwanted shadows, further enhancing your shot.
Simple steps for photographing clear bottles:
- Prepare the bottle – This includes cleaning the bottle and creating controllable condensation
- Select the background and base surface – These will have a big impact on your overall image
- Light the product – This can be done using just a few lights with basic modifiers
- Photograph the bottle – Determine your composition and camera settings
If you enjoy this class, check out our Whisky Photography and Wine Bottle Photography classes. You can also find tips for creating your own perfect condensation in The Perfect Pint and Condensation Cold Look.
Questions? Please use the comments section below.
Comments
I’ve been coming back to your videos to improve on my efforts. I’ve also circled through the Post videos to improve, and I have improved. I have tried many things including introducing rim lighting gels to add hints of atmosphere perhaps adding to the narrative. I have been focused on bottles and cans to really repeat and learn so my approach becomes more intuitive. However, your videos don’t seem to directly have examples of cans. There is the coke can proof you will be doing, plus the chrome product videos, but I would like you to think about creating a can specific video which looks at the swing of different representations in advertising. Beer and pop sometimes are represented very wet and icy, sometimes dry and pristine.. some are highly metallic and shiney, some more matt and highly printed or patterned, and some quite mixed with highly metallic copper, gold or chrome bits with other elements which may be matt or satin. I’ve tried several setups to control the reflections and sculpt a 3D shine but I would love to see your approach. If you could think about what is missing from your classes concerning cans and put a class together concerning this subject I would be grateful and very interested.
I have made projection attachment to fit Bowens S Mount which allows you to use a “S Type” adapter to use speedlights as well. I can modify for Profoto or Broncolor as well.
Karl, you are a genius with lighting. If I use speedlights can I go with 3mm frosted acrylic? Obviously opacity impacts the power of the light. I use speedlights because my set up is almost a mobile studio, I can shoot on location.
Hi Raj, yes you should be OK with 3mm acrylic. If you are using it as the background behind the bottle then it is better if it is frosted acrylic on the side facing the camera so that you don’t get reflections from the surface from your side lighting. Also if your speedlite is the background light and it is a rectangle shape speedlite then you may need to create a round hold through black card with a piece of diffusion material so that the light coming through the acrylic looks like a circle.
Thanks for another awesome video tutorial, Karl! One question that I had when you were describe the model light that Ashley was putting into position and controlling was this: What purpose does the flash serve in a shot for which the same model light provides continuous light? That was confusing to me. Remember, I’m a beginner.
Hi, the continuous light does not record in the picture only the flash does. Please see this classes to understand why: https://visualeducation.com/class/shutter-speeds-and-apertures-to-flash/ and some of the other classes in this section will help you too.
FYI https://strobepro.com/products/strobepro-optical-snoot, I got this as a xmas present for christmas 2020, it comes with a number of gobo’s and is quite good once you get handle on inserting the gobo and rotating the body to get the correct orientation. I use a canon 50mm F1.4 FD lens for the optics.
Hi Karl – I’m doing some studio shopping and noticing that the acrylic sheets are super expensive. £79 for
size A0… and I think the ones you use are about A0 + 50%! so must be £100+ a go? Any tips on where to source these? If i’m going to get a good selection to play with, this is going to be some serious $$
Thanks Karl!
Great tutorial. Full of fantastic tips. May I ask what the dimensions are of the frosted acrylic sheet? I think you said the thickness was 5mm but missed the length and width. It just seems like the perfect size for starting out using that material.
Thanks
Thank you, this piece is about 90cm x 150cm.
Hey Karl, used the varnish, sprayed on the liquid glucose (in Canada, it is a Crown product called lily white corn syrup). Prepped several glasses, a beer bottle and a Vodka bottle. I started with the vodka which is a local product, nice frosted glass with ink printed directly onto the glass. A couple things I noticed.. I sprayed on nice drops, but in photographing them, I felt they looked a too slight.. almost unnoticeable. I decided to add additional spray and increased their size which seemed to present no issues. Frankly, I thought the drops needed to look too much to the eye, so when they were photographed they appeared more natural. That surprised me a little because as I assumed what I can see would be captured true. However, I think the frosted nearly white glass was the issue. It presented some real issues to light. I tried many positions with the lights (the back light behind frosted plexiglass, side lights with and without soft boxes/scrim, plus a top light snooted), yet the bottle persisted in looking somewhat opaque. I was trying to give it that feeling of glow, plus I wanted the best definition on the drops giving them a 3D pop. Because of the frosting, would you approach the bottle lighting from behind a little differently? I few places on the bottle looks wicked, but in other places less so. I posted on instagram https://www.instagram.com/p/CPZzA_oNqsC/
I’d say the results are looking good. I’d probably want a bit more contrast in the bottle in regards to the central glow and then the fall of on the sides of the bottle. This is controlled from the intensity of fall of in the background and how quick it goes dark out to the sides, distance of the subject from the background also has an effect.
I tried a slightly different approach using a dark background and a silver card behind picking up some light bounced from the side. With the frosted glass this gave me more control on the contrast within the bottle. Instagram: https://www.instagram.com/p/CPbZxpItCpB/
Since the Vodka is called Shadow in the Lake, I added a puddle of water on the stainless to liquify the reflection, although much of it is outside the crop in that image. And I added a light, less glow and more hinting at a spotlight casting a shadow on the background .. seemed to fit the brand. I should have this convo on facebook group.. but I thought I would keep this subject string intact.
hello sir , if i don’t have a scrim like you to diffuse, can i use acrylic sheet as a substitute of scrim?
Hi, yes acrylic sheets are very good diffusers.
Hi Karl – Just joined and having watched this tutorial would like to know if a piece of Silver/Mirrored Acrylic/Perspex would work instead of the polished metal sheet.
Thanks
Fee
Hi Fee, thanks for joining us. Yes acrylic mirrors work well for this.
Hey Karl. How are you? I have a huge doubt about lights and If you can answer two things about it and make clear for me I will be really thanksfull. ✌️
I’m planning to start my own business of product photography (E-commerce & Still) and product video but I don’t have a huge budget to get start and I wanna get the right lights like this I could work in photography and video without problem.
My huge doubt is
If I take continuous lights for video and for E-Commerce, could I use the continuous light for the still photography? One example for make this Absolut picture. Could I make this one with continuous light too?
I know the continuous lights are not strong as flashes but I’m trying to at least for the begin buy 3 continuous lights 200w for work with all 3 types of job together. (E-commerce, Still, video and maybe 360) can it work?
Thanks ✌️
Hi Guigo, I’m good thank you. You wouldn’t me able to make the absolut splash style shot with continuous light, well not to the highest quality, but you can use good continuous lights for still life work, but you need to work in a darkened studio space. There are some extremely powerful LED lights from Apurture that I could make work for splash still shots if I was using them through scrims but there would still be limitations. Check these videos to for more info:
https://visualeducation.com/led-photography-lights-comparison/
https://visualeducation.com/class/how-to-use-continuous-led-lighting-for-packshot-photography/
https://visualeducation.com/class/understanding-flash-duration/
Hi, how did you get rid of the big A on the back of the Absolut bottle? Thanks
Hi Barry, is this question for Guigo or me, as I’m unsure what big A on the bottle you are referring to.
Hello Guigo,
I thought about this often. Of course, the consensus is that strobes are much more powerful than continuous lights. But, I still couldn’t relate.
So, I put my aputure 300d at 100% power, with the included reflector, and took a picture of a bottle, from 3 to 5 feet away, in the studio. I left shutter speed at 1/60, and closed my aperture until I had what I thought was a good exposure; closed to 7.1 on a 35mm camera. ISO stayed at 100.
I then repeated with a 400w strobe and with the aputure reflector. This time, to shoot at 100% power, everything else being equal, I left the aperture at 7.1 and I reduced the shutter speed until I got the same ballpark of exposure as the aputure 300d. I had to turn High-speed sync on. I counted 5 stops of shutter speed (from 1/60 to 1/2000).
For me, while not ‘scientific’ it gave me the comfort level knowing that a 400w strobe is 5 stops brighter than a 300w continuous led.
I hope that helps!
Thanks a lot man. ✌🏼 I really aprecciate it. In the end i took 3 GODOX FV 200 (continuous) and 2 GODOX DP 600 III. (Strobe). Now i’m kind of in the safe zone and i think is pretty much enough to start. ✌🏼 Thanks a lot
Hi there, sorry for the silly question but I am not able to find any Frosted acrylic sheet for 5mm, could you link a possible source? i am only finding 3mm or perspex opal but not sure if the effect could be the same….
Thanks.
Angela
Hi Angela, in the UK I get a lot of my acrylic from these guys – https://www.theplasticpeople.co.uk/frosted-acrylic/
Hi Karl,
I really love product photography, getting into it more and more, thanks for all your work.
My question :
I find the text reflected on the metal going a bit strange.
Could we have a straight text ? like without distortion?
It’s this coming from the position of the bottle?
I hope that I am clear enough, I don’t have the words in english.
Thanks
Hi Cecile, which text do you mean? Vous etes francais?
Oui, bonsoir Karl, nous pouvons parler français, oui oui 🙂
I speak about the text of the bottle reflected on the metal.
It started around 1:16:30, when you switch bottle, the text reflected is strecht (IMPORTED), and then around 1:31:50, if you look the reflexion on the down part of the pic, on the Bombay bottle, I have the feeling that the reflexion of the bottle on the right side is curve and not straight anymore.
Is it coming from the position change of the camera, a different angle with the metal ? or from the ND filter , I guess not.
Merci beaucoup et bonne soirée
Bonjour Cecile, mon français n’est pas terrible, assez pour comprendre mais je ne pouvais pas parler de politique! Ma femme est française donc elle peut traduire si nécessaire
The distorted reflection is simply because the metal had a dent or bump in it.
Merci pour votre réponse, et bonjour à votre femme
Always take a metal without bump then,
And I would like to say thank you to share your knowledge in a so nice way. I hope one day I will master the light like you do.
Cheers
Merci beaucoup!
Hi Carl.
Why is your back so bluish? When i tried to shoot some today it got gray background it it looks very simulary. Is your background plate so much bluer then standard?
And how would you make background a little more blue as it’s a nice colour contrast to yellow. Would you just gel you light ? If so how would you control that the light wont’t get to strong blue?
Hi Per, I noticed with this particular sheet of acrylic it had a bluer tinge, this was a frosted sheet of acrylic that maybe just had a slight tint to it but it wasn’t intentional but yes adding a very weak blue gel on the light would give you the same result.
HI
I was the assistant back in the late 80s working with the photographer on Absolut advertising.
I can reveal the actual techniques to shoot the ads. I know this is a generic tutorial, but I can say the techniques and materials used are quite different and specific than what you are showing. You can never duplicate the look and feel of the ads without the actual materials and equipment used.
What you are showing is correct for a generic bottle shot, but not how it was actually done.
Just FYI
Thanks for the info, it would be great to hear your story on how they approached it. Every photographer is different and I know the Absolut shots have been shot by a number of different photographers over the years and some of it now CGI. All the best Karl.
I apologize. I meant to type I can NOT reveal the techniques. But if you go to the photographers website you can see BTS on some of the images we worked on.
Look carefully and you may see what was done.
Bear in mind this was film and everything was captured on a one sheet of film.
stevebronstein.com
Thanks for the info, yes I’ve seen his work before in some books on photography back in the day.