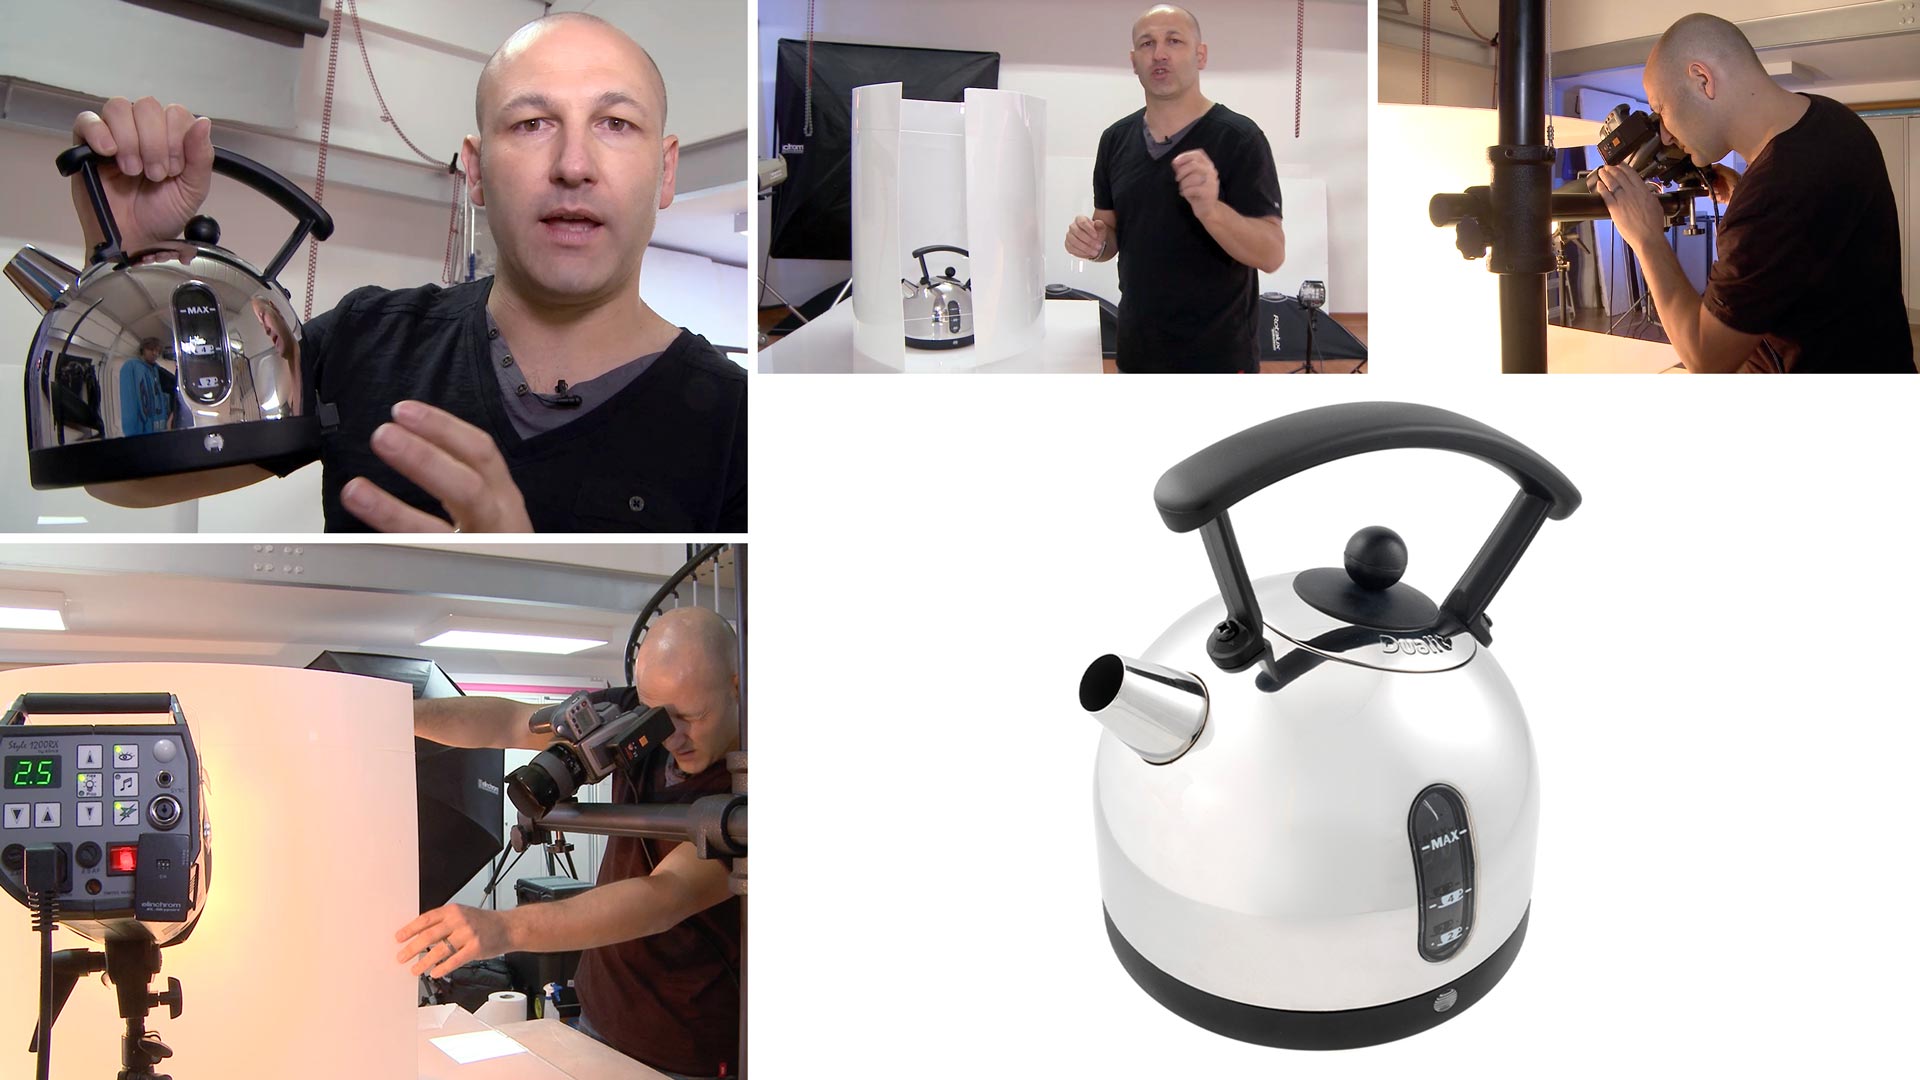

Shiny Chrome Kettle Photoshoot
Shooting curved, reflective objects is a complicated task! Retaining that metallic feeling while avoiding unsightly reflections can be a real challenge.
In this class, Karl demonstrates a simple DIY lighting-equipment solution that you can easily make yourself. Follow his step-by-step workflow and discover how he builds up his lighting to maintain that lovely metallic look on the subject while controlling and removing unwanted reflections in the metalwork.
In this class:
- How to photograph reflective objects
- Techniques for controlling reflections on shiny objects
- Lighting setups for product photography on a white background
- How to balance multiple lights
- How to control light by adjusting the distance from the subjects
To see Karl’s retouching process for this shot, check out Shiny Chrome Kettle | Post-Production.
If you enjoy this class, you may also like to watch Jewellery Photography – Rings and Zenith Watch Product Shoot.
Questions? Please post them in the comments section below.
© Karl Taylor
Comments
Is this useful for jewellery photogrpahy
Hi Akansh, yes it is very similar principles but also watch some of our watch photography tutorials including the live show replays.
Hi Karl,
Would you have any tips on shooting reflective letters on a curved container? I have these protein powder containers that I have been trying to shoot with a gradient from left to right, but the lettering keeps coming out very white, rather than metallic looking. I have tried shooting the containers in a light tent and adding a silver card, but nothing seems to be working. I would be extremely grateful for any help!
Thanks!
Hi Nicole, gloss metal is always a tough one but I would recommend a large scrim/diffussion material as close as possible to the subject and then experiment with the light (bare bulb) a few inches behind and then vary the distance. Alternatively a two light set up, one for the general scene to get the overall exposure correct but without lighting the letter so more indirect lighting and then adding the scrim for the gradient in the letters with just a very low power light.
Hi Karl, the objective is to obtain a shot of the spoon from the top, with a transparent colored liquid inside (think cough syrup). For this, I’d like the spoon to look a little shiny (but without any harsh black lines) with a soft gradient toward the edges, and with a nice highlight in the middle so the syrup doesn’t look dark. Attached are two examples I found that resemble a little what I’m trying to achieve although my spoon doesn’t have that antique feel. Attached is a progression of what I have been able to achieve so far. The highlight in the middle is still too harsh, and the spoon looks like brushed chrome rather than shiny silverware. I’ve tested with a scratched old spoon, but the final one I’ll use will be new and spotless. Any help would be greatly appreciated. Thanks!
Hi Thanh, I emailed you the answers to this, thanks Karl.
Hi Karl,
Would you have any tips on how to shoot a reflective and curved object, from the top, such as a spoon, facing upward? I’ve created a tube of diffusion around the spoon, put a lid of the same diffusion material on top with a hole in it for the camera lens. I then lit from the top (behind the camera), but the result is not totally convincing. I’m getting a gradient from the middle of the spoon to the outer edge, but the center of the spoon is a little hars, and the outer edges of the spoon are not contrasted enough. Any insights? Thanks
Hi Than, my first question would be ‘how do you want the spoon to look and why?’ I believe there is a solution for most image requirements but first we need to be clear of the objective and the reasons behind it, then we can work on the physics of how to do it. Do you have a picture example on a website that you can link to of the look you’d like to achieve?
hi. is the below reflection of the kettle acceptable? can we shoot with gradient all over?
Very Good and perfect lightening …………… love your work
Hi Karl, great work. Instead of trying to bend Perspex would it work the same if I create a tube using tracing paper?
Hi David, yes any form of uninterrupted diffusion will work.
Hello Karl,
thank you for the video.
What is the difference between perspex and Lee 216?
How do you decide which one is better.
Thank you
Hi Roberto, Perspex may be slightly better but it has disadvantages in that it melts very quickly if the modelling lamp is too close to it. It’s also heavy. It’s advantages are that it’s rigid so for small to medium sizes you can use a sheet without having to make a frame for diffusion 216. Other than that not much difference I use both.
Hello Karl! Would it help to have a large soft-box behind the camera as well so the black spot on the kettle is limited to only the shape of the camera and the stand?
Hi Gurushankar yes as long as the additional light doesn’t create a problem for your subject. Alternatively you can take a white piece of foamboard and simply cut a whole in it for the lens and put this in front of the camera.
I would have been there a month trying to work that one out, an ingenious solution. Once your lights are in place, as you want them, why don’t you turn off your modelling lights? I tend to turn mine off once I’m set up and know where the light will hit, am I doing it wrong?
Yes that might work but you would get lines where the polyboards meet and the gradation would change at those points.
What if a sort of tent could be made of Poly Board large enough to bounce light on spots of the board Like shooting a car so more tonal graduated fall off could be attained Also maybe using spot grids on the bounce lights so clean fall off can be controlled What do you think?
Thanks
Very Good
I would really want to learn how to shoot silhouettes of the wine bottles on a dark background too (if I may). I’ve tried some on my own, but can’t get this beautiful and smooth gradient of the rim-lights of the bottle even using big diffusors. Thx
Hi Vadim, if you visit the ‘live shows’ page and check the schedule you will see that is coming.
Thank you Vadim, I have also have some new methods for shooting shiny jewellery and metal objects that I will be sharing in future courses here on KTE.
Fantastic work!