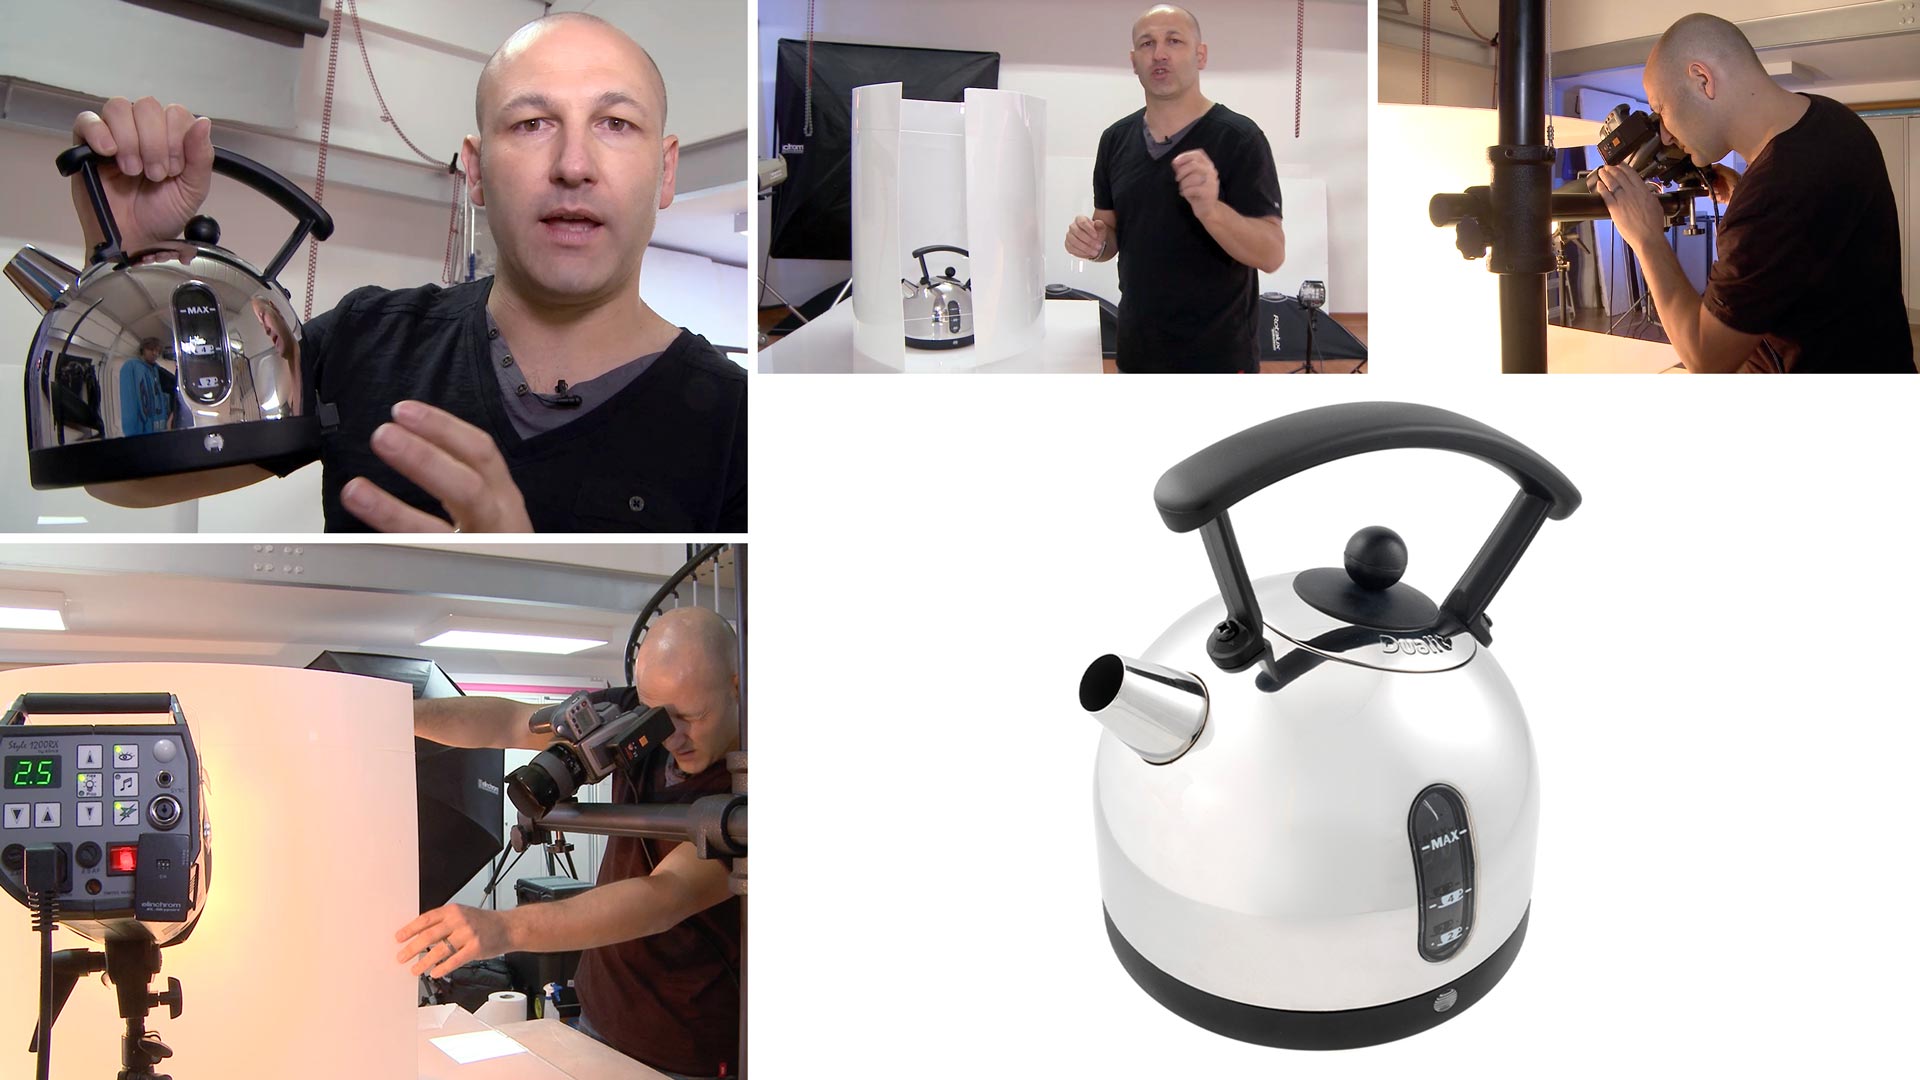

Shiny Chrome Kettle Photoshoot
Shooting curved, reflective objects is a complicated task! Retaining that metallic feeling while avoiding unsightly reflections can be a real challenge.
In this class, Karl demonstrates a simple DIY lighting-equipment solution that you can easily make yourself. Follow his step-by-step workflow and discover how he builds up his lighting to maintain that lovely metallic look on the subject while controlling and removing unwanted reflections in the metalwork.
In this class:
- How to photograph reflective objects
- Techniques for controlling reflections on shiny objects
- Lighting setups for product photography on a white background
- How to balance multiple lights
- How to control light by adjusting the distance from the subjects
To see Karl’s retouching process for this shot, check out Shiny Chrome Kettle | Post-Production.
If you enjoy this class, you may also like to watch Jewellery Photography – Rings and Zenith Watch Product Shoot.
Questions? Please post them in the comments section below.
© Karl Taylor
Comments
Hello Karl,
at the time i have to shoot a curtain rod that you can attach without drilling. the main problem is the 1m length, which is why it is a bit more complicated to shoot the glossy (chrome) rod. Do you have some Ideas for how i could build up my set up, so that the full rod is visible in the frame. The Rod is avaiable in 3 Colours, which is why it would be very helpful to change the rods without having to change the whole set up.
I am really interested to read how you would go about it.
looking forward to receive a response from you.
Best regards
Selim
Hi, are you photographing the curtain rod in place on a wall? If so then the white ceiling above can be used to bounce light from just block the light path from the flash so that it doesn’t directly strike the curtain rail and it only hits the ceiling.
This is fantastic Karl, like all your other tutorials! thank you so much! I am shooting now highly glossy beauty products for a client and it has been quite challenging to say the least…. This course, has helped me a lot. Due to time constriction, I created a similar set from a heavy Savage plastic roll and it worked well too. Excellent tutorial!
Hi, glad it helped. Also check our Jewellery ‘Rings’ shoot for a similar technique.
I sure will! Thank you again!
Hi Karl,
Thank you so much for this tutorial. Recently, I did the photo shoot of a perfume bottle and the cover of the bottle has the similar shiny reflecting property as the kettle. I am seeing my own reflection, all the lights, and other small details. I wish I could see the post production process of how you fill the missing area and final result.
Hi, Thank you. Also see the Clinique product shoot and post production that will help you with some ideas.
Thank you so much. These tutorial are really helpful.
Excellent Karl, thank you! I am shooting glossy, translucent pieces for a new client and it has been hell. lol This course, along with some of your other courses have helped me tremendously.
Great to hear Robin.
Hi Karl,
I really loved watching this kettle shot, I am wondering if there is a way to get the kettle to look more reflective and glossy?, I do understand that the job is pretty much to take away the reflections that is visible on the highly reflective surface but is there still any method of having the end result showing that the item is glossy as a mirror?
Thank you very much
Hi Joseph, If you stop and think about it there is no such thing as glossy as a mirror. A mirror is essentially an imaging device that simply reflects it’s surroundings a polished kettle also does the same except with fish eye lens properties. Often a technique we use to induce a sense of artificial ‘normality’ is to place black strips of card to reflect as black lines in our highly reflective objects.
Hi Karl, thanks for the amazing tutorials. Do you have any tutorials on how to shot glasses as a pack shot? (behind a white background)
Hi Rayan, not sure we’ve done so many but also check our previous live shows as we’ve done some on glasses and some on packshots
Sorry- I wrote this question twice thinking it hadn’t sent!
Hi Karl, I’m really struggling photographing golf clubs (drivers with lots of logos and embossing). I’m using 2 scrims and a 2 light set up- bare bulb, but I can’t seem to get the gods of reflections, highlighting and detail to align. Do you think the kettle set-up would be better? Many thanks, Lucy
Hi Lucy, that’s a difficult question with not seeing what you are doing. Maybe post the image in the Facebook members group and if I get a chance I can take a look there. The kettle setup is definitely good for spherical objects because you have a continuous light shaper but you should be able to achieve something similar by creating a wrap around of scrims.
Hi Karl, I’m really struggling photographing golf clubs. Do you think this would be the setting to tackle it? I’m currently using scrims and a two light set up, but I can’t get the lights and reflections looking right. Many thanks, Lucy
Karl, what would be the best option if I need to take multiple still life photos of objects and food for stock photography, needs to be with pure white background and diffused shadows.
What shape and size of a soft box is the best for this? What type of material for non reflection? Do you think a still life table is worthy? or maybe creating a backdrop with another softbox? I dont have the studio size to illuminate my walls for this.
Thank you so much for sharing all your amazing work!
Hi Paul, thank you for your kind comments. With regards to your question I will be happy to answer it if you still feel you need it but I would really implore you to watch these sections in the order below first as you will then know the answers for yourself much more confidently, come back to if you have any questions:
https://visualeducation.com/class/introduction-and-understanding-light/
https://visualeducation.com/class/lighting-modifiers-and-their-effects/
https://visualeducation.com/class/pack-shots-product-photography/
Hello Karl
Perchance, are there any images available online showing the lighting build up, where we can see each light added in separately and what it is doing? I’m assuming probably not but I’d thought to ask anyway. Thanks in advance.
Hi Tim, in this very similar one and technique yes: https://visualeducation.com/class/jewellery-photography-rings/
Hi Karl, Fantastic Videos compliment for your amazing Works. I want know what is the material of that white Panels? Background and the base? Thank you so . much.
Hi thank you. That will be white foam board.
This looks a perfect solution for our metallic cookware, so am keen to give it a go!
How thick is the white perspex you are using?
Hi, I use both 3mm and 5mm it doesn’t make a huge difference for this sort of thing, the 3mm is easier to bend though.
Thanks Karl. I am going to try 3mm for the ring and a thicker piece underneath.
Do you have any advice on how big to make the ring – this looks a bit over twice the size of the kettle and around 70cm high in the video.
Hi Neil, the bigger the better in most cases as you have more shooting space but it will all depend on what you are shooting. Yes 5mm solid white for the base is a good idea, probably worth having a gloss and a matt version.
Hi Karl. I am shooting shiny metal sculptures using scrim and diffusers etc. The sculptures have mostly soft curves so the graduated light is working really well but where the sculpture has a prominent high point or feature, the curve is very acute and I am getting some nice specular highlights in this area which is the look I want. My aim is to create some sparkles on the very tips of some of the curves to make accentuation points.
My question therefore is, can these sparkles be allowed to clip the exposure level (i.e. slightly over exposed ) to create the sparkly effect or should they never be allowed to be clipped and kept below 255 on the histogram?
Hi Peter, definitely sparkle highlights can clip beyond 255, in fact they need to or they will look flat. In reality if we were looking at the object those specular areas would be a direct reflection of the light and would be beyond white.
Is this useful for jewellery photogrpahy ?