


Landscape Photography at Sunrise
Getting up early to make the most of the best light may be difficult, but the result will usually be worth it. It is early in the morning that the light is usually at its most beautiful (and there are less people to disrupt your shot).
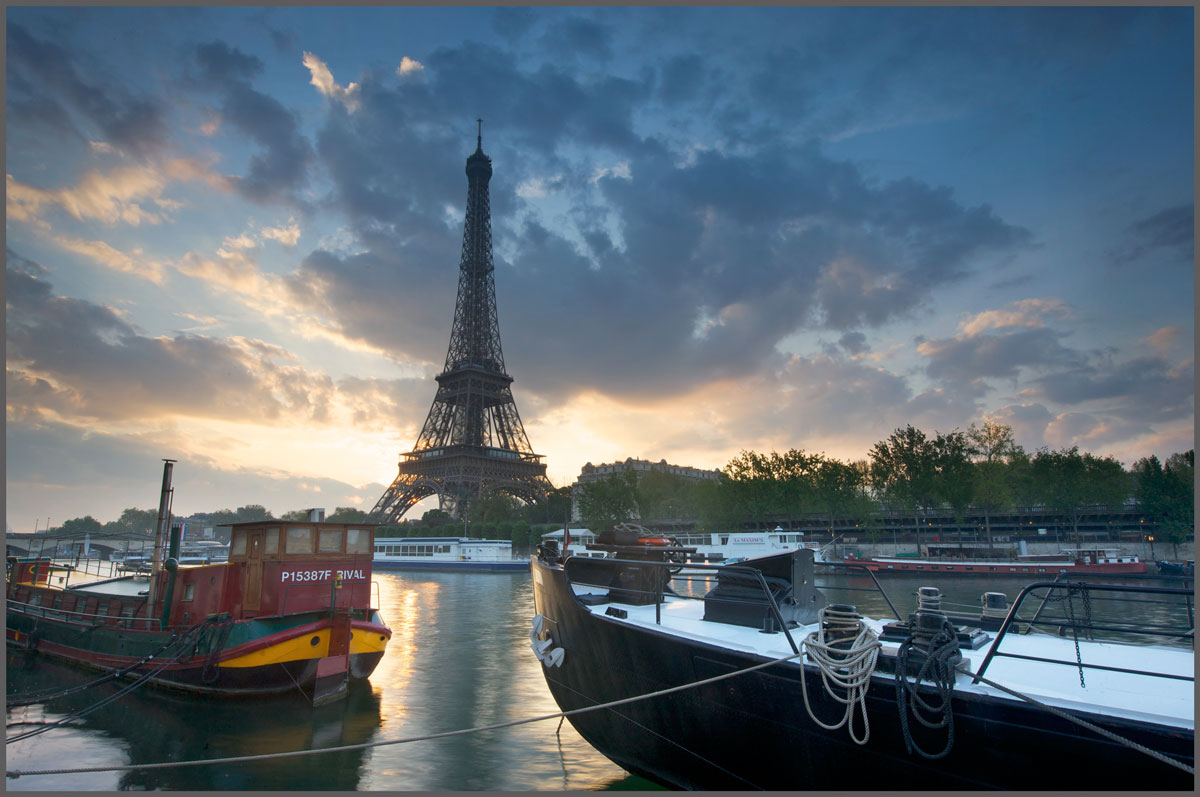
In this photography class Karl and the team head to two locations to capture a classic Paris sunrise shot – to Palais de Chaillot and along the riverbank below the Eiffel Tower. Here you’ll see just how important planning is and how it can allow you to make the most of the limited time before the light changes.
Karl explains how to identify great locations and control the light. He also reveals exactly what equipment he takes along for work on location and the cases he uses to ensure maximum mobility.
In this travel photography class we cover the following:
- Travel photography
- Planning: How to identify good locations for photography
- How to photograph at sunrise
- Camera settings for sunrise photography
- Useful equipment for photographing on location
If you have any questions about this photography class please post in the comment box below.
NOTE: This photography class is available with subtitles.
Comments
Hi Karl,
Was that a polarizer you had on your camera on an ND Filter ?
Hi, I’m not entirely sure as this is from 2009 but my guess is it’s just an ND filter if I’m pointing towards the sun as the PL will have little effect on the sky when facing the sun unless I was using it to depolarize other things in the scene. Generally my ND filters are 3 stops blocking of light whereas a PL will only block about 1.5 stops which sometimes is useful if you need to use it for that. The most useful filter though in this setup is the ND graduated filter which I would have been using here.
Greetings…!
It’s regarding wide angle lens …….12 /24. 16/35 18/35
Which set gives the best result and I have seen some of them in youtube use the above for table top shoot instead fixed focal …..the ultra wide or super wide or wide I thought it’s for wide landscape and street , architecture , forest area…..and so . And you have used fisheye which totally kills the wide perspective we don’t require a lens which completely distort the image .
And I have seen few photographer keep constantly striking the image on. 12 16 18 If it’s 18_35 they are not into 18 constantly .any reason behind
Another question I’m impressed by the beauty dish , will it work well with led lamps # jus asking .
From the clips what I feel is the strobe lighting system brings lot of uncertainty will take many years to master it …. speed light I’m not that happy with the outcome …I have seen few images of Joel Grimes he’s also a strobe guy he created some cow boy style fantabulous images ..
What I need …. piece of filled subway bread but all your lectures are like masterchef Australia in a very big scale & thanks
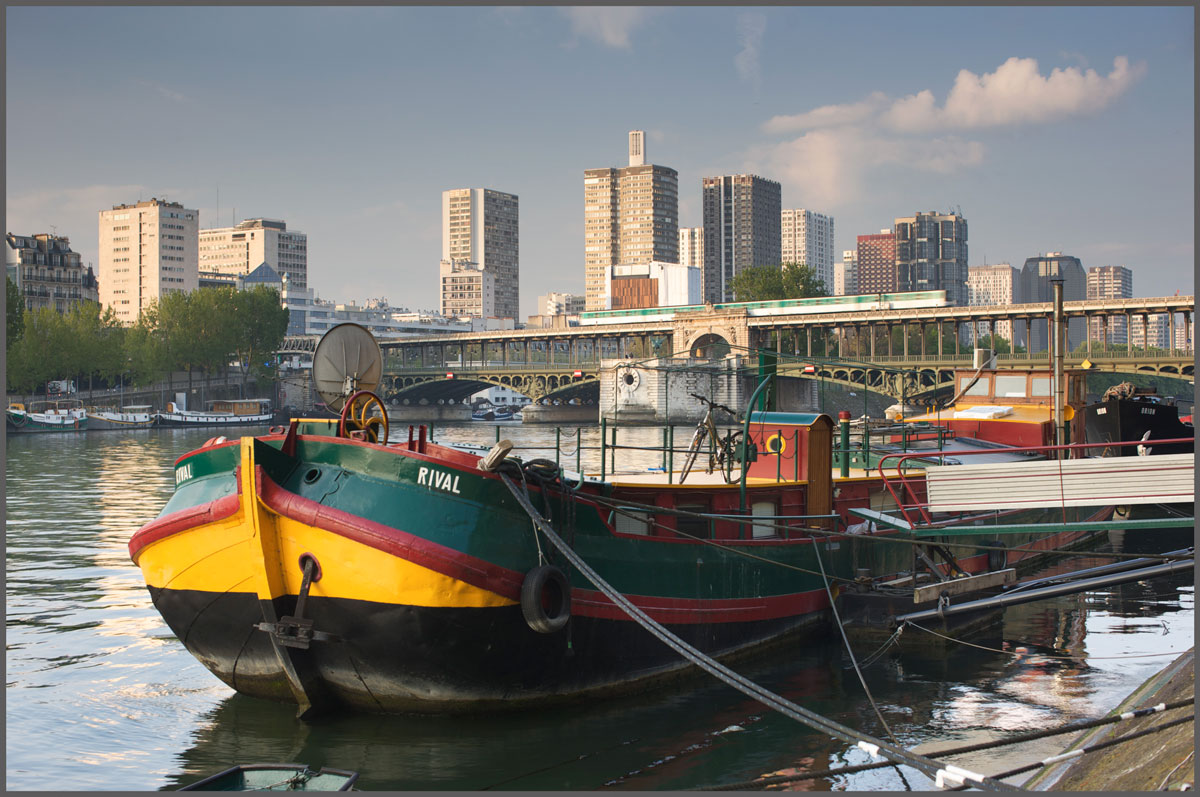
Hi Karl, I Just purchased your course and am watching the videos. I was surprised to see that in the 2nd photo (barge with yellow stripe and metro in the background) that the aperture was f:4. Because the train was pretty much in focus and yet so far away and the barge rather close, why wasn’t the train out of focus?
Enjoying this course so far. This evening I’m heading out to implement what I’ve learned.
Robert
Hi, because it was a wideangle lens and once you get past a certain focal distance the depth of field characteristics of wide angle lenses are much greater than standard lenses.
Thank you Karl, I’ve been outdoors this weekend practicing that! Thanks so much!
I’ve was taught to shoot in AV mode outdoors and now that I have been doing your workshops, I am practicing outdoors with Manual mode. I have always used manual mode in the studio and didn’t know I should use it outdoors. Do you ever use AV mode outdoors Karl? Or always manual mode? Enjoying your workshops!
Hi Tamarah, I only use manual mode for everything!
Karl, great advice about not fearing to use small apertures as F22 if required. I think a lot of weariness around this is online lens reviewers looking through a loupe at 200% magnification! In reality its barely noticeable.
What really isn’t too clear yet in essentials is metering. Would be nice to know when to use Matrix Metering (Nikon), also known as Evaluative Metering (Canon) Center-weighted Metering or Spot Metering in your thought processes.
I understand when you say ” ND grad filter in first as it is only affecting the sky and it will help the cameras light meter decide on a more accurate exposure for the whole scene” would probably suit Matrix/Evaluative though.
I am one day in to this and already 13 videos in – yes I am hooked. However, as a complete newbie what would be really helpful is if all the images you have created had the Aperture, ISO and Shutter Speed listed. This would give newbies a really good starting point to then adjust to meet there needs and conditions.
Hi Paul, I think that starts to happen in chapters you have coming up soon. Usually I mention the settings in the video and I think they are shown on final images at the end of certain the chapters. I’ll make a note though to review if or why they are not on certain chapters at the early stages of this course.
HI Karl Its amazing shot but there is a question What is the difference between polariser filter and ND Filter and ND Grad. Filter.
Hi Akansh, that is covered as you move on through the course.
Karl what model travel case are you using
Hi Lionel, that should be clearly listed in the equipment list on the bottom right here. But I can see it is not so I will find out who did that and fire them immediately!! Just kidding, it’s a 1510 pelican case. I’ll get the list updated. Cheers Karl.
Hi Karl.
You use closed aperture here, even 22 once. I’ve read that there is a point for each camera where if you close more than that you will loose quality. For example my camera is Canon 6D and its maximum diffraction free aperture is 10.5 . Should I pay attention on that factor or it’s not that matter at all ?)
Hi Anna, yes what you are saying is true but it is not such a big problem that it is often made out to be. I often shoot at f16 and f22 on good quality lenses it is fine. It does often depend on the quality of the lens and if diffraction occurs it looks like a slight softening of the image almost like a slight mistyness to the finer details. Easiest way to check is to set up a still life shot where you can control the light up and down in power and then run some tests from f4 all the way through to f22 etc and take a look at the results zoomed in at 100%.
Thank you, Karl. I’ve made such test outdoors at sunset near a busy road (and now I understand that there could be lots of reasons for bad quality )) and results were not so obvious. Great idea – to eliminate all distractions and concentrate only on aperture. I’ll definitely run that test!
What the bungee cord wrapped around your tripod and camera for
Hey, what kind of contraption was that on your camera? Did I see a new product, some kind of “Bunggy Cord” to hold down the camera. Does that help to keep the vibrations down? :)!
I am just kidding, have a great day.
RV
No it was just a strap I have around my tripod to keep the legs closed when I’m carrying it!
Thumbs up Thanks
Hi Karl,
Greetings from Costa Rica.
Because my monther tongue is not English, I don’t know if I missed from explanation in this video, if you explained how to set up the camara, speed and aperture, using the ND filters, taking into consideration the time during sunrise to get the best shots, I know you have to measure conditions of environment before using ND filters.
Let me know. Thanks
Hi Max, you can actually put the ND grad filter in first as it is only affecting the sky and it will help the cameras light meter decide on a more accurate exposure for the whole scene. But what I did here was simply determine the correct exposure for the foreground and then add the right strength ND grad until the sky is correct. We never know the settings other than say ‘OK i want f16 or f11 for depth of field reasons’ and then you work everything out manually from that point. To fully understand that process then go to our ‘Introduction course’ first. Cheers Karl.