
Understanding Digital Images
If you’ve ever wondered what the difference is between a TIFF and PSD file, what 16-bit means or which color mode is best for printing images, then this is the photography class for you.
Before looking at the Photoshop interface and main features and controls, it’s important to understand each of these concepts and how they affect your images. Understanding all of this may seem overwhelming at first, but in this photography class Karl explains each concept clearly.
Here he provides detailed explanations of different file types, resolution, bit depth, color profiles and color modes, outlining all you need to know about digital images.
In this photography class we cover the following:
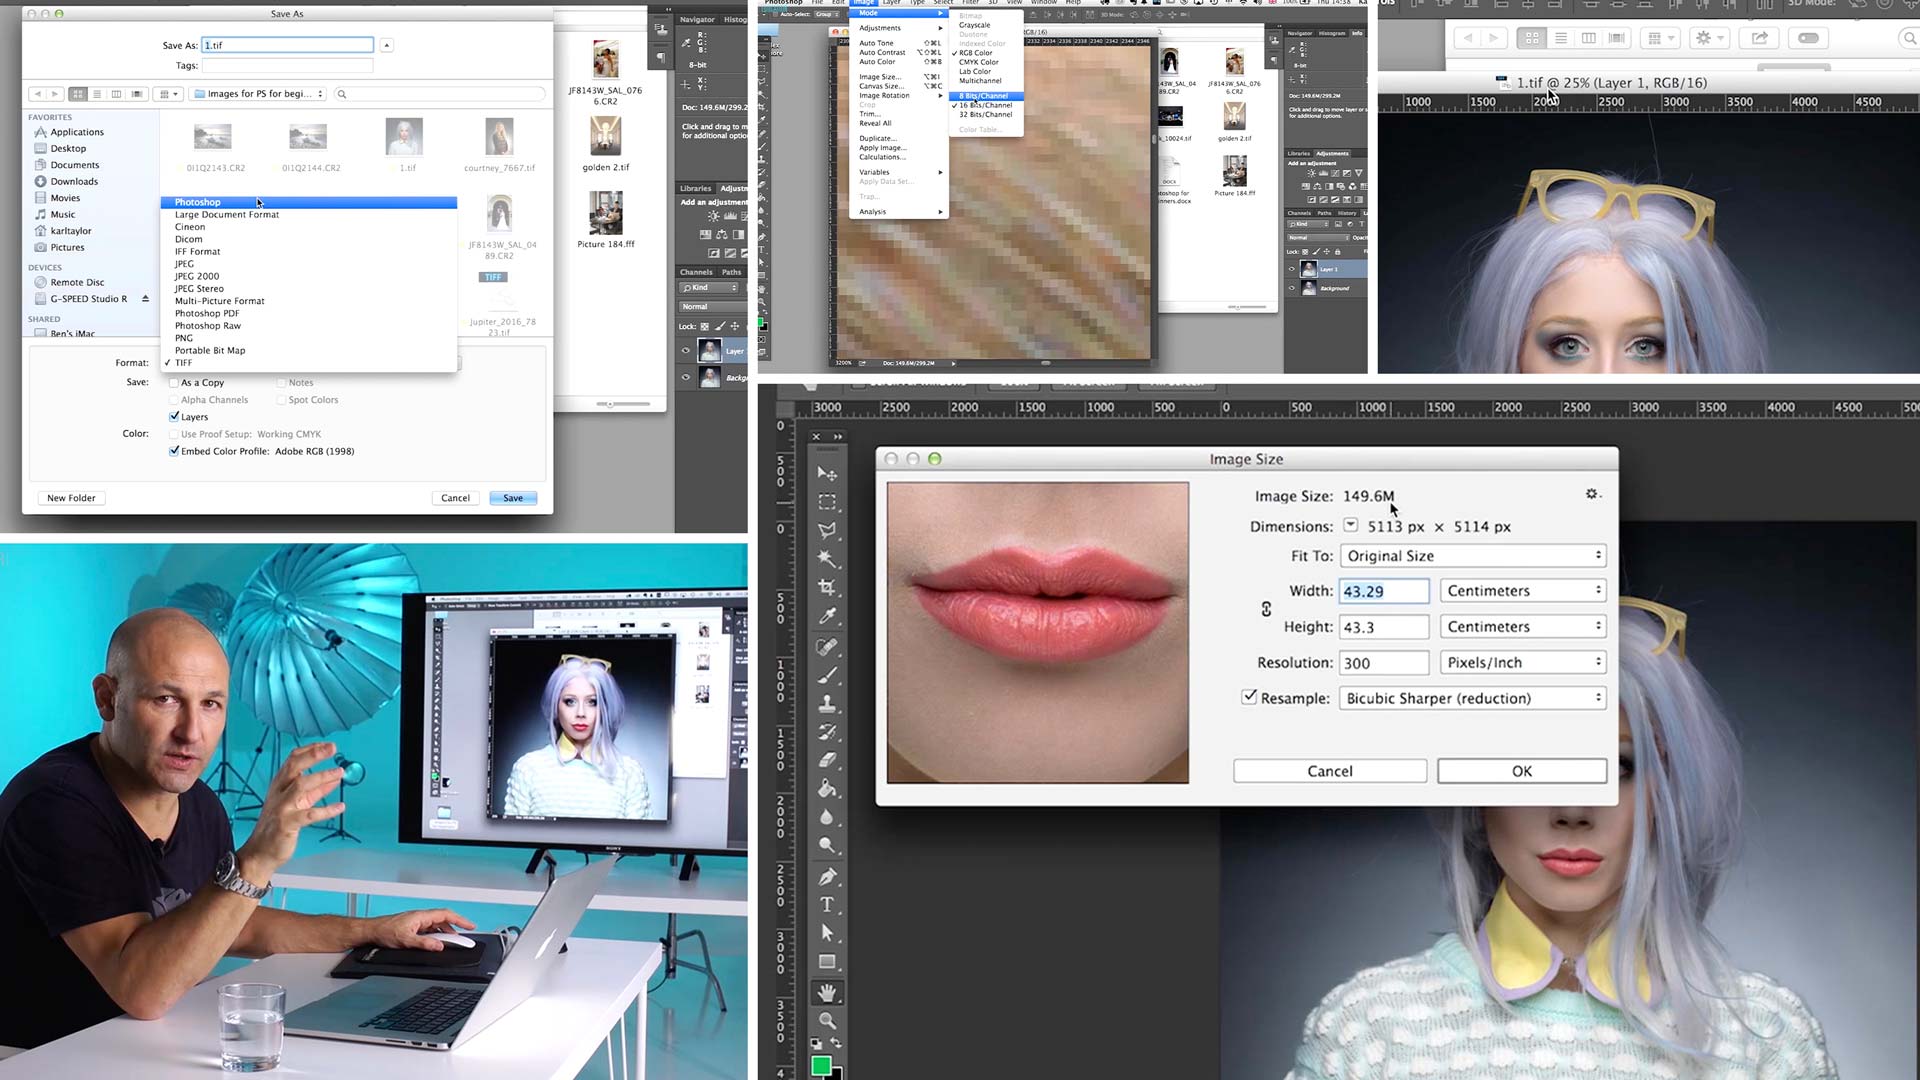
- Image file formats: Types of digital files
JPEG | TIFF | RAW | PSD | PSB
- Pixels & resolution
- Bit depth
- Colour space & colour profiles
- The difference between RGB and CMYK
- Recommended colour modes for printed images
- Resizing images
If you have any questions about this course please post in the comments section below ?
Comments
Hi Karl, I am enjoying very much all your tutorials! I decided to shoot in sRGB as I like to print my work ( canon pixma pro 100)I use colour correction in camera via colour rite pass port and calibrate my laptop ( MacBook Pro ) and desk top ( iMac mini plus “generic TV monitor “) using “ colormonkie” , I usually create my own icc profiles for the papers I use but find the downloadable icc profiles more than acceptable. The reason I shoot in sRGB is that in every monitor that I have used and tested all achieve 97% sRGB gamut and less than 80 % AdobeRGB . My rational is I want to see the colours in my prints as I see on screen. Is my logic sound?
Hi Charlie, based on your setup and what you are doing with your images your logic is sound.
Hi Karl,
Thank you for this information. I feel I understand digital files a lot better now. However, I wonder, if larger bit depths are yield a greater range of colors, why should one choose to edit in 16-bit instead of 32-bit? Thanks.
Hi Ariel, because if you choose 32bit you will have to borrow a computer from NASA to process the images. That and it is currently beyond what’s necessary based on the display options our visual perception and computer power. There are some situations in 3D software where have 32bit available is useful to increase dynamic range when applying images maps and reflections to objects etc.
Karl, for years now I haven’t understood RGB. I was taught at school that the three primary colours are red, YELLOW and blue and those three colours cant be made by mixing any other colours. How can it be that the adobe colours are red, GREEN and blue? Green is made by mixing blue and yellow so how come the three colours don’t include yellow?
Hi, the key difference is you’ve not been taught the ‘additive colour model’ which relates to light and the frequencies of light, in fact this really should be the only colour model in my opinion. The other colour model exists because it regards mixing pigments like ink and paint and because of impurities in the pigments it works differently to mix colour. You’ll find this useful https://en.wikipedia.org/wiki/RGB_color_model
Hi again, Karl. Thanks for your prompt and informative reply; I now have a much better understanding what’s going on when I print my photos. My concern was the opposite of “wasting” ink by using “too much”. It had occurred to me that using a lower DPI might put insufficient ink on the page, which in turn might result in a poorer quality and less durable print. But thank you for your concern about my bank balance! LOL
Hi Karl,
This may be a stupid question, but does printing with a higher number of dots per inch put more ink on the page?
Hi Graham, 300dpi is the standard requirement for the digital image file settings. The reality is that the printer (inkjet) is laying down about 1200dpi any way, although the process of laying the dots is not quite the same as the pixels in the image and therefore resulting in a smoother tone. I don’t think you need to worry about the ink. Ink is expensive i admit so print small test strips first before you commit to your final image.
Thanks for the reply master….
Hi Karl, i have an image and i opened its image properties there it says
Horizontal resolution 300 dpi
Vertical resolution 300 dpi
I imported same image in Photoshop and exported (jpg) without any editing and now, in properties it shows
Horizontal resolution 96 dpi
Vertical resolution 96 dpi and sometime its 72 ppi.
In photoshop i checked image size, there it is 300 dpi.
Can i take output image same as the original image resolution (300 ppi)
what is difference between dpi & ppi.
Thanks.
Hi Srinivasan, there is something wrong here? Anyway DPI is dots per inch and PPI is pixels per inch so they are basically the same thing. However your image has been changed from 300 dots to 96 dots but what you really need to check is what the total image size is: how many pixels wide by how many pixels tall that’s what’s important. The dots per inch can always be changed after.
Hi Karl, at last I understand pixels and resolution, the difference and most importantly, how to use them for different purposes. You explain them so well. Thanks a mil…!!!
Thank you May.
Hi Karl, to what color space would you suggest setting the camera to, sRGB or Adobe RGB? What is the difference?
Hi Giovanni, I’d go with Adobe RGB as it is a large color space and then continue to work on the image in Photoshop in Adobe RGB and then convert to SRGB if you are sending the image to the web or digital media/video etc. For print with good labs you can leave the image in Adobe RGB and let the labs RIP convert the image. If you are shooting for magazine then the final conversion will be to CMYK and this is better from Adobe RGB too.
in this video, you explained how CMYK is simply there so you can look at what the printed result will be. You mentioned that you shoot in RGB and edit in RGB and sent it to the print lab and the lab will convert the image from RGB to CMYK……my question is (please keep in mind yesterday was the 1st day I have ever even OPENED photoshop!)… Does converting from RGB to CMYK, have a significant visual difference? I guess I’m wondering if after I edit, and before I print, if I should convert to CMYK myself to see any differences? I hope that question made sense (it did in my head, but not sure how to convey what I’m thinking) 🙂 thanks!!!
Hi Ashley, yes converting from RGB to CMYK in photoshop will result in noticeable differences but these are usually only perceptual in relation to lithographic printing on printing presses and the simulations in photoshop are designed for that purpose to simulate for designers what will happen in say a brochure. However in photographic lab inkjet or RA4 process printing things are somewhat different as the type of inks used are much more vibrant and often instead of a 4 ink process they use a 6 and sometimes 9 ink process, resulting in images far more vivid than those of a litho process. It is also worth mentioning that the choice of paper from a photolab has a large influence on the final appearance, contrast and vibrance. My suggestion is not to convert to CMYK, use a calibrated high quality monitor and find a professional lab that you can trust and run tests on various stocks of paper to establish what suits best the type of work you hope to produce. All the best Karl.
Thank you very much! I always appreciate your in -depth answers!
Hi Ashley you might also enjoy our next live show on Wednesday with master printer John Fitzgerald.
Hi, Karl,
What are your thoughts of using AI/neural network upscaling where there’s not enough image data to hit the resolution mark or for extra sharpness? These sorts of upscalers don’t just use bicubic upsampling or sharpening like Photoshop would, but actually analyze the image data and retain sharp details and lines upon upscale – basically a much better job than Photoshop could do. I always turn to them for lower-res assets at work.
I was wondering if you ever used anything like this and what your thoughts are, if any.
Hi Rimantas, I’d only read an article about this I think on the BBC technology page a few weeks ago and whilst the results were impressive they were still plenty of artefacts and problems with the upscaled images. Also the examples shown were of images taken from very very low resolution so it would be interesting to see what it could do with say a regular 12 or 18mp image. I’ll be honest with you though it doesn’t appear that this solution will oust the capabilities of say a 100mp Hasselblad as the data is not there then it’s just a computer/AI making a guess, which is never as good as having all the facts in the first place.
Thanks for the reply, Karl. I was wondering that because not all of us have access to 100+ Mpix Hassies and maybe a 30Mpix image could be upscaled to push it juuust a hair towards an acceprable print in certain scenarios.
While there definitely are artifacts typical with upscaling, I’ve at least come to rely on such upscalers to keep the lines sharp, something PS does not yet do well, even with the latest upscaler of theirs. Though I’m sure you won’t need anything like that with your files! 🙂
Hi Karl,
This bits of information has really helped me to have an extensive knowledge on my images.
One of the challenges I had with my images was that,prior to this tutorial, I discovered that I usually have a lots of changes in colour spacing which usually affect my images ezpecially when clients view my images through their phones.
After I followed this wonderful tutorial, I discovered I have not been applying any of the information I got from this tutorial.
Many Thanks
Oluwatobiloba Amusan
Nigeria
Hi Karl I have most of your DVD’s too you have made an photographer out of me tho the years. Justr an Question as I have moved to light room as photoshop bridge is not to good. well that what I think lol. I use lightroom but do I loss info from moreing from lightroom to photoshop then move back to light room. or is there and eazy way.
2ed Question is is there a way to do 3D gray scale relief for carving with photoshop its for a friend to see if we can and how we find more info on.
Hi Karl
Just to say I think these tutorials are brilliant. I have been on various workshops over the years and have mostly switched off after a few minutes of techi stuff! But for me this is at the right pace and it’s sinking in! Well don’t test me on it!
So well done.
I have most of your dvd’s which I purchased several years ago and they were brilliant, but now having access to them on your tutorial site is so valuable to
Thank you Sharon, the team and I are very glad you are enjoying KTE. We have lots more to come! 🙂
I totally agree with you Sharon. Thanks Karl!
Thanks Cherry.
Like to know how we can convert on 16 bit files if we have 8-bit raw files using Photoshop/Lightroom. Is there such option available in PS/LR and whats the drawback if we do so? Will there be any degradation of quality when we convert 8-bit file to 16-bit file in Photoshop/LR while we edit? If we are doing composite using the mix of 8 bit and 16-bit files, will there be a seamless merging of end result or we see some differential artifacts in the end result.
Hi Melvin, my first question is why aren’t you able to generate 16bit files out of the raw software in the first place? My normal process is to grade the RAW file in Phocus or LR and then export the RAW file as a 16bit tiff and then I start any necessary photoshop work. If you only have 8bit images then you will still be better to convert them to 16bit before you start photoshop work.
Hi Karl, I get the same, I shoot with a Canon 70D and my raw file is only 8 bit, is that something to do with the camera that we are shooting with? is there a setting that we can change on the camera? How important is to get to 16 bit instead of 8, is the quality of the image really compromised?. Thanks
Very happy I joined the course btw, it’s great!
Hi Leonor, you would have to check in your camera menu settings, it might be able to achieve 12bit but that would be in the settings. If it only shoots in 8bit convert the image to 16bit when you export the digital file and before you do any post production/retouching work, it will help you with hight quality during the post production stage.