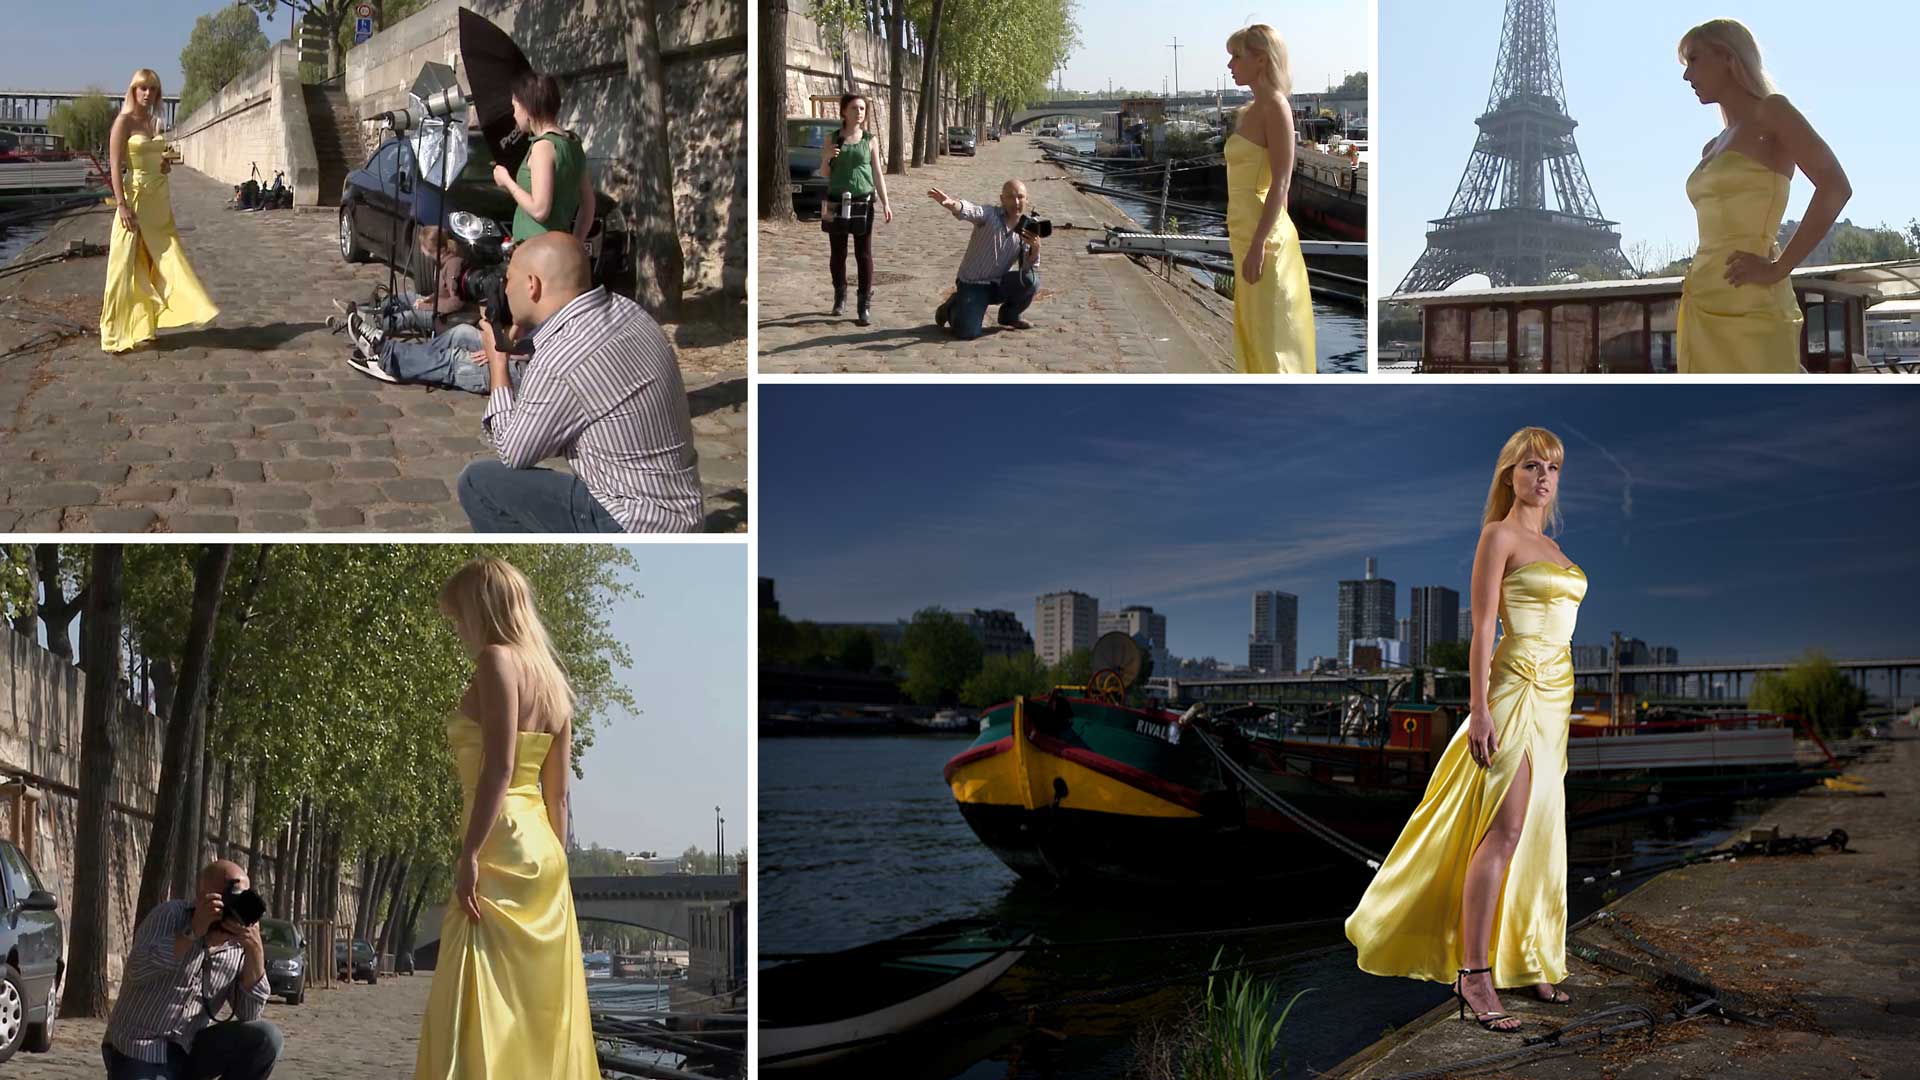

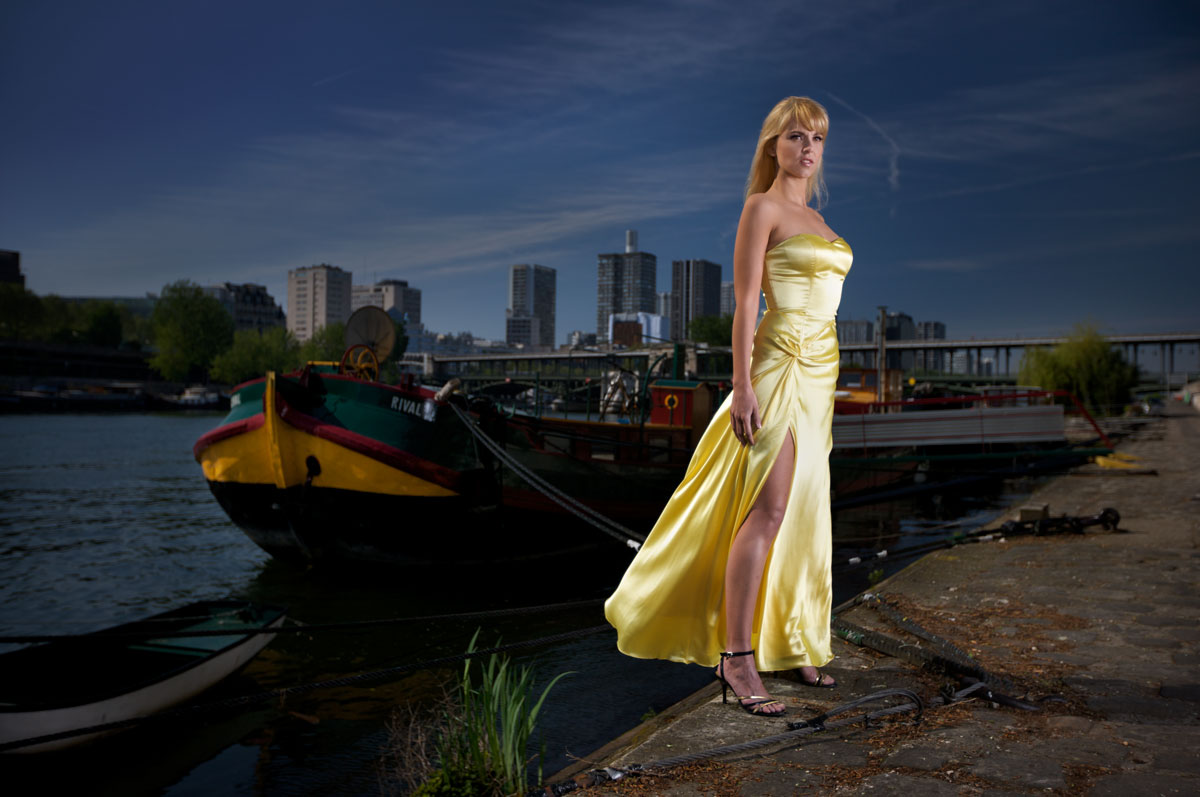
Flash on location
Have you ever been unsure of how to use studio flash on location? In this photography class, Karl explains the shot he’s looking for and how he plans to achieve it.
Using carefully identified key elements in his backdrop, Karl uses filters to deliberately underexpose his background. He then uses portable studio flash to correctly expose his model, creating some very interesting and dramatic effects.
In this class, you’ll learn how to identify strong compositional elements to incorporate in a shot, how to use filters for creative effect and how to balance daylight and artificial light.
In this class:
- How to use flash photography on location
- When and how to underexpose an image
- How to balance natural and artificial light
- Camera settings for shooting outdoors with flash
- Using filters for photography
To learn more about using flash photography on location, visit our Location Lighting Setups in the Portrait section.
Questions? Please post them in the comments section below.
Comments
Hi Karl,
Can a nikon SB 700 flash work for this type of shoot?
Yes if it has enough power
very nice, is there anyway we can share some of our work so you can give us some input?
Hi Yes, please use our members facebook group.
Karl, that was a brilliant shot and it certainly gave me a way out for the combination of ND2 Filter and Polarising filter. I am certainly going to try this again again and send you the results.
Brilliant tutorial, thank you
How did Karl determine the exposure values for this shoot?
Karl, looking at the specification of the shot I see:
f2.8
1/160th shutter speed
ISO 100
flash + ND & Polarizing filter
Since there are so many different ND filters out there, do you remember which density you used? I have a variable density one I use, and I have a couple of fixed density ones that I have (2x, 4x, 8x)
I like to learn by breaking down the mechanics of a shoot based on what I see in the video, and the specifications to learn what options can be done. Thanks in advance, and I love the courses. Even though I have been doing photography for a while, I find learning from different people give me a broader understanding and sometimes new ideas.
Hi William, I mostly use the Lee 0.9 ND which is 3 stops. I believe the variable ND filters use two polarizing filters combined which I think would mean the neutral density won’t be exactly even across the field of view.
Thank you very much! I really do love the end result of this shot. Very beautiful!
Hi Karl,
How are you determining the flash power
what is the white balance you prefer
what is your take on HSS vs ND filters ?
1. Look at the result on screen and histogram
2. Daylight or Flash
3. Prefer ND filters
To clarify, you used a polarizing filter to cut down on the glare in the sky and water, not a ND filter and this allowed you to use a shutter speed of 160 so no high speed sync reqd. Do you happen to speak on the use of a ND filter vs Polarizing filter and benefits of each for outdoor shooting? Fab tutorials…learning so much cheers Tim
Hi Tim, The polarizing filter will enhanced the sky by saturating the blue and enhancing the clouds and cut down the reflections on the water, it will also saturate the colours in the image. You will see the effect of this when looking through camera and rotating the filter. The polarizing filter will also cut down 2 stops of light enabling you to use a slower shutter speed in daylight to sync with the flash. If you needed to stop the light down further to use a slower sync speed or because the sun was brighter you could also use an ND filter as well as the polarizing filter. Your can find out more about polarizing filters here and what they do in comparison an ND filter will only stopdown the light reaching the sensor.
Thank you so much…do you mind if I ask which ND and polarizing filter brand you might recommend for the budget minded? Thank you so much for your quick response 🙂
Hello Karl. How do you know the right exposure settings to apply?
Hi Oussama, you first have to fully understand how to use a camera in complete manual mode, which is what I teach in the Introduction Course. It is worth completing the Introduction course even if you are not new to photography because I teach things a different way which will change your understanding. Once you know how to master a camera in Manual mode then you will be able to answer your own question 🙂
Dear Karl,
I am still little bit confuse how to measure light while using CPL filter. I mean do we need to measure light then set the proper shutter speed and aperature and use cpl filter the use flash light.
for example
Lets assume without cpl filter light meter is 250/f 8 and with cpl filter and do we need to down 2 stops shutter speed without using light but if we want to use speed light then what will be our shutter speed and aperature value.
Best Regards
Rukesh Shrestha
Nepal
Hi Rukesh, the PL filter will lose you about 1.5 stops of light off of both the flash and the ambient light because the filter is on the front of the lens. So I’d put the filter on first and run your tests.
Perfect job Karl
Excellent tutorial… Polarizer makes sense, have to try it…
Where I post my picture or to know about my photography shot discuss with you any email id for discussing?
Hi Jaspreet, you can post your pictures in our ‘forum’ section. https://visualeducation.com/photography-forums/
Thank you Karl, will definitely purchase a filter. Also, I have limited budget and I need to get a portrait lens for my Canon 6D; I would like to have good blurred out background. Which lens would you suggest as I can only buy one at this time? I rent 24-70 mm f/2.8 for my engagements shoot, which works okay but doesn’t give me that much bokeh.
I use 50mm or 85mm prime lenses for a lot of portraiture. Great bokeh if you use them relatively wide open and get in close.
Karl, excellent shot! if I don’t have the filters; could I cut down the ambient light by increasing the shutter speed without high speed sync?
Hi Karar, if your camera/flash system can use High Speed Sync then yes but there can be limitations, the alternative is to use an ND filter and then increase the flash power.
Beautiful work Karl!