

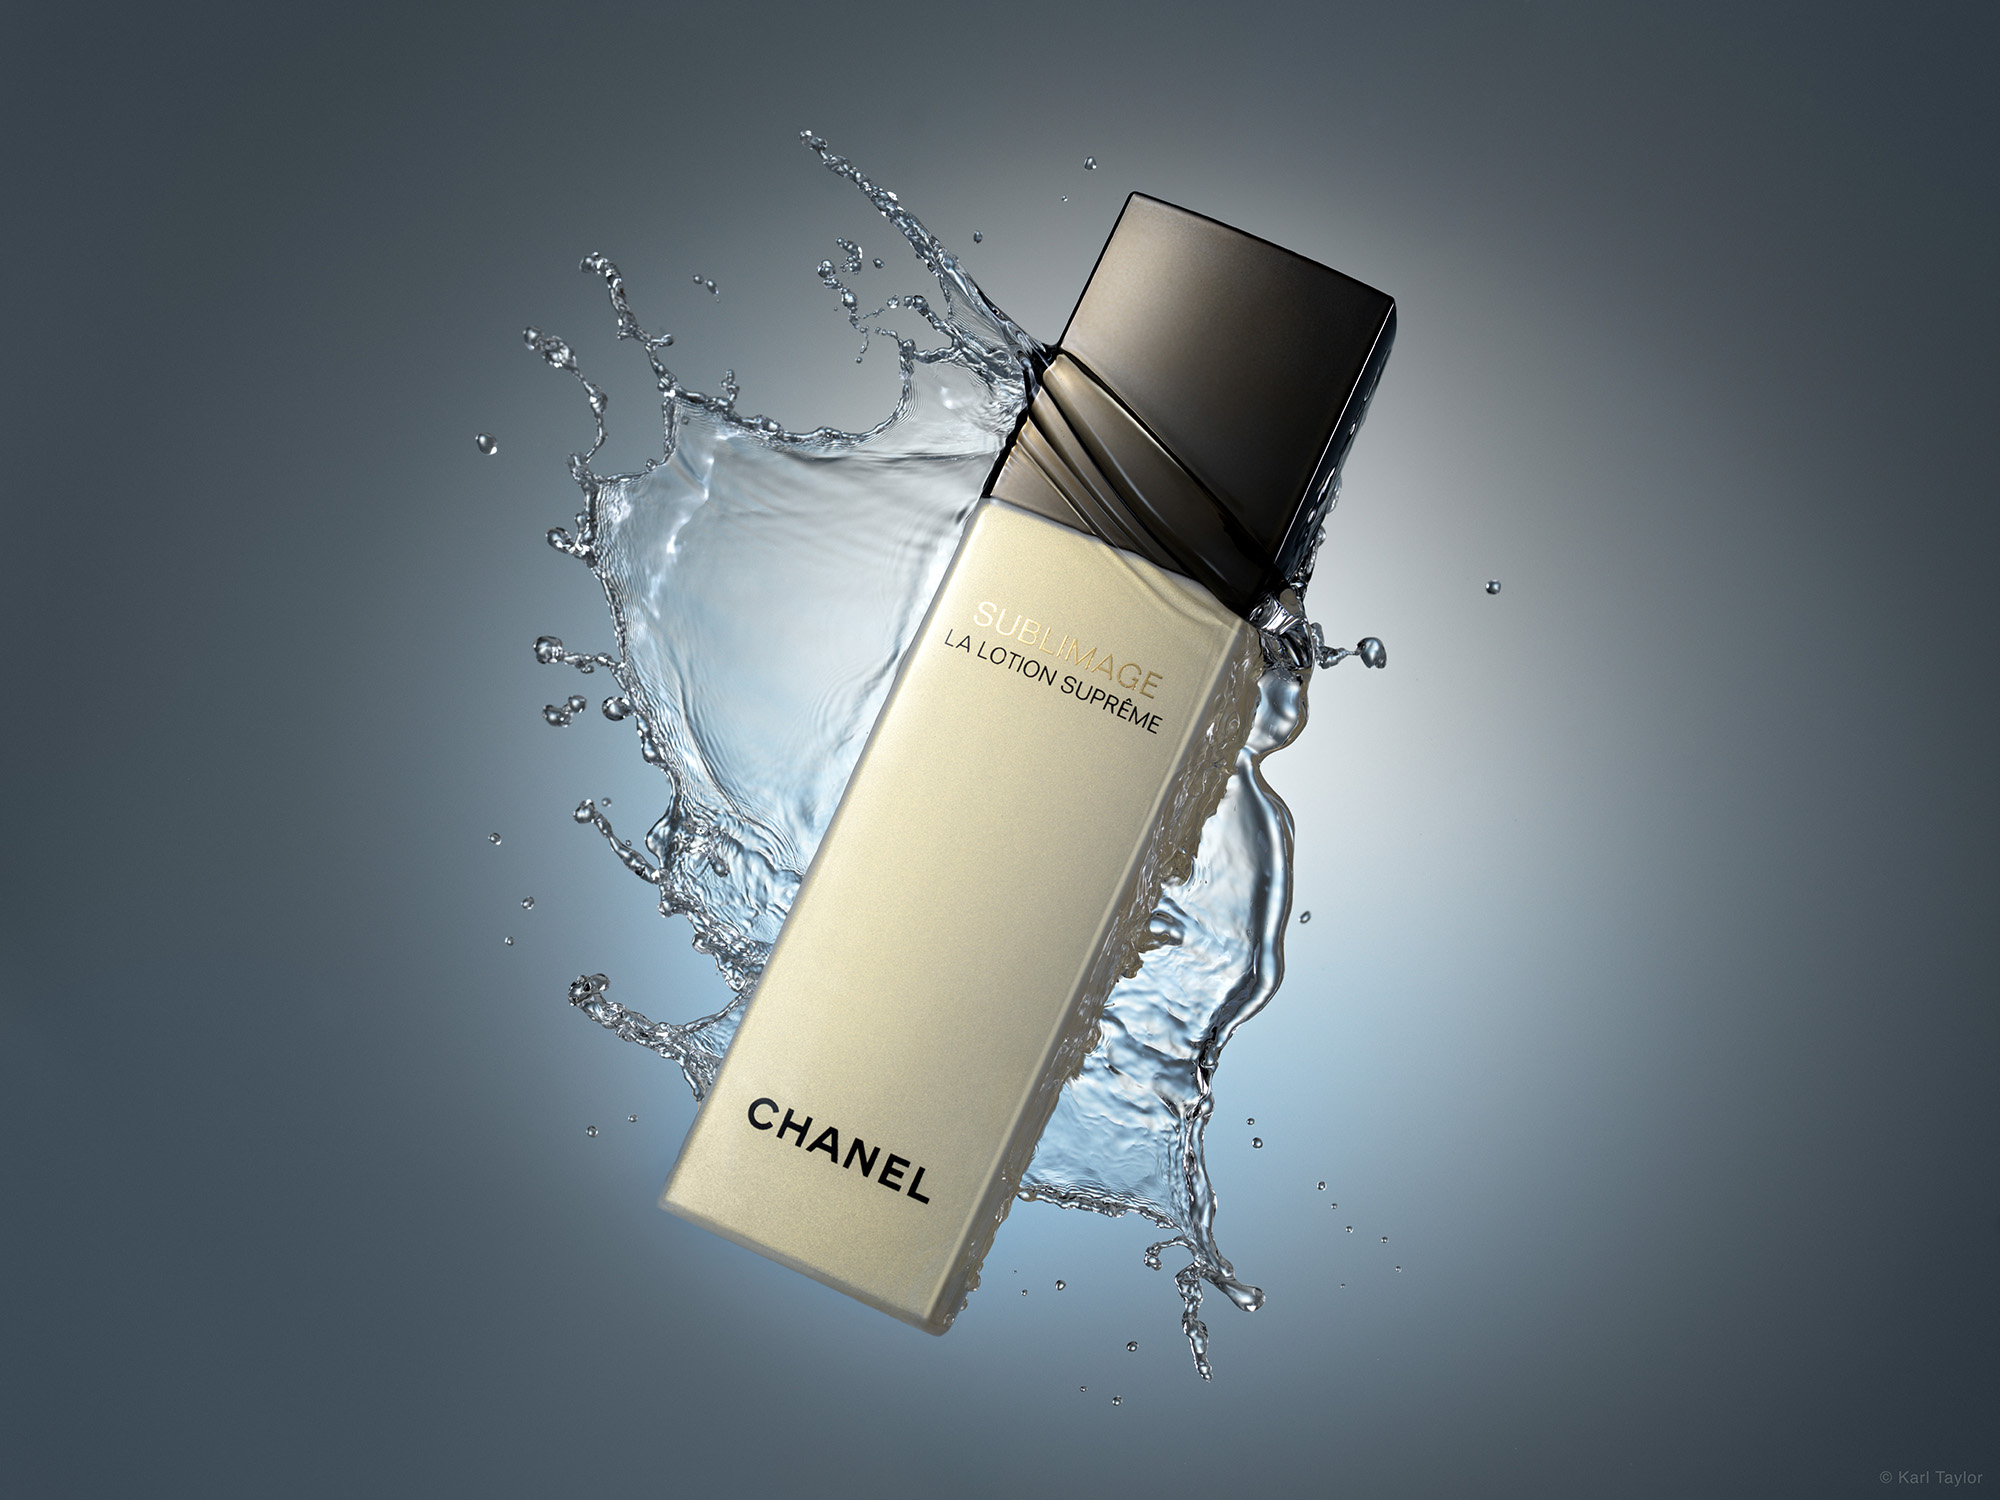
Floating Cosmetics Splash Shot
Combining carefully controlled lighting and meticulous attention to detail, Karl creates a high-end ad-style splash shot of a bottle of Chanel moisturising cream.
Starting at the beginning and guiding you through the whole process, Karl explains his planning and pre-visualisation before going on to build up his studio set and lighting.
This product photography class covers the necessary tools and techniques you need to capture a pro-level liquid splash shot like this.
In this class:
- Product photography: How to photograph cosmetics
- Product photography tips
- How to photograph splashing liquids
- How to create composite images
- The best lenses for product photography
- Useful tools and equipment for studio photography
To watch Karl edit and retouch this image, check out Floating Cosmetics Splash Shot | Post-Production.
Comments
Hy Karl,
Thanks for that great tutorial.
I was just wondering, if it would still work if you used a smaller scrim, but closer to the product?
Would it make any difference?
Thanks a lot in advance for your help.
With kind regards from Austria,
Philipp
hello sir
what if i stick this product on acrylic instead of plastic rod ?
Hi, then you may have big reflections from your light source.
Hello,
How do you recommend getting the liquid in focus when shooting larger objects. Would aperture be the only option? Obviously focus stacking wouldn’t work. Thanks!
Hi, shooting with greater depth of field is one option, the other is to shoot the liquid splashes as separate entities and comp them together for the final shot.
This is my third time watching this video. A lot that i can keep learn from this one but quite interested with what Sir Karl said “playing around with light ratio” something i never thought before.
Thanks
Hello Karl, 3mm or 5mm thick of the acrylic make any difference on the result or gradient ?
Regards, stay safe.
Hi Daniel, not that I’ve noticed, I have both, I use the thicker one if I don’t want it to bend.
Hi Karl what kind of stuff you use to making diffuse light
Hi Anish it is lighting diffusion material we mention the brand in many of our other tutorials which I recommend you watch as there are 2 main types that I use for slightly different purposes and there is another way of diffusing using acrylic that you will see in many of our tutorials too.
Hi Karl,
I would like to know, was there any specific reason to use two lights with bare bulbs for cap and bottle areas ?…. Instead can a large soft-box be used.
or was it because cap material was glossy glass/ceramic and cap was chrome so we used bare bulbs.
Thanks you.
Hi, the two materials had different levels of reflectivity so it is easier to control each exposure with two different light rather than one large softbox.
Got it, thanks Karl.
Hi Karl,
in case i would to treat label in a uniform way, how do i achieve that? i try to explain what i meaning: glossy label “sublimage” is affected by gradient due position of light, therefore the first letter are brightest than the remaining ones. In case i would get a uniform color of label like the black one on below how i can do that?
thanks indeed
Hi, the physics wouldn’t allow it. The reason the Chanel logo is uniform is because it is non-reflective and black. The ‘sublimage’ writing is gold and reflective so if we have the gradient of light on the bottle where it is then it has to be on the ‘sublimage’ logo too. So our options would be to retouch the ‘sublimage’ logo in Photoshop or move the gradient of light to a slightly different position on the bottle.
hello Karl, how much is frosted acrylic and how thick is it?
Hi Lucas it comes in 3mm or 5mm thick, I usually use the 5mm. For pricing check with your local sign service company or plastic supplier.
Hi Karl!
Great shot! Are all three flashes on top working with a short pulse? Is it possible to create a similar image with only one high-speed flash?
Hi Alex, yes all the studio lights are using fast flash duration. See the ‘Portrait’ section and watch the lighting theory chapters on understanding flash durations and power etc. In answer to your second question then the answer would have to be no as I wouldn’t have had a background light and I wouldn’t have been able to get the gradients of light where I needed them. However we have plenty of tutorials on shots you can do with one light.
Hi Karl
Thank you for your response.
I take the picture with the H6D100c can you tell me what shutter speed should be set for the splash, since I can sync the flash up to 1/2000th of a second? and at what ISO set the camera?
Thanks again in advance and you are the best.
Best regards
Aquilino
Hi Aquilino, the shutter speed only needs to be fast enough to cut out any daylight, ambient light or your modelling lights. I’d go up to 1/350th or 1/500th and take a test shot with the flash trigger off and see if you record any ambient light, if not then you know that shutter speed is sufficient for your set up. I shoot at ISO100 but you could easily increase to ISO400 if you need to with minimal effect on the image.
Hi Karl.
Great explanation and beautiful photo.
I have a question for the splash: I have as flash a Senso A4 generator with 2 light points plus a picolite that I can mount on the Senso generator, plus I have a Move 1200 generator with only one light.
My question is: do I use the Senso lights to illuminate the product while the Move uses it as the light behind the scrim to stop the splash? Right????????
Thanks in advance
Aquilino
Hi Aquilino, that would seem the most logical given that the water illumination is from the backlighting but I would still get the Senso to it’s fastest duration to be on the safe side. You have to test backlight with and without front lighting to see if the front lighting is causing any blur.
Not to disparage Mr Hadad’s shot, but yours is lit better. Jus sayin.
Thank you Brett.
Hi Karl. As usual a great tutorial.
Just following up on Jared Wolfe’s question, if you were having a problem with too much water splashing onto the camera or lens, would a longer focal length as he suggests (120/150) be a possible solution where you could then move further away from the splash zone?
Hi Peter thanks for your comments. A longer focal length lens would obviously put you further away from the product, the problem with this is that the product doesn’t feel as intimate and can feel to remote, I would rather just put a protective filter on the lens, or just give it a wipe.
hey Karl,
what brand are the c-stands?
greetings