

Flying Tea Food Shoot
Elevate your food photography with this deliciously creative class.
In this food photography class, you’ll learn how to create an eye-catching flying tea image. All it takes is a dash of knowledge, a pinch of ingenuity, and a healthy serving of creativity – plus two experienced professional instructors in the form of Karl Taylor and Anna Pustynnikova!
As Karl and Anna guide you through each stage of the planning, preparation and lighting, you’ll learn how to create your own version of this explosive and exciting photograph. You’ll learn about problem solving and creative thinking, how to control lighting and why fast flash duration is crucial when photographing flying objects.
In this class:
- How to photograph flying food shots
- How to use pre-visualisation as part of your planning
- Lighting setups for food photography
- How to suspend items for photography
- How to freeze motion using flash
To watch the retouching and editing process that followed the shoot, check out Flying Tea Post-Production.
Questions? Please post them in the comments section below.
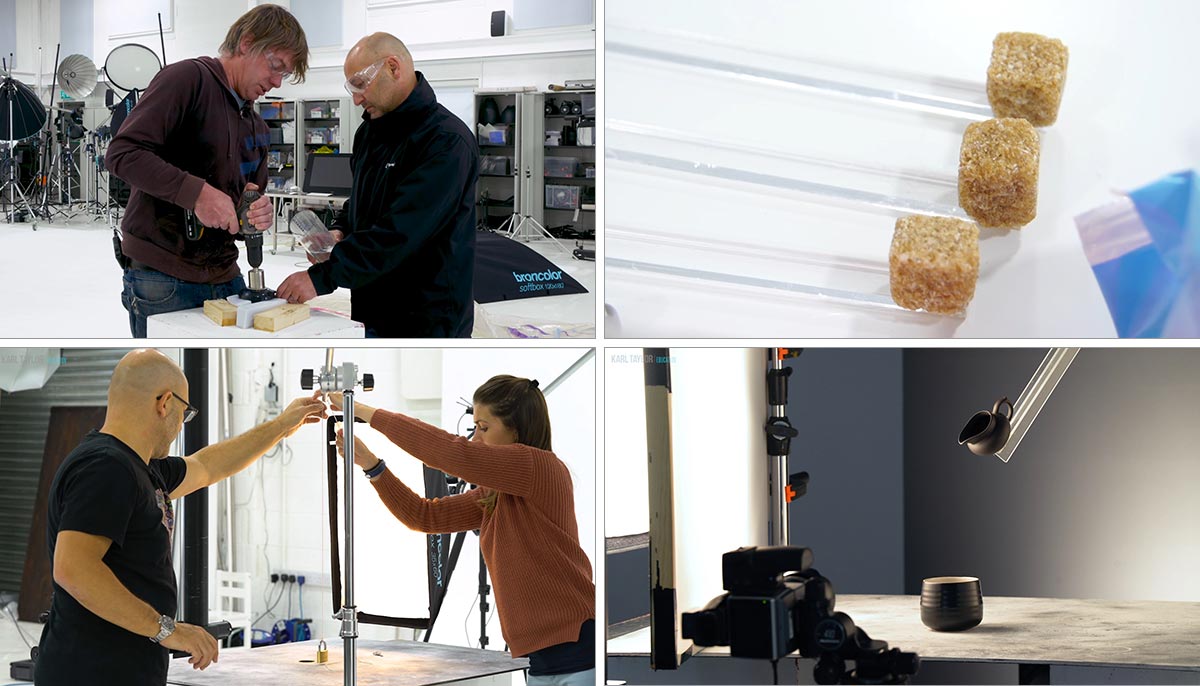
Photography often requires creativity and problem solving to realise your creative ideas.
Anna and Karl wanted to create an image of a cup with rose bud tea and sugar cubes exploding out of it and a floating milk jug above, pouring milk. Guided by Karl’s pre-visualisation, the pair were able to identify a number of challenges that they’d have to overcome to get the final result. These included:
- Create a realistic explosion of rose bud tea
- Include sugar cubes to add depth to explosion
- Create floating milk jug with pouring milk
- A lighting setup suitable for the cup, milk jug and exploding objects
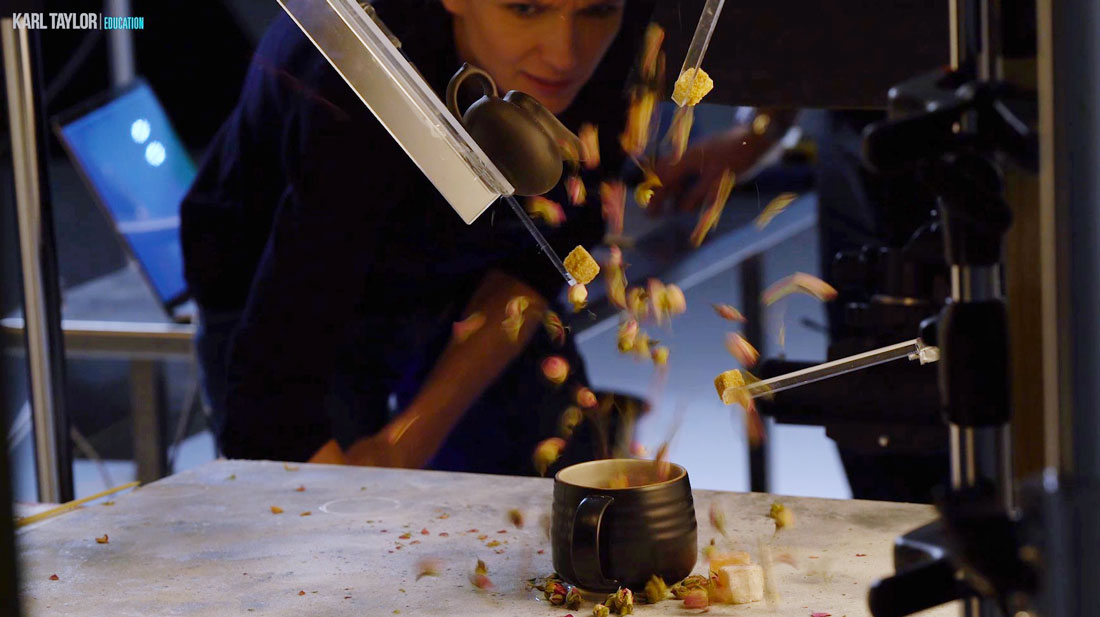
Freezing the fast moving rosebud tea was just one of the challenges Karl and Anna had to overcome.
Together, through a combination of DIY, acrylic rods and fast flash duration, they overcame each of these problems. The setup, although it looks complicated, required only four lights with simple modifiers.
In the end, this shoot proved that it is possible to bring any creative idea to life — all you need is careful planning and the right knowledge.

The final flying tea image.
Comments
Great stuff ! Very complex shoot. Congrats with your team and keep up the good work !
Thanks Jared
karl, can you please provide links to alternatives for the air pump method ?
Hi Yechiel, I would suggest a small 2 or 3 litre scuba tank known also as a pony bottle and then a wip line that fits on to the tank. Other options would be an air compressor or simply a can of air that is used for cleaning cameras.
Thank you karl
Hey Karl what type of bid for cutting the glass ?
and also can you elaborate a bit more on the cutting process, whats the water doing
?
Hi Yechiel, I think we explained in the video that the water was simply cooling the drill piece and material. The same diamond edged drill cutter would be needed for glass but i’d suggest taking glass objects to glass cutters and letting them do it for safety reasons. I get my bottles etc cut at glass cutters, they have all the right tools.
Thank you karl
Fantastic tutorial Karl! I really enjoyed it. Thank you.
Thanks Oksana, it was a lot of fun!
Woaw! I love so much the process of preparation! it’s a beautiful team work
Thanks Sidar.
Karl
I only have two Godox light SK300ii, I need a third one for the globe of light in the background and create this beautiful gradient.
what kind of light or what minimum power requirement should I need to do recreate this gradient of light for backgrounds in general ?
Thanks in advance for your help.
Maria Angelica
Hi Maria, I wouldn’t buy anything less than 300J and you’ll need an approximate 70 degree reflector (usually the standard one)
Very interesting, specially the preparation before the shoot the concept or idea behind the shoot, I love the action (milk pouring , roses flying, sugar cubes..etc) in the photo as well as the delicate touch of the roses and the turkish delight suits next to the cup.
I was wondering why you chose to blow the roses from the cup instead of throwing them from the top.
thanks
Congrats Anna & Karl.
Hi Maria, the natural shape created by them coming out of the cup is much better than them falling. Also shooting them falling would have needed lots of shots to choose and comp from.
Brilliant work Karl.Great tutorial.
Thank you, definitely a team effort to get the result.
As others noted, I really appreciated seeing this from conception to execution. And I’m eager to see the post-processing as well. Thanks for always being instructive and inspirational, Karl.
I’m morphing from an enthusiast to paid photographer (not nearly a professional yet), with just a couple finished projects so far. I’m grateful to have come across your work, and especially your educational material. I’m keen to try my hand and some more involved projects like this.
Thanks Kevin.
For the steam, why not use a cotton ball glued to a bamboo skewer and heated in a microwave?
Good idea but we don’t have a microwave in the studio!
Just when you think you have everything you could possibly need, I have to go shopping for a scuba rig!
Awesome work!
Hi John, if you are interested in that then just so you know your best option would be a smaller more manageable 3L bottle (often used as a back up bottle in diving) and then a connector called a whip. Cheers Karl.
Thanks Karl… I will research that!
hello, i haven’t seen the video yet, but i wanted to know , how you guys created that illustration of this shot? was that made before the shot or after it, cause it also has lighting effect in it , Thank you so much in advance…. love what you do
Hi, this is something called Pre-visualisation and it’s covered in a lot of our courses. The process of creating the shot is all about solving problems first and figuring out how you are going to make that shot a reality, this is best done by sketching things out to work out your lighting and composition and the position of your objects. And yes the drawing was produced first.
Thanks Karl for this video, it’s so magical.
Great video !
Quick question : Which glue and glue gun are you using ? Mine doesn’t hold anything !!
Thank you
Gaelle
Hi Gaelle, a Stanley one but to be honest I’ve never looked for a special one? I’ve only ever grabbed what’s on the shelf at the DIY store.
Thank you for your answer Karl 🙂
Good stuff, as always