


Landscape Photography using a Standard 50mm Lens
After trekking for three miles along cliff paths and in the rain, let’s see what landscape photography I come up with when I forget to bring the landscape photography lens I wanted to use and revert to using the standard 50mm lens on another camera!
When setting out to photograph landscapes, there are a few camera essentials that you should always carry with you in your bag. In addition to a sturdy tripod, filters, cable release and cleaning cloths, it’s important not to forget a good variety of lenses. But, believe it or not, that’s exactly what happened when I set out on this occasion!
After hiking three miles along uneven cliff paths, in less than ideal weather, I finally reached my desired location, only to find that I had failed to pack the lens I had planned to use.
Equipment to have in your camera bag
Some of the equipment you should have in your bag when you set out to photograph landscapes includes:
- Camera;
- Lenses (wide angle, super wide angle and telephoto are the most commonly used);
- A variety of camera filters (these should include neutral density filters, graduated filters and, if you need, polarazing filters);
- Cable release;
- Cleaning cloths and lens cleaning solution (this is useful to have should your lens get dirty);
- Tripod and suitable mounts; and
- Extra batteries and memory cards.
What could have been a disaster turned out to be a fantastic chance to learn and explore different techniques as I had to think on my feet and quickly find and compose an alternative shot before the rain rolled in.
This oversight meant, instead of using my normal camera, I had little choice but to switch and use a different camera, one which I’d only recently purchased, with a standard 50mm lens.
This may seem like an odd choice for landscape photography as wide angle and super wide angle lenses are the most commonly used for this, but don’t underestimate the humble 50mm lens.
While wide and super wide angle lenses allow you to capture the grand, breathtaking views we all set out to shoot, there are some great advantages to using a fixed lens such as the 50mm for landscape photography.
These include:
- It encourages us to move around to find a shot;
- In doing so, we can discover new compositions;
- We spend more time thinking about the shot;
- Tighter crops allow us to focus on the finer details often overlooked in landscape photography; and
- It isn’t too heavy to carry around with all your other gear.
While wide angle lenses are generally the favourite for landscape, that doesn’t necessarily mean they are the best. It simply comes down to preference and what you are shooting. Below I briefly outline some of the advantages and disadvantages of each type of lens.
Wide/Super Wide Angle Lens
Advantages
- Allows you to include a lot more of the scene in your shot
- Allows for large depth of field
- You can get right up close to your subjects
Disadvantages
- Can result in some distortion
- It’s easy to include too much in the frame, which can result in a busy, messy shot
Telephoto Lens
Advantages
- Allows you to get closer to subjects without having to move
- You can focus in on smaller details
- Allows you to emphasise size and scale
Disadvantages
- Can be heavy/bulky to take with
- Don’t always allow for large apertures
50mm Lens
Advantages
- Allow for tighter crops
- Encourages you to move around and find new compositions
- Not too bulky to carry with all your other gear
- Deliver exceptional quality
Disadvantages
- If working with prime lenses, you’ll need to take more than one to cover a variety of focal lengths
- You have to move around more to achieve the desired composition
You can see exactly what other equipment I take with me to photograph landscapes in this video, where I shoot cityscapes in Paris, or here, where I show you some smaller pieces of equipment that few people think about.
After I’d found my new shot, it became a race against time as I could see rain clouds quickly approaching. Although it seemed as though everything was working against me, in the end I was still able to get a shot that I was happy with.
The 50mm lens allowed me to shoot a tighter crop, capturing smaller details such as the textures in the rock, while the grey clouds made for an interesting moody sky.
Key skills to take from this photography tutorial
- Check your gear before you leave on any photography shoot
- Pick a composition that works with a tighter crop
- Sometimes you can get a fantastic shot even when the elements are working against you
Below are the landscape photographs I captured.
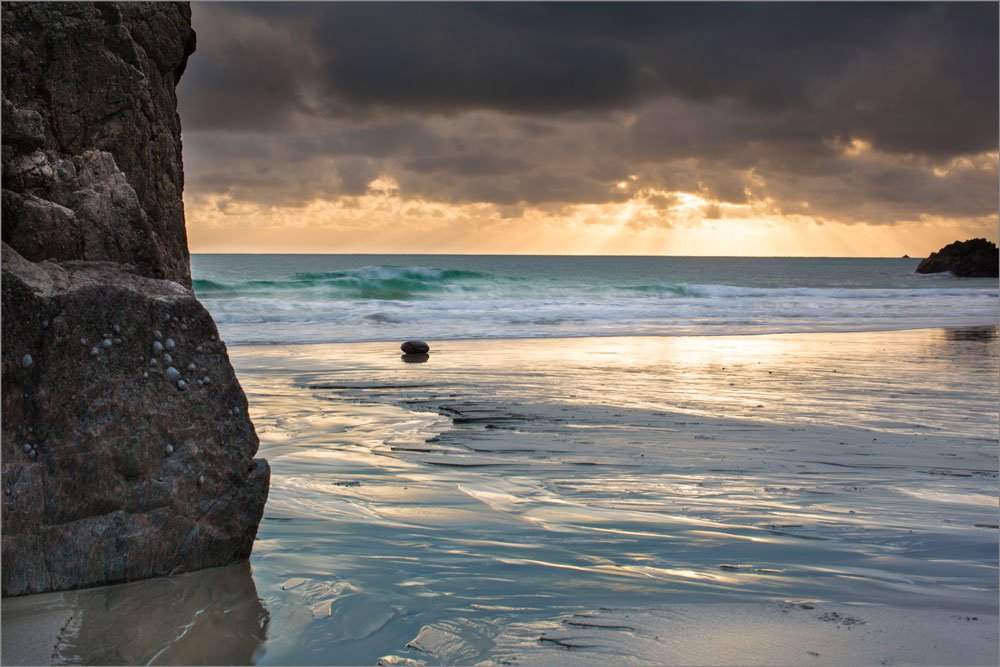

Both of these shots were taken using a 50mm lens, an unusual but great choice for landscape photography.
As with any other type of photography, no two landscape shoots are the same. If you’d like more tips on how to take eye-catching landscape images, make sure to keep reading! I discuss a few other handy tips and tricks below, all of which will help you improve your landscape photography.
How to take better landscape images
1. Planning
The first step to landscape photography (any type of photography really) is planning the shot you want to take. Unfortunately in this case, my planning had almost become null and void because I wasn’t able to work with the equipment I had planned for, but had I not done any planning it would have meant I would have spent even longer planning everything from scratch when I arrived.
After deciding where you’re going to photography, the next thing to think about is the time of day that that is best for landscape photography. Sunrise and sunset is usually the best time, during the ‘Magic Hour’. One important piece of advice that is important to remember is, if you’re photographing at sunset, don’t be in a hurry to pack up and go home. Often the best colours fill the sky about 20 to 30 minutes after sunset. It means you’ll have to have a little bit of patience, but it can be well worth the wait!
Weather is something else you can try and plan ahead for. It is definitely worth checking the latest weather updates to make sure there is no inclement weather forecast. While bad weather can make for some great, dramatic shots, you have to be sure your equipment can handle getting wet. If not, it may be best to reconsider things.
It may seem obvious, but it’s important to dress correctly too. If you know you’re going to be hiking along cliff paths, a good pair of walking shoes could be a good idea. If the sun is out, suncream is one thing you may regret not packing, so make sure to think about what conditions you’ll be out in.
While planning may seem like a lot of effort, I guarantee it’s something you won’t regret.
2. Composing your shot
Photographic composition is very important when it comes to photographing landscapes. Failing to correctly frame a landscape shot can easily make what could have been a beautiful scene seem flat and 2D.
Again, it may seem obvious, but don’t forget to consider the rule of thirds when framing. Keep in mind where you want your horizon line (do you want to focus on the land or the sky?), where your points of interest will fall and where you want the viewer to look. Having said that, you can achieve some great shots when you break the rules too, so use your judgement.
For one of the images in this tutorial I used two large rocks in my foreground to frame the swirling waves while making sure to include some rocks further in the distance, which helped to create a sense of depth in my shot. It is easy often to forget your foreground, but simply adding some rocks, a shrub or piece of wood can help add depth.
Keep your eyes open for lead in lines, unusual shapes, complimentary colours and interesting patterns too. These can all be used in different ways to create interest, add movement or accentuate distance.
3. Settings
What settings you use depends entirely on what you want to achieve. Shooting in manual mode will give you the greatest control over the results, but you’ll need to experiment with different shutter speeds and aperture combinations to see what works best.
Shutter speeds
I set out to capture the motion of the waves, which meant I needed a slow shutter speed. After some experimentation, I found that a slower shutter speed of about one-second allowed me to capture just the right amount of movement.
Slow shutter speeds are not the only option when photographing seascapes. Using a faster shutter speed will allow you to freeze the movement in the water, which can be great if you’re wanting to achieve something similar to the shot below.

This shot, which partially freezes the waves crashing on the rocks, was taken using a shutter speed of 1/20 at f13.
Slower shutter speeds can also work well if you’re trying to capture the movement of clouds flying across the sky, trees blowing in the wind of grass swaying in the breeze, whereas fast shutter speeds may work well if you’re wanting to capture the dramatic movement of crashing waves, horses running through a field or simply catch the early morning light.
In this video (where I get my feet wet) I shoot a number of shots to show a comparison of what can be achieved with different shutter speeds when photographing water.
Aperture
When it comes to aperture, we generally want to capture as much detail as possible in our landscape photographs and we can achieve this by making sure we have a large depth of field.
Smaller apertures (try starting from f8 or f11) are therefore ideal as they will allow for the greatest depth of field. This isn’t a hard and fast rule though. Make sure to play around to see what works best, perhaps a shallow depth of field works better — it’s all about getting creative and trying different things.
Remember there are other factors, besides aperture, that influence depth of field. Wide angle lenses allow for greater depth while telephoto lenses greatly reduce depth of field.
The distance between you and the subject also has an impact.

ISO
What ISO to use depends entirely on your other settings. You can use your ISO to lighten or darken your image, depending on what you need. When shooting long exposures, a lower ISO will reduce the amount of light captured by the camera, but if you’re shooting birds in flight at sunset, you may want a higher ISO as this will allow in more light and allow you to use a faster shutter speed to capture the movement.
The important thing to remember when selecting your ISO is noise. While a lot of noise might not be an issue if you’re capturing a busy scene like crashing waves, it will definitely become a problem if you’re looking to capture reflections in a lake.
Note: One question that often comes up is what to do if there’s too much light to use a slow shutter speed. If you’re already using the smallest aperture and a low ISO then the next step will be to use a filter. These cut out some of the light and if you’re using a graduated filter it means you’ll be able to achieve similar exposures in the sky and land/sea.
White balance
After setting your shutter speed, aperture and ISO, don’t forget to consider what white balance your camera is set to. While it may work having your camera set to auto, you may want to consider testing other options such as daylight, cloud or shade, depending on your environment.
4. Do something different
Often when we picture landscapes we image rolling fields, towering mountains or vast oceans bathed glorious light, but there’s much, much more we can do. If you’re looking to try something new, something slightly more challenging, you might want to try your hand at night photography.
As I explain in this Photography Under Moonlight tutorial, moonlight is essentially sunlight reflecting off the surface of the moon, so while it may seem daunting to photograph without sunlight, try think of the moon as a giant reflector.
For this shot, I was using long exposure techniques, with shutter speeds starting at around 30 seconds. For my first shot, I used an aperture of f8 and ISO of 100. The slow shutter speed captured the movement of the ocean as is swirled around the cliffs while my aperture and ISO worked together to ensure I had a well exposed image.
Up until this point, I haven’t spoken too much about my ISO settings, but in this tutorial I explain how you can use your ISO to determine your shutter speed and aperture. Sound a bit backwards? Let me explain. By figuring out the correct exposure at 6400 ISO, I was able to achieve a relatively short shutter speed time and determine all my other settings.
For example, if my exposure, at 6400 ISO, is correct at one-second at f2.8, then it will still be correct at two-seconds at f4, four-seconds at f5.6 and so on. As I touched on earlier, a high ISO can result in a lot of grain, so 6400 really isn’t ideal, but we can easily get around this now that we know what setting combinations work best.
If I were to drop my ISO from 6400 to 3200 (by one stop sensitivity) while shooting at f11 for 16-seconds, this would mean my ISO would half, as would my shutter speed. My new settings would therefore be 16-seconds exposure time at f11 and 3200 ISO. I could then reduce my ISO further, to 1600 and this would allow me to shoot for one minute at f11.
By knowing what settings you’ll need to get the correct exposure without having to take multiple test shots. That means you’ll be able to spend less time testing and more time photographing!
Summarising
All of this can be quite a lot to take in, especially if you’re completely new to landscape photography. While it may seem like a lot to remember, if we really strip it down landscape photography can be summarised into just three simple steps.
- Planning
- Getting out there
- Experiment
Planning is important, it will help you make the most of your time outdoors. Once you’re out, don’t be afraid to try new things. Just because you’ve seen hundreds of photos with blurred water does not mean your photographs have to be the same. The more you get out, the more you’ll develop your creative eye and you’ll soon see your own style develop.

I hope you found this helpful. Please share your experiences with our viewers in the comments below.
Achieve more of your photography goals with help from myself and thousands of like-minded photographers in our photography community.

© Visual Education. All rights reserved. No content on this page may be used or shared by third parties.


